• Welcome to the Checkmate Community Forums forums.

    You are currently viewing our boards as a guest which gives you limited access to view most discussions, articles and access to our other FREE features.
    By joining our free community you will be able to:

    » Interact with over 10,000 Checkmate Fanatics from around the world!
    » Post topics and messages
    » Post and view photos
    » Communicate privately with other members
    » Access our extensive gallery of old Checkmate brochures located in our Media Gallery
    » Browse the various pictures in our Checkmate photo gallery

    Registration is fast, simple and absolutely free so please, join our community today!

    If you have any problems with the registration process or your account login, please contact support by clicking here or by using the"contact us" link at the bottom of the page.

A Star(liner) is (re)Born

Status
Not open for further replies.

Mark

Well-known member
About a year ago I saw a 1986 Starliner on the forum for sale. It was in Florida and I was in Canada, but I decided it was a rare enough find and good enough deal to go for it. Like many of you, I love the Starflight hull, but as a family man prefer the bowriders. I knew it was a project boat but I was still in for a surprise when I met the seller in Nashville. He had started the resto and decided to bail out after he had stripped the hull down. After I hauled the boat 24 hours home and went through the boxes of parts, I discovered it had no deck hardware, no lights, no rubrail, no bowrails, no gauges, no steering wheel, no wiring, no cooler latches, a broken windshield and a bunch of other missing parts. The floor and stringers were completely rotten(which I did know) but there were 13 holes drilled into the balsa core(wet) and 2 of them went clear through the hull and were plugged (sort of) with 1/4" bolts. (Can you spell Caveat Emptor?) The good news was that the rest of the hull, other than being oxidized was in perfect shape. "Light silver black" metal flake is what the factory calls it. This was going to be a big project, not just the labor, but finding all the correct parts to put it back together. If Chris is able to post the pics I'll give you the play by play.
 
Love to see the pics of your project. Add one more Mate to the "saved from the bone yard" list! Good job Mark
thumb.gif
 
BTW guys, I've actually already competed the project, so you aren't going to have to wait a year to see the end result. I will try to post the whole process over the next week or so. It took 10 months from start to finish and was way more work than I ever imagined. When a hull is stripped down this bare, it is an incredibly time consuming effort to get it back together, especially when you are missing parts.
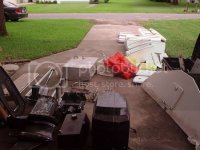
In the first picture you can see that the floor(lying in foreground) is almost completely rotten. If you can get it out intact, you can use it as a template. This makes building the new floor much simpler. When you cut out the old one you just need to find the seams and cut 1/4" thru fiberglass and the rest will just lift out. You need to be very careful not to cut into the core or worse yet right thru. I used a spin saw. The blades don't last long in fiberglass thou.
Once I got the floor out, the foam was completely saturated with water and the whole area was crawling with cockroaches and other insects. This boat sat out side uncovered for years. That's what wreaks them. Checkmate used to staple the floors in and the water eventually finds its way through the staple holes(and other perforations) where it is trapped under the floor forever. Then it justs rots from the inside out. Chances are the stringers are going to be shot too if it has been wet too long.
If you look in the background of the second picture you can see I got the foam out intact. After about 6 months it dried out, but I just couldn't bring myself to put it back into a brand new floor. I thought, if it ever gets water under there again, at least I'll be able to hear it sloshing around and could drill a hole and just drain it out. The way I rebuilt it thou, it will never get water in it again. I'll cover that in a future post.
 
It was basically a floating insect colony. They really were eating the rotting wood. there were places where the stringers were hollow. And what a stink! Fortunately cockroaches don't like Winnipeg winters. Actually there are lots of people who don't either. Wimps!
 
Geez,

I figured the termites might have removed all the old wood for ya for free.
icon_biggrin.gif
 
Here is all the parts spread all over the driveway. This is what you call a "boat in a box". The previous owner had taken every single thing apart. The motor was a 2.4 Bridgeport. There were studs that were broken off during disassembly and parts missing. Though I'm sure I could have been able to reassemble it, it had been in salt water and it was going to be a nightmare. I put it on S&F for sale and sold it, as is, in one day. I shipped it in a crate and the guy who bought it couldn't have been happier. Those guys love these silly motors. They seem way too high maintenance for my liking.
The seats however had been completely redone by the factory and never installed. And though they were dirty from sitting in the wet hull a couple of years they were in excellent condition.sstP8150011.jpg
 
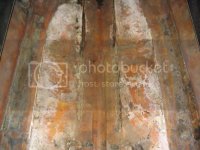
Sorry about the oversized picture above, I will do better here. If you look carefully at this pic you can see 1/4" holes in the hull where the Goof decided to drill deeper holes for the seat pedestals. Two of the holes went clear thru the hull. Here's a tip for repairing wet balsa core. You can see the wet core because it is darker than the surrounding area. Drill a small (3/16") hole into the core at the lowest spot where it is wet. Don't go thru the hull!!! Squirt acetone into the top hole until it comes out the bottom hole. This displaces the water. Now use a small vacuum cleaner on the bottom hole until the balsa is dried out. Then plug the bottom hole and squirt low viscosity epoxy in until it fills right up. You made need to do it again after it sets up since it will probably soak in. I did 13 holes and it worked perfectly. For the 2 holes that went right thru, I taped over the underside of hull and put fiberglass fibers down in the hole to create strength. Epoxy by itself lacks the integrity to seal holes. Adding the fibers makes a permanent strong repair.st107_0758.jpg
 
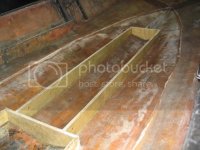
Okay, then I won't keep you waiting. Here I have installed the new stringers. They are a little tricky to build since they have to follow the contour of the bottom, and yet be level on top so that the floor goes on flat. Lots of trial and error. I glassed them onto the hull with double 1" strips of mat and held it all together with wood strapping and screws until it cured in place. I also weighted it down slightly to get a positive bond. After it cured I glassed them in using 2 layers of 6 oz. mat. I left the top surface bare since I was planning on glassing the floor in without screws or staples to produce a completely waterproof floor.
Notice how I have no drain holes between the compartments. I was doing away with the ski locker since I don't like those rickety teak hatches right in the middle of the floor where everybody steps. The floor was going to be solid and I was going to end up with 3 air tight and water tight compartments underneath. As I said earlier, I did not replace the foam, but even if I banged a hole into the hull, I would have 2 other air tight flotation compartments. Hey, just like how they built the Titanic!

st108_0857.jpg
 
Looks great so far. I had sun also installing my stringers. In and out of the boat way to may times to make adjustments.
 
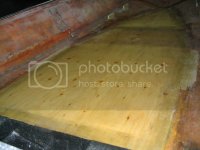
Here is the floor installed. I used the old floor as a template. It is 1/2" plywood glassed over on BOTH sides. In the 80's these floors were just resincoated on the underside (I don't know what they do now days). If it ever gets wet under there, the resin alone will not protect the wood. It is not a lot of extra work for a repair you will never have to think about again. I used double 1" strips of glass on top of the stringers and all around the perimeter. I put the floor pieces in place and weighted it down with bricks until it cured. No screws, nails or staples. Then the seams were covered in double 4-5" strips. You can see where the seat pedestals are going to go. There are probably several ways you can do this. I think Starflites have a slightly raised installation block. Female threaded inserts could also have been installed. I wanted the floor completely flush, so what I did was fiberglassed in a 12" by 12" piece of 3/4" plywood directly underneath. This gave me a 1 1/4" backing plate for the pedestals in which I screwed and epoxied large screws. I now have a water tight floor with no mechanical perforations that go right through.st110_1086.jpg
 
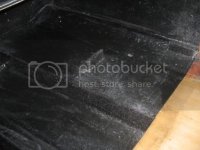
I had some black gelcoat I was using for cosmetic repairs so I decided to gel the bilge. It looks nice here but once I got the fuel tank, battery, seatboxes etc. in, you could hardly notice it was done. Positioning the cleats to mount the seatboxes was a challenge because the original ones had disintegrated and I wasn't sure exactly where to put them. They are in the bow as well, and once you glass them in, you are committed to where you put them. I obsessed a little over it and I think I got them spot on.
This hull had no original transom knees and I never added any. If I had known I was going to end up with 11" of setback, I think I would have beefed up the transom somehow. On the other hand, the one thing the previous owner did right is he had sealed the thru transom holes with 3M 5200 and the transom was completely dry and solid. Checkmate built these things originally to accomodate the 300 HP V8 Johnson. As long as it stays dry, I think it is going to be OK.
stIMG_0189.jpg
 
Status
Not open for further replies.
Back
Top