• Welcome to the Checkmate Community Forums forums.

    You are currently viewing our boards as a guest which gives you limited access to view most discussions, articles and access to our other FREE features.
    By joining our free community you will be able to:

    » Interact with over 10,000 Checkmate Fanatics from around the world!
    » Post topics and messages
    » Post and view photos
    » Communicate privately with other members
    » Access our extensive gallery of old Checkmate brochures located in our Media Gallery
    » Browse the various pictures in our Checkmate photo gallery

    Registration is fast, simple and absolutely free so please, join our community today!

    If you have any problems with the registration process or your account login, please contact support by clicking here or by using the"contact us" link at the bottom of the page.

Setback Brackets installed...with pics!

Sam I am

Well-known member
I finally dug her out of the garage and got busy with the setback brackets I bought from Hotdaddy last fall. They were in great shape and lined up perfectly...a couple of photo always make a thread more readable. Enjoy.

Hooking up the hoist...

DSC_0001.jpg

We put an old winch on a rail in the garage attic to help my father get the heavy stuff up there...works awesome for skinning coyotes and hanking outboards.

DSC_0003.jpg

It was tight getting to the top nuts. After about a 1/2 hour of jacking around with regular wrenches, I cried uncle and went and got a set of rachet wrenches...and they totally kick ass. Talk about the right tool for the job. Well worth the trip to town.

DSC_0004.jpg

The winch made working the motor off so easy. A little up, pulled hard, the bottom bolts slid out, a litte down with simultanous pulling...she's off!

DSC_0008.jpg

The transom bolts were either glued in or it's the strongest silicone I've ever encountered. Anyway, only one bolt spun, so I pulled it out, put a hefty amount of 3M 5200 in the hole and a bead of it around the bolt after it was through. I put a bead of 5200 around the other 3 bolts too even though I couldn't get them to spin. Does anyone know if the factory uses 5200?

DSC_0006.jpg

I put a solid bead of silicone all the way around the perimeter of the brackets mounting face. After the bolts and nuts were torqued down there was a nice residual bead pushed out...I just left it to set up rather than make a sticky mess out of everything trying to wipe it off. I'll clean it up after it cures if it looks too unsightly.

DSC_0010.jpg

This was the trickiest part of the job: getting the jackplate holes to match up with the bracket...I ended up having to loosen one of the brackets from the transom, line everything up and get the hardware inserted and nuts started and then tighten everything back up. Oh yeah, all the hardware is stainless steel: nuts, bolts and washers.

DSC_0011-1.jpg

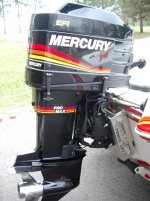
All done! Overall, it was a pretty easy job. The hoist and the right tools made it pretty fast too. I actually like the black. Theres black on the boat, so it fits right in. There's a lot of play in all the wires and rigging too. While I'd still like to have a 10" hydro, thiswas a lot easier on the budget. Hopefully this and the 26 trophy plus will put me over the top for 80.

DSC_0012-1.jpg
 
Nice! Thanks for documenting the job!

My Pulsare had a stainless steel transom plate under my jack plate, I see yours doesn't. You'll want to watch the bottom corners of the plate where it meets the transom every so often. There have been rare instances of transom damage at those spots without the stainless plate.
 
Now that you mention it...

...You're right. My pulse had a plate on the transom. Hmmmmm, I'm concerned now.

I know it's not the most exciting thread ever, but, dang, I got spring fever and I'm bored!
 
The only way I can figure to mount a plate is to flush mount it. There's no lip on the rear of the splash well to "hang" one on. Maybe that's why the factory didn't do it?
 
Mine was flush mounted from the factory. I wonder if it was an option. I think they just held it on with the four engine bolts and sealant. The 10" setback HD RapidJack was so wide I had to remove the rub rail end caps, and you can't see the plate like you can under the standard 5.5" CMC jack plate
 

Attachments

  • 108-0838_IMG.JPG
    108-0838_IMG.JPG
    120.8 KB · Views: 70
  • IMGP0238.jpg
    IMGP0238.jpg
    111 KB · Views: 73
Last edited:
I can't believe you sold that boat JW.:brickwall:

Love the colors!

I don't have a plate between the slider and the transom either. I am careful to make sure that the nuts are always snug on the inside of the transom

Sam, the brackets look good. I am happy that you are satisfied with them.:cheers:

HD
 
The only way I can figure to mount a plate is to flush mount it. There's no lip on the rear of the splash well to "hang" one on. Maybe that's why the factory didn't do it?


I really like this hull design with no splash well. Wish CM would eliminate it from the other models. Just looks stronger and cleaner, and no problem with water and dirt getting in the well.

Of course rigging the top bolts becomes a little tougher/2 man job, but that's a fair trade off.
 
The Mercury race mechanic who rigged my 280 took stainless backing plate off my Starliner when mounting 6" hydraulic CMC. I can't remember reason he gave as to why it had to come off, but he said it needed to.

I remember the sticker on the transom that said something like "warranty void if plate removed for installation of jackplate" which lends me to believe it must be removed for some reason. Just don't know why??

I'd be interested in knowing more because I had several others who couldn't figure out why it was removed.
 
Mine had no plate from the factory, so they voided their own warranty! lol

Hey Sam I was just thinking,

Was there any reason that you put the brackets before the Slider?

I had them between the slider and the motor bracket. My fear was that the separate brackets don't provide enough lateral support at the transom and a larger contact area. I also, felt like it looked better aesthetically due to all of the black parts coming after the aluminum slider.

Sorry to bring all of this up after you have installed them. :(

Just my oppinion.

HD

HD-
Good question and there was a couple reasons: Plain physics. I figured a 6 inch jack plate is designed to be a 6" jack plate. By adding the brackets in front of the jackplate, the physics and subsequent forces acting on the hydo plate are exactly the same as they were before. BUT, if I put the brackets after the jackplate, then the torque acting on the the jackplate is actually that of a ten inch jackplate instead of 6". (you can figure it by using the old formula of T=FxD (torque=force x lever-arm). I wasn't sure that the 6"plate would stand up...I could be overly conservative. Reason #2: I was informed by others on this forum that boat, brackets, hydro, motor is the correct order for those same reasons. I'll try and find those threads.


Thanks again for the brackets!
 

The brackets mentioned in that thread are completely different from what you have (Gorilla and CMC). They have a much larger surface area against the transom to spread the load, and they also have lateral supports that "tie" things together so they affectively act as one piece.

You obviously have engineering background as well, so I feel comfortable in your analysis. I chose to look at it from a different perspective (the relationship of the brackets to the transom and the constant lateral load on them due to prop torque), as you chose to focus on the affects on the JP. One thing that is missing from the equation is the original design (and safety factors) of the slider. I do feel there is added strain on the JP without a doubt.

I guess the brackets are "fixed" in place by the transom and the JP, so maybe my concerns are a bit far fetched.

I don't think either view is wrong, just different.

Good luck with it!

HD
 
I've been looking at the pictures again and it looks like I have a lot more "direct surface cantact" with the set brack brackets than I did with the Jackplate. More would seem to better in terms of distributing the forces into the hull. Still not sure what I'm going to do here...:confused:
 
I stand corrected...

I did some more research, and they belong against the transom.

I still think it worked fine the other way, but the manufacturer is the word to trust.

Sorry for the confusion.

HD
 
No worries Hotdaddy! No need to be sorry about anything and I appreciate the PM's!

Thanks to all who chimed in!
 
Back
Top