• Welcome to the Checkmate Community Forums forums.

    You are currently viewing our boards as a guest which gives you limited access to view most discussions, articles and access to our other FREE features.
    By joining our free community you will be able to:

    » Interact with over 10,000 Checkmate Fanatics from around the world!
    » Post topics and messages
    » Post and view photos
    » Communicate privately with other members
    » Access our extensive gallery of old Checkmate brochures located in our Media Gallery
    » Browse the various pictures in our Checkmate photo gallery

    Registration is fast, simple and absolutely free so please, join our community today!

    If you have any problems with the registration process or your account login, please contact support by clicking here or by using the"contact us" link at the bottom of the page.

Enforcer Transom/Setback Resto

Status
Not open for further replies.

Rob B

Moderator
Staff member
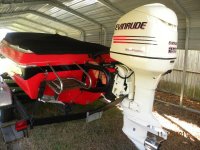
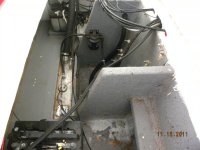
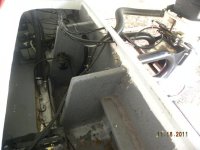
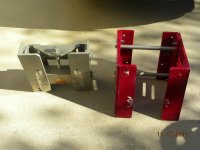
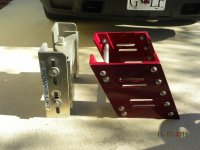
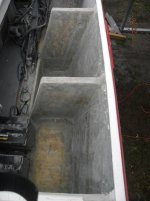
I finally got some time to do a winter project on the Enforcer!! I'm removing the old tube gil bracket and will replace it with a setback bracket and a jackplate. While the boat is apart I'm going to gelcoat the bilge and surrounding areas or where the batteries and oil tank sit. Durning the floor and transom resto I used a non skid application, worked for the floor but for some reason it started peeling in the bilge area.

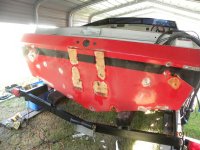
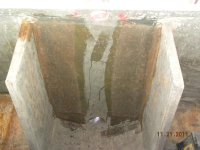
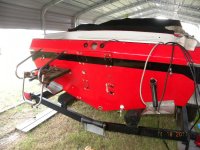
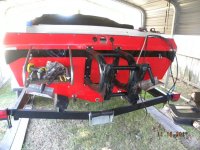
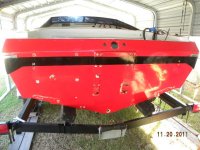
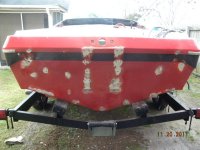
So here we go, I removed the motor and gil bracket today. Hopefully over the weekend the trim tabs and swim platform will be removed as well. This is for painting the transom later, first I'll plug all 18 holes with a dowel dipped in resin. Then glass them over on the inside and out. Then drill new holes for the setback bracket (4).Once that's done I'll need to repair some gel cracks then prime and paint. Here are some pictures from today.
 

Attachments

  • DSCN2667.jpg
    DSCN2667.jpg
    82.4 KB · Views: 86
  • DSCN2668.jpg
    DSCN2668.jpg
    55.5 KB · Views: 83
  • DSCN2671.jpg
    DSCN2671.jpg
    53.5 KB · Views: 81
Why the change? Any advantage over the gil bracket, seems the gil support would be greater than setback/jackplate w only 4 holes.....?
 
Why the change? Any advantage over the gil bracket, seems the gil support would be greater than setback/jackplate w only 4 holes.....?

First to update the looks like the 2400 and not have as much setback. Plus no adjustments other than the bolt holes on the motor. The gil bracket is 24". Strength wise it should be the same. The bolts are larger for the 4 hole pattern. The bolts for the gil bracket are smaller. Oh and the gil bracket is heavy!!!
 
Awesome, love watching your resto's , should be a nice update to the look of the boat and it will be nice to have some adjustment :thumb:
 
I finished removing the trim tabs and swim platform from the transom today. I got most of the sanding/grinding in the bigle area and on the inside of the transom. The 18 holes are sanded and plugged with 3/8" dowel dipped in resin, tomorrow I'll glass them in. Once that dries I'll finish sanding the transom, fix some gelcoat cracks then get it ready for primer. Hopefully my supplies will here this week. Here are some pictures.
 

Attachments

  • DSCN2686.jpg
    DSCN2686.jpg
    75.1 KB · Views: 45
  • DSCN2692.jpg
    DSCN2692.jpg
    64.1 KB · Views: 45
  • DSCN2699.jpg
    DSCN2699.jpg
    93.3 KB · Views: 46
Robbie,

Your ambition is just overwelming. I am not sure I would go through another resto. At this time I am trying to work up the mental strength
to get back onto the Crackerbox and get that completed. There are just not enough hours in the day anymore. If only I could go back 8 or 10 years, I would be non stop building/restoring.

Keep up the good work.

Jim
 
Robbie,

Your ambition is just overwelming. I am not sure I would go through another resto.
Jim


Ditto.

I wish I had his energy. I wouldn't do it again.

I'm restoring my Mustang now. Whole lot easier than a boat. Plus I get to lay down or sit down for a lot of the work ;).
 
Robbie,

Your ambition is just overwelming. I am not sure I would go through another resto. At this time I am trying to work up the mental strength
to get back onto the Crackerbox and get that completed. There are just not enough hours in the day anymore. If only I could go back 8 or 10 years, I would be non stop building/restoring.

Keep up the good work.

Jim

I'm done after this!! Well I say that now!:D The good thing is it's not a total tear down and replacement. The down side is on changing the setup is all the holes from the gil bracket that need to be plugged up. Thanks for the kind words.:thumb:
 
Ditto.

I wish I had his energy. I wouldn't do it again.

I'm restoring my Mustang now. Whole lot easier than a boat. Plus I get to lay down or sit down for a lot of the work ;).


I have plenty of energy, my wife swears I got ADD !!!!:D
 
Today I got the holes glassed in on both sides. Probably be tomorrow before I can finish sanding the outside and add filler to those areas. Also established the center line by measuring between the outer chines. Then measured from the bottom up 28" to establish the setback bracket height, I'll get pictures tomorrow. Hopefully I can/will drill new holes tomorrow. Oh my supplies shipped out today. Here are some pictures.
 

Attachments

  • DSCN2700.jpg
    DSCN2700.jpg
    77.1 KB · Views: 31
  • DSCN2701.jpg
    DSCN2701.jpg
    46.6 KB · Views: 35
  • DSCN2703.jpg
    DSCN2703.jpg
    58.1 KB · Views: 32
I can remember when I tried to establish the new holes in the transom for the motor, it was crazy. I used a 2 axis laser to level the hull, then balance the holes from left to right using the chine corners. Nothing was balanced. I could not believe how far off balance it was. Visually the motor is not centered to the motorwell now. The original motor location was 3/4" to the right of the center of the hull just to be in the center of the motorwell. I guess that didn't help the CB's!
 
I can remember when I tried to establish the new holes in the transom for the motor, it was crazy. I used a 2 axis laser to level the hull, then balance the holes from left to right using the chine corners. Nothing was balanced. I could not believe how far off balance it was. Visually the motor is not centered to the motorwell now. The original motor location was 3/4" to the right of the center of the hull just to be in the center of the motorwell. I guess that didn't help the CB's!

I'm using a 4' level after finding the center, it seems to work so far. I don't have a level spot in the yard or out in front the house(slopes for drainage purposes).The center lines up with the drain and cable holes on the transom. I'm gonna recheck the measurements twice more before drilling new holes. I think Brian had to do the same thing on his playmate. I'm not sure why CM doesn't get the motor holes correct or maybe it's the dealer rigging the boats.
 
I'm using a 4' level after finding the center, it seems to work so far. I don't have a level spot in the yard or out in front the house(slopes for drainage purposes).The center lines up with the drain and cable holes on the transom. I'm gonna recheck the measurements twice more before drilling new holes. I think Brian had to do the same thing on his playmate. I'm not sure why CM doesn't get the motor holes correct or maybe it's the dealer rigging the boats.

I started by using 3 small hydraulic jacks (2 under the rear corners of the trailer and 1 under the tongue at the v) and jacked the trailer at the back until the chines were level and then the jack under the bow until the keel was level. Then I laid out the transom. Maybe overkill, but it is as accurate as it can be. (the nemisis of being an ex machinist/welder/fabricator)
 
And He's at it again.

As always looking good Robbie.

Cant Imagine there is any dust around your house.
 
Status
Not open for further replies.
Back
Top