• Welcome to the Checkmate Community Forums forums.

    You are currently viewing our boards as a guest which gives you limited access to view most discussions, articles and access to our other FREE features.
    By joining our free community you will be able to:

    » Interact with over 10,000 Checkmate Fanatics from around the world!
    » Post topics and messages
    » Post and view photos
    » Communicate privately with other members
    » Access our extensive gallery of old Checkmate brochures located in our Media Gallery
    » Browse the various pictures in our Checkmate photo gallery

    Registration is fast, simple and absolutely free so please, join our community today!

    If you have any problems with the registration process or your account login, please contact support by clicking here or by using the"contact us" link at the bottom of the page.

87 Starflite Questions

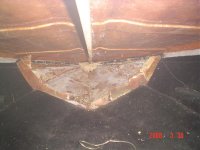
the shine, i have gotten some aqua buff off line that i'll be using per the guys on here. i can't do that untill it warms up some...... today i pulled all the foam out of the nose-a must for you if not done yet! not fun!!!!! the gas tank- mine is bolted or screwed to the floor and any time you can start fresh or new with anything on that lil' bugger your best off you don't want to make a mess of stuff you all ready bought when you have to rip something apart later!!!!lesson learned the hard way!:sssh:
 
nose foam

yes, all foam must go. If you look past the ice block in the picture above, i have already cut the plywood out, the foam just needs to thaw so I can get it out:).

Not to happy with all the rot in the stringers. I hoped that I could get away with just replacing the front, but i think I am going to have to rip the back floor up as well.

But again, I think this mate was VERY neglected, and I kind of knew that when I bought it...
 
i see that you got all of the "wall" out! how did you do this? was it a pain in the ***? let me show you a pic of what i did today! i was hesitant to pull the wood out around where it came in contact to the bottom of the boat-u will see-hold on a min let me go take a pic..........
 
by the way i would recommend getting the foam out before it thaws!!!!!!! strongly!!!!!!!!!!!!!!!
 
here is a pis of my boat... and the playpen!
 

Attachments

  • DSC03903.jpg
    DSC03903.jpg
    58.3 KB · Views: 54
  • DSC03904.jpg
    DSC03904.jpg
    73.7 KB · Views: 60
  • DSC03905.jpg
    DSC03905.jpg
    85.2 KB · Views: 64
skill saw

Hey Ross,
I just used a skill saw on the bottom part of the 'v'. The top as you know is not connected. I "finished" it with a sawzall. I may make a door at a later time so I wanted to save something to connect it with. As rotted as the floor was (even at the very front), the plywood holding back the foam was fine.
 
i guess i didn't see the bottom wood left- i wanted to get rid of it completly and do the rhino lining thing. not sure i can but i was going to use a roto-zip to do my finishing work and put a light weight door there myself. thinking of using some real thin wood so it is light and paint it black....let me know how it turns out for ya!!!!-ross:cheers
 
A propperly rigged transom would have compression tubes. Compression tubes are basically 1'' fiberglass tubes that are epoxyed into the transom to distribute the stress from the engine better and prevent water damage.
How this is done in a nutshell is.. you first drill the bolt holes with a 1'' holesaw just until you reach the back layer of fiberglass.(Measure twice and cut once cuz you only got one shot to get it right) Clean the remaining core out with a small chissel or flathead screwdriver. You then coat your holes w/ epoxy. Then measure and cut your fiberglass tubes to the necessary length and coat them with epoxy and put them into the holes. This is the best way to mount your engine. No need for metal plates, and your transom will never crack at the bolts again;)

do you have any pictures of these things. i was thinking of a sleeve type arrangement for my boat - just wasn't sure if they would work
 
If we could get them together we would have a matched set of three.
My deck was VERY faded also, doudted it would come back but it did-after about 40 hours of sanding and rubbing-but all worth it. Started out wet sanding 600-1000-1500-2000 grit then buffed all day, then the next year I got some Aqua buff, this stuff is greate, buffed it again with 1000 & 2000 A-B and it looks 97% perfect. to do it again I would start with A-B 1000 and work it with that (Allot) and try to cut out the wet sanding then fallow up with A-B 2000 and then a light fine clear cut and glaze to finish. I cant do anything more because I'm almost thru the clear and into the flake, next step is to reclear. I'll keep it well waxed & cross my fingers it will hold up, didnt loose any shine last summer.
F150GT
 
Back
Top