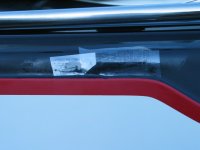
I took this picture a few days ago after I knocked the shine off to see what I had to work with. The crack doesn't look as bad in person. I bought the gelcoat repair kit from Overton's it came in last week. Today I had a few minutes so I sanded until I got the crack smooth. I'm hoping to have this repaired over the weekend. I'll post new pictures after it's done.
-
Welcome to the Checkmate Community Forums forums.
» Interact with over 10,000 Checkmate Fanatics from around the world!
You are currently viewing our boards as a guest which gives you limited access to view most discussions, articles and access to our other FREE features.
By joining our free community you will be able to:
» Post topics and messages
» Post and view photos
» Communicate privately with other members
» Access our extensive gallery of old Checkmate brochures located in our Media Gallery
» Browse the various pictures in our Checkmate photo gallery
Registration is fast, simple and absolutely free so please, join our community today!
If you have any problems with the registration process or your account login, please contact support by clicking here or by using the"contact us" link at the bottom of the page.
You are using an out of date browser. It may not display this or other websites correctly.
You should upgrade or use an alternative browser.
You should upgrade or use an alternative browser.
Crack in the gelcoat
- Thread starter Rob B
- Start date


I second that. I'm thankful the checkie wasn't new when that happen,bad enough it was new/ used to me.
 On the bright side it can be repaired.

after seeing it sanded, it looks like the crack will need to be ground into a v, filled, and feathered out. with out doing that kinda work, you most likely will not be happy with the results.
I had a few minutes earlier this morning to do just that. I'm thinking I might have to fill it, sand it and fill the crack again to get a smooth finish. Hopefully with good results.

Boston Predictor
Well-known member
CMP, Its hard to tell whats going on in the pic. Is it chipping? or not filling propperly?
You did the right thing by grinding it and feathering it smooth. It looks like you are on the right path so far. It usually takes 2-3 coats of gelcoat and or filler to egt it the way you want it.
Just for future referance, when sanding the area, tape off the area to keep the scuffs local")
You did the right thing by grinding it and feathering it smooth. It looks like you are on the right path so far. It usually takes 2-3 coats of gelcoat and or filler to egt it the way you want it.
Just for future referance, when sanding the area, tape off the area to keep the scuffs local
CMP, Its hard to tell whats going on in the pic. Is it chipping? or not filling propperly?
You did the right thing by grinding it and feathering it smooth. It looks like you are on the right path so far. It usually takes 2-3 coats of gelcoat and or filler to egt it the way you want it.
Just for future referance, when sanding the area, tape off the area to keep the scuffs local
BP I decided to dig the crack a little deeper and cut it back on a 45 degree angle. Then I'll feather it into the rest of the gelcoat. What it looks like to me is the clear gelcoat under the color if that makes any sense. I'm letting it cure longer than a hour which it what the directions said to do. I'll see how it goes this afternoon. Thanks for the tape off tip.

Maybe next time a pair these might Help!
Sure will, i'll have some the next time i go out.

81 enchanter
Active member
Well finally got the crack in the gelcoat repaired. I have some fine spider cracks around the area that was repaired. But i can live with that. Here's a picture of the repair, i need to buff it out one more time.
excellent, can't even tell!!