• Welcome to the Checkmate Community Forums forums.

    You are currently viewing our boards as a guest which gives you limited access to view most discussions, articles and access to our other FREE features.
    By joining our free community you will be able to:

    » Interact with over 10,000 Checkmate Fanatics from around the world!
    » Post topics and messages
    » Post and view photos
    » Communicate privately with other members
    » Access our extensive gallery of old Checkmate brochures located in our Media Gallery
    » Browse the various pictures in our Checkmate photo gallery

    Registration is fast, simple and absolutely free so please, join our community today!

    If you have any problems with the registration process or your account login, please contact support by clicking here or by using the"contact us" link at the bottom of the page.

do's and dont's for spraying gel

ezflyer

Active member
hi everyone.:p i am fixn to try to spray a new clear gelcoat on a boat that i want to resell. the previous owner had it cleared with automotive clear and it didn't last. we striped all the old clear off with a aircraft paint remover. it worked great without soften up the old gelcoat. i want to spray the clear gelcoat so i can learn what its all about. i have painted a few cars. so i do have some knowledge of how to paint. i do know that it must be sanded with 80 to 100 grit and u must use a much larger spray tip on the spray gun etc. any info on this project will defintly help out. i want to know how much it can be thinned and what brand is the best to use. should i put the wax it with every coat or should i put it on the last coat only. i would like to end up with about 25 mills so when i start sanding i dont bust trough. any directions, tips, do's, dont's,. i read that the temp outside makes a big diffrence. can yall help a brother out a little. thanks charles
 
Gel coat, clear coat

It was getting to me seeing this thread just hanging there, so maybe I can get the ball rolling. I Have never fooled with any Gel coat repair, But I do have some experience with paint. Some boat manufacturers use this paint as a top coat on their boats. I have used it on a few of mine. It is Imron made by Dupont. I sprayed my Jetmate with it. It has the look and feel of gellcoat, and should hold up on your boat for at least 10 years if applied properly.
Check out pics of my boat... http://checkmate-boats.com/forums/sh...ad.php?t=14018 . Imron was developed in the 1960's to be a durable industrial paint for trucks and equipment. Dupont soon realized the paint was way better and much more durable than they had exspected.

One of their promotional adds showed a piece of tin foil that was sprayed, let dry, then crumpled, and then uncrumpled, and the paint did not crack or break. Imron now is advertised as aviatoin paint and is used on all types of airplanes from small Pipers to the largest Jets.

I have used Imron on three boats with success and would not use anything else on a boat. That is if your pocket book will permit, as it is a bit pricey. I spent over $800.00 for the Imron for my boat 4 years ago, and that was the discount price. I'm sure it may be more now.

The method I use for painting a boat in Imron is simple but effective. Fiberglass flexes especialy on a boat. Imron too is very flexable. That is why it works well on fiberglass. So to insure the integrity of the paint I apply it directly to the gelcoat, no primers, no sealers that may not be as flexable as the Imron. In other words I am putting a flexable paint directly on a flexing surface, nothing in between that does not flex or give with the boat or the Imron.

Prep for the boat surface is simple. If you are preping a boat that has never been painted and the gellcoat is still intact, I sand the boat with 100 grit sand paper. Never go any courser than that. DO NOT USE 80 GRIT PAPER! Gellcoat is very hard and 100 grit paper cuts the gellcoat about as much as 320 grit does to standard automotive paint. Along with normal surface cleaning and dewaxing (very important) with something like prepsol, that is all I do before painting a boat. Wash, dewax, sand, dewax again right before paint, tack, and paint.

You can also go over the boat with clear Imron to bring the shine back. You will need a finer grit paper than 100 for just a clear coat. If the boat looks good wet, a coat of clear Imron will probably work fine. Let the garden hose run on the deck to get an idea.

Here is one thread to get you started;
http://checkmate-boats.com/forums/showthread.php?t=16233&highlight=Imron
You can also do a search on this Checkmate web sight, just use the drop down tool under search at the top of the page.

Good luck if you decide to paint. Hope this helps.
 
hey jetmate thanks,thats is some of what i am looking for. the reason for going back with gelcoat is that, when ever the previos owner had the boat cleared it left tiny little holes in the gel. after doing a little research at the local paint store {ppg auto}, they said that the holes came from a chemical reaction from using a cheap clear and putting no sealer on it. the holes look like someone would have took a ballpoint pen and stabbed the boat,but its only where the clear was put on heavy, like in the body lines were it can settle. so with that being said, i am gona haft to spray a few mills of gel and sand it till the holes are gone. i tried to use a ppg sealer and it only made it worse. not to mention it is $12.00 a can. i didnt want to buy a quart if it didnt work. so i think i will go back with the same original gel that was on the boat. i hope that it is not to late and we haft to repaint and regelcoat. thanks for that info, because i think when i get back to work on my mate, i will do the imron paint and clear. thanks charles
 
hey jetmate thanks,thats is some of what i am looking for. the reason for going back with gelcoat is that, when ever the previos owner had the boat cleared it left tiny little holes in the gel. after doing a little research at the local paint store {ppg auto}, they said that the holes came from a chemical reaction from using a cheap clear and putting no sealer on it. the holes look like someone would have took a ballpoint pen and stabbed the boat,but its only where the clear was put on heavy, like in the body lines were it can settle.
Those are fish eyes. They come from contaminates in the base ( i.e.wax, greese, silicone, etc) It was not cleaned proper before clearing was done. What makes it wores is when you put more material on to try and "bury it" it makes it worse. Only way to cover is to let it dry to touch and lightly blow some clear on it till it covers or sand down and start over. Fish eyes suck :brickwall:
 
the previos owner had the boat cleared it left tiny little holes in the gel. after doing a little research at the local paint store {ppg auto}, they said that the holes came from a chemical reaction from using a cheap clear and putting no sealer on it. the holes look like someone would have took a ballpoint pen and stabbed the boat,but its only where the clear was put on heavy, like in the body lines were it can settle.
brian the holes he's talking about might not be fish eyes, but solvent pop caused by to much paint in one spot,not letting the solvents gas off be for the paint starts to dry. paint dry's from the inside out. hope this helps you some!:thumb:
 
brian the holes he's talking about might not be fish eyes, but solvent pop caused by to much paint in one spot,not letting the solvents gas off be for the paint starts to dry. paint dry's from the inside out. hope this helps you some!:thumb:


i realy wish i knew all the lingo for talking paint.:confused: yf i thought it was fish eyes myself until i took it to the body shop and my painter said it was not fish eyes:eyecrazy:
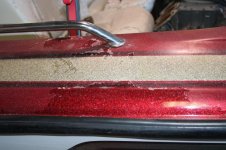
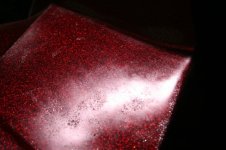
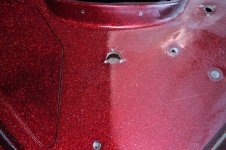
, because it is to deep, and is a perferct round hole ,about a 1/16 deep and maybe a 1/16 round with sharp conners.( i would get pics up if yall tell me where to post. its not a mate.) so he told me a chemical reaction. so i went to the paint store and dug a little deeper, sure enough it was a chemical reaction and pete m said it the best. i dont know all the trade talk to explain myself. so thanks pete ,that is exactly what happen. now i will repair this with a new gelcoat because, it seems that not to many people out of the factorys mess with it. i see a lot of questons about it on this site and i want to learn what its about. so keep the info coming and any litte bit of info helps out. thanks charles....:thumb:
 
Pete, you could be right. Here is what I have found and been told from PPG rep.
Solvent pop is where the outer layer of clear dries to guick and traps the solvents under it. It breaks the top layer of clear as it escapes. This is common when painted in a unventalated area and the fumes do not escape as they should. these holes are not smooth and are very small like a sewing pin poked it all over.
DSC00592.JPG


Fish eyes are smooth, and almost perfectly round. They look like a bic pin stabbed the fresh paint and happen as soon as the material is laid out. It is caused from surface contaminates such as silicone, wax, greese.
fish-eyes.jpg

As I was searching for images I found this website page. This has all the problems that every painter has come across!
http://www.briansmodelcars.com/tutorials/tutorial/30
 
If you are shooting clear gelcoat, use Duratec additive and you don't need another nozzle. It can be sprayed with HVLP gun. Catalyze only what is going in the cup to spray. When you are done spraying that gun cup, disassemble and clean gun parts with Acetone and start again-lather, rinse repaeat.

You can scuff the surface with 220 DA before shooting the clear and it will still cling.

Duratec is $100 a gallon. Mix it 1:1 with gel-one quart to one quart
If its a 18 foot boat, you should be able to get away with 2 quarts of gel and 2 quarts of duratec and still have some left. Gelcoat is $70 per gallon. Use gelcoat

Imron is still paint, it is soft and less scratch resistant than gelcoat
 
hey yf you are the man.:thumb: i thank yall so much. this info is great and that link you have found is awsome. the pics that best describe my problem is pin holes and the solvent poping. the pin hole pic is the closest to what i have. the diffrence is my holes may be a bit bigger in diameter but are the exact same it apereance. this is good stuff and i am sure it will help many others in there quest to repair and repaint boats...... :surf: kary thanks dude that is also some good info as well. all this stuff will be very useful for others as well as myself. do any of you guys have a paticular place that yall like to get yall's material from. what i am asking would be like the best price and easy to deal with kind of company. i know i remember some of yall talking about a place called mertons????? thanks guys keep it comming. my compressor just broke a rod,so i am gona go buy me a two stage 60 gal, compressor and never buy another oiless again.:pissed::pissed::pissed:. keep it coming guys.
 
If the holes in the surface that you were talking about are in the actual fiber glass and not the paint it may actually be holes in the glass created when the boat was made due to tiny air bubbles in the glass and old gel coat close to the surface. If the boat was sanded and painted before, they may have broken through to open these air pockets.

I had the same thing happen on my boat. If you are only going to clear the boat to preserve and bring back the original color, whether using clear paint or gel-coat, I would simply prep and pre spray those areas with your clear of choice to fill and build up those areas. then after those areas are cured thoroughly re-prep those areas and the whole boat for your complete clear coat.

This would also apply for a color coat too, and assuming the holes are tiny. Gel coat and high build urethane like Imron is the only thing I would use to do this.
:bounce:


thanks so much for info and suport. i am gona go take a few pics of some of the area's that are bad. i hope i dont get in trouble for posting them here. i would realy like you guys to see what i have. i think it is just in the clear gel. in a few places i have went all the way to the flake and it disapears. it also ruined the flake. i am gona go with gel just to see what it's all about. i talk with a local boat repair shop and he says its no diffrent than spray anything else with a catalyst to harden. the problem starts when you start adding the pigment because you cant hardly match colors. its not like you can do a blend job like you do on paint. so if you do any colors, you have to spray the whole boat, and you only have about 15 to 20 minutes to do the whole thing. it will kick off in the gun if your not careful. he said doing just a clear top coat is nothing. he said if i buy the mat. and prep the boat he would shoot for $450, but how am i gona learn if i dont do it. thanks guys yall have been very very helpful. i love this site. yall are the best.
 
thanks so much for info and suport. i am gona go take a few pics of some of the area's that are bad. i hope i dont get in trouble for posting them here. i would realy like you guys to see what i have. i think it is just in the clear gel. in a few places i have went all the way to the flake and it disapears. it also ruined the flake. i am gona go with gel just to see what it's all about. i talk with a local boat repair shop and he says its no diffrent than spray anything else with a catalyst to harden. the problem starts when you start adding the pigment because you cant hardly match colors. its not like you can do a blend job like you do on paint. so if you do any colors, you have to spray the whole boat, and you only have about 15 to 20 minutes to do the whole thing. it will kick off in the gun if your not careful. he said doing just a clear top coat is nothing. he said if i buy the mat. and prep the boat he would shoot for $450, but how am i gona learn if i dont do it. thanks guys yall have been very very helpful. i love this site. yall are the best.


this pic is the only one that you could see clearly. the rest are much smaller and alot less visible. this was the worse spot of all.
 

Attachments

  • IMG_2799.JPG
    IMG_2799.JPG
    98.3 KB · Views: 17
this pic is the only one that you could see clearly. the rest are much smaller and alot less visible. this was the worse spot of all.

From what I can see from your pic, it looks like you are down to the original gel coat. I had that same condition on mine. I can see where you have gone through to the flake and removed some of the color from the flake.

If this is in fact the case ( hard to be sure with out seeing the boat in person) I would start the prep process for clearing the boat. If I understand you correctly you are trying to keep the original red metal flake and just want to add a clear gel coat to make it look presentable.

If the whole boat is in that shape and no worse it should work. Like I said before, if you let the garden hose run over the surface of the boat you can get an idea of what the outcome will look like. Take the nozzle off the hose lay it on say the deck and let the water flow over the boat to simulate a clear coat. It can look a little better than the actual clear depends on your skill level.

Another trick you can use to hide the fact that you have silvered the original red flake when you broke through the original gel coat is to add a little dry silver flake to your first coat of clear. You can by dry flake at most automotive paint stores.

What you would do is add a little flake into the first coat of clear gel. You want to make it look like one of those liquid snow seens you see at Christmas time. You know the clear plastic ball with water in them, you shake it up to make the snow swirl around. That is what the clear and flake should look like when stirred in the cup. Dust this over the whole boat, not as heavy on areas where the silver flake is already popping through on the boat. This will give a slightly different look, but not much, and give a reason for a little touch of silver flake to the finish. It actually looks good. You can actually simulate this look by taking some of the dry flake in the palm of your hand and blowing onto the top surface of the boat. When you actually spray, do this only on the first coat and then finish up with straight clear.

Keep in mind I have only done this with Imron and automotive paints, But I don't see why it would not work if you are spraying Gel as in "kary's" post.
Maybe he can give us a hint. Also spraying may not be advisable for the first timer. I would get all the professional help as possible. Good luck, keep us posted and send the pics as you go along. :rof:
 
hey jm you are right. i have busted through some of the gel and turned the flake silver.:shakehead: 
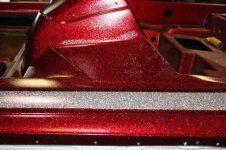
i will be able to hide it with some non slip stick on stuff that looks like a fine watersand paper. it will look great. i have talk to my friend that works at a place called resin systems and they build fiberglass tanks, pipe, and also some shells for a local helicopter company. good friend to have in my kinda hobbies that i do. he said that he would come coach me, but he would not do it, so i can learn.:eyecrazy: as far as the boat, that was the absolute worst spot on the boat. to get back on the flake problem i have, it wont be bad because the main flake is red with a big silver flake strip. on top of that is the baddest ass flake on any boat i have ever seen. it has a bunch of small small flake over the red, those colors are silver,purple,pink,green, and only come out when your in the light just right. almost like a pearl but its flakes. it is awsome. i will order the clear and reducer etc tomorro i hope. my new compressor parts should be here friday. hey guys i realy apreciate yall's support. kinda keeps me motovated. thanks :bigthumb:


p,s, i did buff out a spot and it was beautiful. i wish it didnt have all the holes in it. that would have saved me a lot of b.s. hey its a hobbie so its on to the next level. i think that i am gona do my mate with the same color scheme as this boat. guys, it is the most beatiful color scheme i ever seen. :D:D:D
 
a little update. i order all the clear from fibreglass.com. the salesman was great and a pleasure to deal with. he was very knodgleabe and help me out. he said to prep the boat with 320 grit. the deal with spraying gel is temp. and humidty. that is a very delicate thing wear i live because of the high humidity. i ordered the aditive to reduce the gel and the wax. he said not to put the wax in untill the last coat. what i thought was the most helpful was that there is a liquid called featherfill and you wipe it on with a rag and it fills in the voids. {holes in my case.} it is a micro fiber liquid that builds up when you wipe it on. i am doing more research on it. my gel should be i tuesday and i just got finished rebuilding my compressor. so as i go along i will post more updates. thanks for info and all the help form yall. charles.
 
update. i received all the material wensday and cleaned the dust off the paint gun. thursday after work i finished prep work on boat and begin a journy i dont want to ever repeat again. i read all the directions because this was my first time i ever spray gel. i got out the mixing cups and here we go. first i mix the resin as the directions call for and put in the cup. then i set my air dryer to what i thought was about 22 psi and boy was i wrong. i spray a 1/4 of the boat and i tlooked like i had a sprayon bed liner. it was so organge peeled i could have tore skin off my arm. my gauge was bad and it turned out that i had about 50 psi. thats was the second mistake. the first was try to do a project with out prior knowldge. the third mistake was (after calling manufactor) i mixed the batch with the directions saying optimal condition, and those condition are climate control spray booth. so when i wake up friday morning to go out and sand down the, what looks like a bad case of acne, i then realize that it is still as wet as when i sprayed it on. so a gallon of mek, and a box of scuff pads later i have the boat ready for a new coat of gel again. i double up on the hardner and the wax and got a new gauge for the dryer. it turned out to look almost like glass. it does have some what of a texture to it. i let it dry and buffed out a few spots, one with 320 and one with 600. it looks awsome. so now that i have it together and understand it, the only down fall to doing gel verses automotive clear is the sanding to get a glass like finish. oh and you also have to spray the whole boat at one time because it is very hard to blend the old with the new. it sprays just like a auto clear and is not hard to work with. it lays down well and is easy to sand if u put enough wax. i dont think it is as big a deal as what it is made up to be. if anyone has any questions please feel free to ask. i have rambled on long enough. as i do more i will post pics and explain exactly what i did and the process i did it in. it is by no means as bad as what i have heard, takin in to consideration this was the first time i have ever done anything of this nature. now i wont do it any other way. thanks and i will update at a later time.
 
thanks for the updates! even with automotive clears,to get a really nice flat and shinny finish it's necessary to wet sand and buff!!......when you get time lets see some pic's!
 
thanks for the updates! even with automotive clears,to get a really nice flat and shinny finish it's necessary to wet sand and buff!!......when you get time lets see some pic's!

All right i am gona show a few pics and a few more things i learned today. :eyecrazy: i started sparying the whole top cap today. weather is perfect, family went to the park.:surf: i mixed up 2 qaurts with the additive and wax with no hardner. i poured 1 one quart in gun and mixed hardner and started to shoot it. it is a 20 foot boat and sprayed it all with one quart. i wanted a thick ending result so i put the other quart in gun and added hardner. :shakehead:well thats where i messed up. i should have stopped and cleaned gun. about halfway through that quart it started to kick off in gun. at least i got another good coat on all the corners and around the console. when i mixed the new hardner with the old hardner from the first quart, it made the second one kick off twice as fast. i got it before it got hard and got my gun cleaned. so the end result was not as bad. it layed down pretty and the boat shines again. as you spray the gel and it starts to cure it will freak you out. it will get a hazy look to it, but not to worry because that is the wax coming up to the top. so here you go. pics pics pics.
 

Attachments

  • IMG_2744.jpg
    IMG_2744.jpg
    72.3 KB · Views: 17
  • IMG_2799.JPG
    IMG_2799.JPG
    98.3 KB · Views: 17
  • IMG_2818.jpg
    IMG_2818.jpg
    93.1 KB · Views: 17
Here is more pics...
 

Attachments

  • IMG_2819.jpg
    IMG_2819.jpg
    67.1 KB · Views: 15
  • IMG_2821.jpg
    IMG_2821.jpg
    91.8 KB · Views: 18
  • IMG_2827.jpg
    IMG_2827.jpg
    87.3 KB · Views: 15
Back
Top