Old Hickory
Active member
Finally getting around to building the first structural parts to my Enforcer. Once the transom was out it was on to making a pattern from the old one; cutting and glueing it all up.
First decision I had to make was to determine what materials I was going to use. I initially was going to build the transom out of Douglas fir due to it's strength and cost effectiveness; but was eventually swayed by several members, one in particular, to give Coosa board a try. The one draw back was cost.
Coosa board is manufactured by Coosa Composites LLC, in Pelham, AL. It is a high density polyurethane foam, reinforced with layers of woven roving and continuous strand fiberglass. Their Bluewater series panels come in 2 different densities. B-26 has their highest strength to weight ratio with a density of 26lbs/sqft and is 30% lighter than plywood.
B-20 has a density of 20lbs/sqft and is 45% lighter than plywood. This from Coosa's website.
As I mentioned earlier, it is expensive. Cost comparison to plywood is as follows:
B-26 3/4" 4'x8' panel $195
B-26 1/2" 4'x8' panel $183
B-20 1/2" 4'x8' panel $129
(Advanced Plastics; Nashville, Tn.)
DFir 3/4" 4'x8' panel $71
DFir 1/2" 4'x8' panel $58
(Nashville Plywood Inc.)
Once I got over the initial sticker shock and found some additional structural products that were actually cheaper than ply,(I'll cover that in a later thread when I get to stringer and floor replacement), the over all cost would not be too much different than ply.
So now I have purchased the Coosa and I am ready to begin the process of making a pattern from my old transom. Here are the tools I used for this part of the rebuild.

First I ground the bondo off the old transom so that tracing would be more accurate.


I made the pattern by tracing the old transom onto a large piece of cardboard from a refrigerator box and then cutting it out with a utility knife.

Doyle watching me cut the pattern

Couple of pics of the finished pattern


You may have noticed that I do not have the engine cut out for the splashwell. I have eliminated it and will be building the transom ala convincor style.
Next I began tracing the pattern on the coosa using clamps and a sharpie. You may notice in several of the pics of the pattern I marked "R" and "L". The original wood transom wasn't completly uniform from right to left. So I marked the pattern and my coosa panels to be sure the glued panels would be consistent.


I was able to get two pieces of my transom off of one B-26 panel; however there was a small area of overlap.

You'll see how I address this later.
Now to cutting; this stuff cuts like butter! I fired up my jigsaw, took a deep breath, and began...

Now many of you know that when you're doing the hot nasty stuff, the kids are nowhere to be found. But as soon as the power tools are out they are all eager to help.
Here's a few pics of two of my boys helping me "cut the coosa"


First panel cut, with the help of my youngest

All three cut and ready for glueing

Here is a pic of the panel that was the victim of the overlap. I cut a small piece to fit the gap.

This panel and the fitted piece will be sandwiched between the other B-26 panel and a panel of B-20. If you havn't figured it out yet that will give me 2" for the structural core of the new transom as opposed to the 1 1/4" from the factory ply panel.
Now it's time for the glueing. I chose to use PL Premium Construction adhesive due to it's lower cost as compared to 3M 5200 Fast Cure. I had found it was being used, by wooden boat builders on another forum, with excellent results.
3M 5200 was $11.45/10oz tube
PL Premium was $3.39/10oz tube.
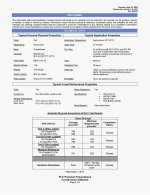
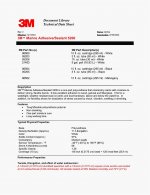
They are both polyurethane adhesives with virtually identical specifications(see the attachments at the end of the post).
Advanced plastics only had 7 tubes of 3M and I would have to order by the case for any more. Lowes has PL on the shelf and I can buy it buy the tube or case; 1/4 the cost to boot.
I started by wiping down all the panels of coosa with a surgical towel to ensure a clean dry surface.
I decided that troweling the adhesive would be the most efficient means of getting it uniform. I used a standard notched trowel I purchased from Lowes.

I applied the PL with a caulk gun and began troweling


It took three 10 oz tubes to cover the surface of the panel. I took the second B-26 panel and laid it on top; then glued the fitted piece in.

And then applied the second round of PL and troweled. I used a total of six 10oz tubes for the the two sides.

I laid the panel of B-20 on the troweled surface; made sure all the edges were aligned; then placed 200 lbs of weight on top to let it cure over night. I added another 50 lbs after I took this photo.

I was very impressed as to how well this stuff troweled. A notched trowel is the only way to go in my opinion. Clean up was a snap using a rag soaked in acetone.
Tomorrow I will remove the weight and will begin shaping the edges and getting the transom prepped for bedding and glassing in this weekend.
Thanks again for looking!
Hick

I have to give alot of thanks to several members here:175checkmate; teamhart2; jallen355; compulse170; LAallison; wca_tim. thanks guys for all your input
First decision I had to make was to determine what materials I was going to use. I initially was going to build the transom out of Douglas fir due to it's strength and cost effectiveness; but was eventually swayed by several members, one in particular, to give Coosa board a try. The one draw back was cost.
Coosa board is manufactured by Coosa Composites LLC, in Pelham, AL. It is a high density polyurethane foam, reinforced with layers of woven roving and continuous strand fiberglass. Their Bluewater series panels come in 2 different densities. B-26 has their highest strength to weight ratio with a density of 26lbs/sqft and is 30% lighter than plywood.
B-20 has a density of 20lbs/sqft and is 45% lighter than plywood. This from Coosa's website.
As I mentioned earlier, it is expensive. Cost comparison to plywood is as follows:
B-26 3/4" 4'x8' panel $195
B-26 1/2" 4'x8' panel $183
B-20 1/2" 4'x8' panel $129
(Advanced Plastics; Nashville, Tn.)
DFir 3/4" 4'x8' panel $71
DFir 1/2" 4'x8' panel $58
(Nashville Plywood Inc.)
Once I got over the initial sticker shock and found some additional structural products that were actually cheaper than ply,(I'll cover that in a later thread when I get to stringer and floor replacement), the over all cost would not be too much different than ply.
So now I have purchased the Coosa and I am ready to begin the process of making a pattern from my old transom. Here are the tools I used for this part of the rebuild.
First I ground the bondo off the old transom so that tracing would be more accurate.
I made the pattern by tracing the old transom onto a large piece of cardboard from a refrigerator box and then cutting it out with a utility knife.
Doyle watching me cut the pattern
Couple of pics of the finished pattern
You may have noticed that I do not have the engine cut out for the splashwell. I have eliminated it and will be building the transom ala convincor style.
Next I began tracing the pattern on the coosa using clamps and a sharpie. You may notice in several of the pics of the pattern I marked "R" and "L". The original wood transom wasn't completly uniform from right to left. So I marked the pattern and my coosa panels to be sure the glued panels would be consistent.
I was able to get two pieces of my transom off of one B-26 panel; however there was a small area of overlap.
You'll see how I address this later.
Now to cutting; this stuff cuts like butter! I fired up my jigsaw, took a deep breath, and began...
Now many of you know that when you're doing the hot nasty stuff, the kids are nowhere to be found. But as soon as the power tools are out they are all eager to help.
Here's a few pics of two of my boys helping me "cut the coosa"
First panel cut, with the help of my youngest
All three cut and ready for glueing
Here is a pic of the panel that was the victim of the overlap. I cut a small piece to fit the gap.
This panel and the fitted piece will be sandwiched between the other B-26 panel and a panel of B-20. If you havn't figured it out yet that will give me 2" for the structural core of the new transom as opposed to the 1 1/4" from the factory ply panel.
Now it's time for the glueing. I chose to use PL Premium Construction adhesive due to it's lower cost as compared to 3M 5200 Fast Cure. I had found it was being used, by wooden boat builders on another forum, with excellent results.
3M 5200 was $11.45/10oz tube
PL Premium was $3.39/10oz tube.
They are both polyurethane adhesives with virtually identical specifications(see the attachments at the end of the post).
Advanced plastics only had 7 tubes of 3M and I would have to order by the case for any more. Lowes has PL on the shelf and I can buy it buy the tube or case; 1/4 the cost to boot.
I started by wiping down all the panels of coosa with a surgical towel to ensure a clean dry surface.
I decided that troweling the adhesive would be the most efficient means of getting it uniform. I used a standard notched trowel I purchased from Lowes.
I applied the PL with a caulk gun and began troweling
It took three 10 oz tubes to cover the surface of the panel. I took the second B-26 panel and laid it on top; then glued the fitted piece in.
And then applied the second round of PL and troweled. I used a total of six 10oz tubes for the the two sides.
I laid the panel of B-20 on the troweled surface; made sure all the edges were aligned; then placed 200 lbs of weight on top to let it cure over night. I added another 50 lbs after I took this photo.
I was very impressed as to how well this stuff troweled. A notched trowel is the only way to go in my opinion. Clean up was a snap using a rag soaked in acetone.
Tomorrow I will remove the weight and will begin shaping the edges and getting the transom prepped for bedding and glassing in this weekend.
Thanks again for looking!
Hick
I have to give alot of thanks to several members here:175checkmate; teamhart2; jallen355; compulse170; LAallison; wca_tim. thanks guys for all your input


 . As far as mounting my twin engines I'll be using a transom extension.
")


