
-
Welcome to the Checkmate Community Forums forums.
» Interact with over 10,000 Checkmate Fanatics from around the world!
You are currently viewing our boards as a guest which gives you limited access to view most discussions, articles and access to our other FREE features.
By joining our free community you will be able to:
» Post topics and messages
» Post and view photos
» Communicate privately with other members
» Access our extensive gallery of old Checkmate brochures located in our Media Gallery
» Browse the various pictures in our Checkmate photo gallery
Registration is fast, simple and absolutely free so please, join our community today!
If you have any problems with the registration process or your account login, please contact support by clicking here or by using the"contact us" link at the bottom of the page.
You are using an out of date browser. It may not display this or other websites correctly.
You should upgrade or use an alternative browser.
You should upgrade or use an alternative browser.
1989 Starliner Restoration
- Thread starter Rob B
- Start date
So is the west system and the epoxy resin system from US Composites the same? Here's the link: http://www.uscomposites.com/epoxy.html
paulsboats
Well-known member
The resin is different but you can use the additives from west in the uscomposites resin. The west sytem stuff may be more $$$$So is the west system and the epoxy resin system from US Composites the same? Here's the link: http://www.uscomposites.com/epoxy.html
redstrat
Well-known member
I've only used west systems so I can't speak of any quality differences. I wasn't even aware of Us composites when I started my project. One difference I notice is that the ratios are different (and the pumps) for different hardeners. West system has one ratio and one set of pumps. This was handy as I switched hardeners several times depending on what I was doing. I'm building a seat mount/center console now.So is the west system and the epoxy resin system from US Composites the same? Here's the link: http://www.uscomposites.com/epoxy.html

paulsboats
Well-known member
I have used both...prefer the west system. all this resto work is getting me ITCHING to get back to work!
RNGRDVE
Well-known member
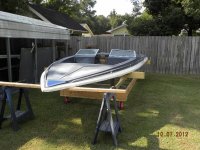
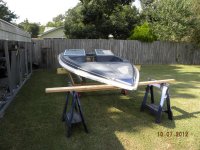
You're gonna need a prettier trailer. Those black things don't look very roadodynamic.
Actually if they are used properly he can stack the liner on the enforcer and bring both boats.
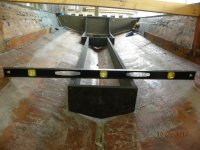
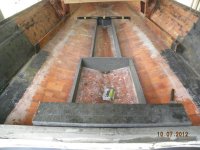
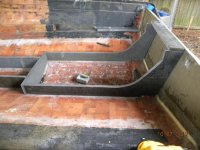
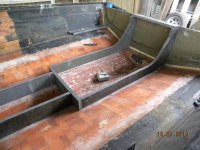
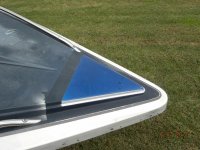
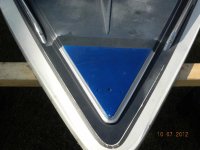
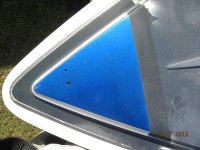
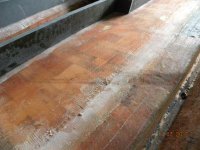
I finally had a chance to work on the liner over the weekend. I got the top off with the help of a neighbor and on to the cradle. Started laying out the knees and stringers, they're 1" thick, need to make a few adjustments to the stringers to get them square and flush with the hull sides. I'm probably going to double the knees to 2" thick, also going to add a horizontal brace on the transom as well. The piece across the top of the knees is to hold them in place and square. Before all this gets glassed in I'll sand inside the hull completely. I'm considering gelcoating the floor. I ordered a rattle can of blue metallic and silver metallic paint and sprayed the nose of the deck so I could what it looks like on fiberglass. Here's some pictures.
Attachments
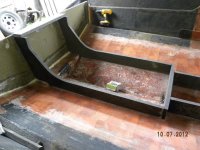


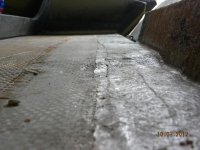
What's going on here? Is the bottom wavy? Roller trailer damage?
I had to go outside and look! That's how the factory laid the glass in. I looked underneath and in that same area is the steps in hull. So I'm guessing it's built up on the top or inside.
I had to go outside and look! That's how the factory laid the glass in. I looked underneath and in that same area is the steps in hull. So I'm guessing it's built up on the top or inside.
WHEW!!

hotdaddy27
Well-known member
I really like the blue!
Don't forget to drill your weep holes in the stringers and headers for water passage!
HD
Don't forget to drill your weep holes in the stringers and headers for water passage!
HD
I really like the blue!
Don't forget to drill your weep holes in the stringers and headers for water passage!
HD
Thanks!! I got them at the bottom of the knees next to the transom, kind of hard to see from those angles. I'll also add one to each of the knees at floor level so the water will flow from the corners to the bilge.
Robbie, nice work! Looking good, The knees and stringers look top shelf. There was a fair amount of bondo even under the stringers and glassed in...The blue looks very nice.
Thanks Sam!!! You're right about working with the composite material, it's messy!!! The good thing was being outside when cutting it. Wore out a jig saw blade, looks like a butter knife!
hotdaddy27
Well-known member
Is there a place for water to get out of the ski locker/fuel tank areas? Hard to tell from the photos.
HD
HD