• Welcome to the Checkmate Community Forums forums.

    You are currently viewing our boards as a guest which gives you limited access to view most discussions, articles and access to our other FREE features.
    By joining our free community you will be able to:

    » Interact with over 10,000 Checkmate Fanatics from around the world!
    » Post topics and messages
    » Post and view photos
    » Communicate privately with other members
    » Access our extensive gallery of old Checkmate brochures located in our Media Gallery
    » Browse the various pictures in our Checkmate photo gallery

    Registration is fast, simple and absolutely free so please, join our community today!

    If you have any problems with the registration process or your account login, please contact support by clicking here or by using the"contact us" link at the bottom of the page.

Transom clamps

Old Hickory

Active member
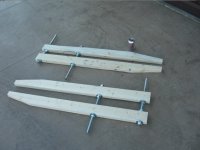
made some transom clamps on tuesday; used 4ft 2x4's and 3/4 10 threaded rods. I have pics but will have to post them later this week. Hoping to get all my grinding and clean up done this saturday so I can bed and clamp the new transom on sunday. they turned out really well; I surprised even myself.

Hick
 
clamp pics

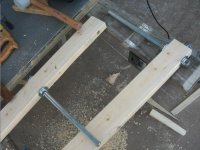
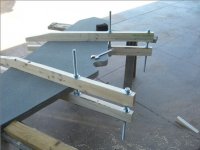
Here are several pics of the clamps. These clamps have a usable length and spread of 32" and 9" respectively. They are made of pine for now; I may in the future make them out of a little harder wood such as oak or ash. The threaded bolts would be much better if they were made of a tool steel; but for now they appear to be fine. I use a crescent wrench to tighten and loosen.

I will go into more details of how I actually made them this weekend when I post the bedding and gluing of my transom on my blog.
 

Attachments

  • 1clamp.jpg
    1clamp.jpg
    28.3 KB · Views: 47
  • 3clamp.jpg
    3clamp.jpg
    38.6 KB · Views: 28
  • 2clamp.jpg
    2clamp.jpg
    34.5 KB · Views: 52
looks great, wish youd shipped me a set over when I did mine :thumb:

Had I known the trouble you were going to have; I would've put the ole hair top computer to work much sooner and gotten a set to you. I hate to say it; your struggle inspired me to come up with a design. I thought of several clamp ideas; but didn't want to reinvent the wheel so to speak. The easiest and most cost effective was to to modify the century old wooden jaw "Jorgensen" hand screw clamp. The type we all learned to use in shop class. We'll see how well it works in a few days.
 
Had I known the trouble you were going to have; I would've put the ole hair top computer to work much sooner and gotten a set to you. I hate to say it; your struggle inspired me to come up with a design. I thought of several clamp ideas; but didn't want to reinvent the wheel so to speak. The easiest and most cost effective was to to modify the century old wooden jaw "Jorgensen" hand screw clamp. The type we all learned to use in shop class. We'll see how well it works in a few days.

Hick that looks good. I know alot folks will use that in the future.:thumb:You can give the clamps some xtra clamping power by adding a threaded rod w/nuts & washers on both 2x4's at the bottom. Then crank one against the other. The middle rods will help the clamps from spreading.
 
Hick that looks good. I know alot folks will use that in the future.:thumb:You can give the clamps some xtra clamping power by adding a threaded rod w/nuts & washers on both 2x4's at the bottom. Then crank one against the other. The middle rods will help the clamps from spreading.

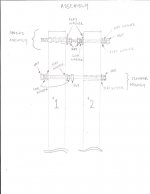
Good point, it appears my pics aren't doing a very good job because thats exactly how this clamp works; by using two threaded rods. Both jaws have a rod afixed in a stationary position using a nut; lock washer and washer on both sides of the jaw and running in opposite directions(you can see them in one of the first pics in my previous post). The front rod then has a nut and washer to the outside; this clamps the jaws. The rear rod has a nut and washer on the inside; this will spread the rear of the clamp slightly and acts as a fulcrum which gives the the front rod increased clamping power. It's the same principle as a jorgensen clamp; but to a larger scale.

Another way of looking at it is the way adults use chop sticks. The fulcrum and clamp are both in the center essentially because of the way we hold it in our hand; but let one of the waiters modify it for the little crumb crunchers by taking a piece of rolled up paper and rubberbanding it to the rear of the sticks, the gripping power increases considerably. The fulcrum is now operating on a different plane and your fingers are applying only clamping pressure. Neat little trick; but it really works. look at the next three pics.

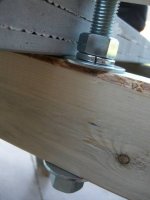
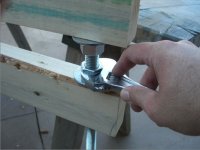
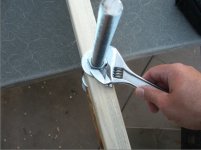
The first shows the front rod being tightened. The second pic shows me slightly spreading the rear. simple but very effective. The third pic is a close up of the fixed end of the rod using a nut; lock washer and washer on both sides of the jaw. You might be able to see it better by looking at the pic in the previous post where I have the jaws completely seperated without the clamping/spreading nuts and washers in place.

This is making me rethink my next blog post. I believe I'll post just on the construction; assembly and use of the clamp (w/ lots of pics) And then make a second post of the bedding; gluing and clamping of the transom. That way I won't leave anyone scratching their head and saying "What the....:D"

cmp170....after writing this diatribe, I realized you may be refering to something different. Are you suggesting that I add more rods? if so, where and how would they be arranged? sorry if I misunderstood.

Hick
 

Attachments

  • 6clamp.jpg
    6clamp.jpg
    23.3 KB · Views: 26
  • 5clamp.jpg
    5clamp.jpg
    29.9 KB · Views: 28
  • 4clamp.jpg
    4clamp.jpg
    30.3 KB · Views: 26
Last edited:
Good point, it appears my pics aren't doing a very good job because thats exactly how this clamp works; by using two threaded rods. Both jaws have a rod afixed in a stationary position using a nut; lock washer and washer on both sides of the jaw and running in opposite directions(you can see them in one of the first pics in my previous post). The front rod then has a nut and washer to the outside; this clamps the jaws. The rear rod has a nut and washer on the inside; this will spread the rear of the clamp slightly and acts as a fulcrum which gives the the front rod increased clamping power. It's the same principle as a jorgensen clamp; but to a larger scale.

Another way of looking at it is the way adults use chop sticks. The fulcrum and clamp are both in the center essentially because of the way we hold it in our hand; but let one of the waiters modify it for the little crumb crunchers by taking a piece of rolled up paper and rubberbanding it to the rear of the sticks, the gripping power increases considerably. The fulcrum is now operating on a different plane and your fingers are applying only clamping pressure. Neat little trick; but it really works. look at the next three pics.

The first shows the front rod being tightened. The second pic shows me slightly spreading the rear. simple but very effective. The third pic is a close up of the fixed end of the rod using a nut; lock washer and washer on both sides of the jaw. You might be able to see it better by looking at the pic in the previous post where I have the jaws completely seperated without the clamping/spreading nuts and washers in place.

This is making me rethink my next blog post. I believe I'll post just on the construction; assembly and use of the clamp (w/ lots of pics) And then make a second post of the bedding; gluing and clamping of the transom. That way I won't leave anyone scratching their head and saying "What the....:D"

cmp170....after writing this diatribe, I realized you may be refering to something different. Are you suggesting that I add more rods? if so, where and how would they be arranged? sorry if I misunderstood.

Hick
Hick,
That's a very good explanation of how the clamp works, being in the engineering business, I completely understand what you're saying. What I was trying to convey and hopefully I can say this right was:
If you add a threaded rod, nuts & washers at the bottom of each 2x4 (the tapered end) So when you slide the clamp in place and tighten the top two you'll be able to do the same at the bottom. I'll try to post a picture of what i'm talking about.
 
:banana:You guys are freaking brilliant!!!!!!!! I've been looking for a way to replace my clamps that got stole for the aluminum. THIS is it!!!!!

The company I got my clamps from no longer has the clamps, so this is great. Thank you Thank you Thank you.


:bounce::bounce::bounce::banana:
 
Coop, you probably could get those made out of some aluminum stock, if you could find a fab shop to do it. :thumb:
 
:banana:You guys are freaking brilliant!!!!!!!! I've been looking for a way to replace my clamps that got stole for the aluminum. THIS is it!!!!!


The company I got my clamps from no longer has the clamps, so this is great. Thank you Thank you Thank you.


:bounce::bounce::bounce::banana:

I hope it solves your quandry. Since making them I've been running around clamping everything in site. Trust me, wrap these suckers around yer temples like a set of ray-bans and start puttin the screws to it; you'll get snot boogers PDQ.:thumb: Look for a post in my resto blog this weekend. I'll have detailed pics and descriptions on how to make; assemble and use the clamp. Total cost for both clamps was a whopping $38. The price goes up depending on the material you use for the jaws. I think the next set I make will be made of maple.(alot stiffer and harder than pine)

Hick
 
Hick,
After talking to you and looking at the clamps you constructed/designed, you're correct in that you will not need the extra set (threaded rods,etc) at the bottom. Very good job!!!:thumb:
 
Well done. When I was trying to come up with a way to clamp my transom I was trying to come up with a clamping device. Looking at your design I was way over thinking it. :thumb:
 
Plans/instructions for transom clamps

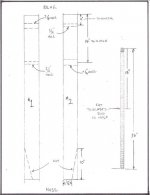
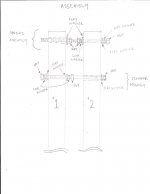
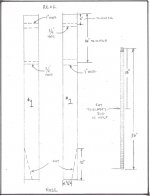
Well I finally got around to it....here are the plans; instructions and parts list for assembling your own GIANT Jorgensen type transom clamps.See attachments for the plans....they are a little crude but should be self explainatory.

Once you have completed them, you will have two clamps that will have approximately 30-32 inches of depth and 9-9.5 inches of width. This is usable clamping power :D So, here it is.

Tools

drill w/ 3/4" and 7/8" or 1" paddle bits
saw(s) wood and metal
tape measure
pencil
adjustable wrench

Materials

2ea 8' 2x4 ( I used pine; maple would make a stronger and more durable clamp)
2ea 36" 3/4" 10 thread rod
12ea 3/4" 10 thread nuts
12ea 3/4" flat washers
8ea 3/4" lock washers

Notes

* Be sure to use 8' 2x4's and cut them in half. If you buy studs you'll be shorting youself 4 1/2". I know it sounds moronic....but you guys can do the math:brickwall:

* Trick for drilling holes if you don't have a drill press...mark your 2" and 16" centers on both 2x4 edges. Then drill toward each other; first one side then the other. They won't be perfect; but will be fairly straight.

* The reason for the 7/8-1" holes is to allow some play so the jaws can clamp slightly out of parallel. This is important....if all four holes are 3/4" they won't clamp. I started w/ 7/8" and had to ream one out a little more so if you don't have a 7/8" bit a 1" should work fine. You can always take more out...but it's hard to add.

* Be sure to get the nuts w/ lock washers good and tight....and try to get them as close to the ends of the rods as possible.....too much threaded rod sticking out narrows the spread width of the jaws.

* Be sure to follow the "Assembly" page(pg2) exactly. The rear assembly "spreads" and the front assembly "clamps". This creates the fulcrum that gives Jorgensen type clamps their power.

* The The 10" angle cuts on the nose of the jaws are optional. I thought it would be advantageous to have them come to a moderate point in order to get the clamps into tighter spaces. Besides, I think they look better this way. Sand and finish to your own discretion. I didn't put alot of time in the finish on mine.

* All the materials I purchased at Ace Hardware and Lumber. Lowes and Home depot should have the same. Total cost for 2 clamps was less than $40. Hardened steel and maple will make more durable clamps....but unless you plan on building boats for a living....these should be fine. They have worked very well on my Enforcer resto.

* I will be posting more pics of the clamps being used in my Enforcer blog. Good luck! I hope they work well for you. :thumb:

Hick
 

Attachments

  • TRPlanpg1.jpg
    TRPlanpg1.jpg
    42.4 KB · Views: 25
  • TRPlanspg2.jpg
    TRPlanspg2.jpg
    39.1 KB · Views: 21
Last edited:
hey guys,

Quick note. The plans on this post incorrectly show The larger hole being 1". It should be 7/8". I corrected the plans for my blog but was unable to replace them on this post. So I am attaching another set w/ the 7/8" revision. I believe the 1" will work but didn't use that size bit due to the narrowness of the remaining wood on the 2x4. Sorry for the confusion.

Hick
 

Attachments

  • TRPlan3.jpg
    TRPlan3.jpg
    24.7 KB · Views: 10
  • TRPlanspg2.jpg
    TRPlanspg2.jpg
    39.1 KB · Views: 11
  • natalienicoletti04.jpg
    natalienicoletti04.jpg
    92.6 KB · Views: 13
Back
Top