• Welcome to the Checkmate Community Forums forums.

    You are currently viewing our boards as a guest which gives you limited access to view most discussions, articles and access to our other FREE features.
    By joining our free community you will be able to:

    » Interact with over 10,000 Checkmate Fanatics from around the world!
    » Post topics and messages
    » Post and view photos
    » Communicate privately with other members
    » Access our extensive gallery of old Checkmate brochures located in our Media Gallery
    » Browse the various pictures in our Checkmate photo gallery

    Registration is fast, simple and absolutely free so please, join our community today!

    If you have any problems with the registration process or your account login, please contact support by clicking here or by using the"contact us" link at the bottom of the page.

Roll and Tip method using interlux Brightside paint

Rob B

Moderator
Staff member
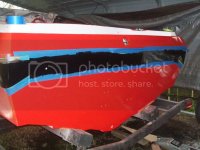
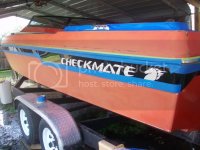
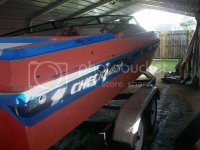
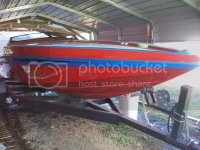
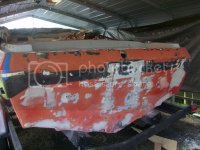
I should've started a thread using the roll and tip method. So here we go, as you know from the resto thread I started with the floor and ended up replacing the transom. I had entirely to many holes so I decide to fill them and start with a new transom. The problem was I couldn't match the color without painting the whole boat, so the closest was the red from Interlux Brightside. Plus having the boat sprayed wasn't in the budget. I then watched the videos, emailed some folks that did it already and figured I can do this. After doing the transom the paint was still off to my liking, so I ended up painting down the sides and gunnells.

The prep part is the key to doing the roll and tip method, if you get that part right the rest is straight forward. Here's pictures from before and after:

From this
100_2092.jpg

100_2144.jpg

100_2147.jpg

100_2160.jpg

100_2158.jpg

100_2159.jpg

100_2164.jpg

100_2169.jpg

100_2170.jpg

To this
DSCN0258.jpg

DSCN0394.jpg

DSCN0393.jpg

DSCN0414.jpg
 
looks awesome

Please further the explanation of "roll and tip" what does it stand for, whats the difference between that and just using a paint roller?? does it leave any roller marks, orange peel effect? is it the paint that matters the most?

sorry, never seen it or heard of it before!:devil:
 
i watched in college, basically, you roll on the paint and then brush afterwards, the guy i watched used a foam brush as it left no brush marks. worked well.
 
Please further the explanation of "roll and tip" what does it stand for, whats the difference between that and just using a paint roller?? does it leave any roller marks, orange peel effect? is it the paint that matters the most?

sorry, never seen it or heard of it before!:devil:

The interlux paint has a self leveling additive that helps eliminate the roller, brush marks and orange peel. The method used is roll the paint with a high density roller and "tip" the paint right after, done correctly you'll get a spray like finish. Watch these videos:
http://www.jamestowndistributors.com/userportal/videoDisplay.do?videoId=116&title=Interlux+Perfection+Howto%3A+Preparation
http://www.jamestowndistributors.co...d=77&title=Interlux+Perfection+Howto:+Priming
http://www.jamestowndistributors.co...=94&title=Interlux+Perfection+Howto:+Applying
 
Is it a one coat, your done deal or do you have to lay several coats on? Also, does that paint lay on like gelcoat where you don't need a clear coat or was that added later?
 
Is it a one coat, your done deal or do you have to lay several coats on? Also, does that paint lay on like gelcoat where you don't need a clear coat or was that added later?

Depending on the color normally 2-3 coats are recommended, doesn't need clear coat for the Interlux Paints. I actually put five thin coats on because I plan on watersanding and buffing later.
 
Wow...that looks really good for not having been wet sanded yet. I can't wait to see what it will look like when you are done with finishing the surface.
 
CM, the boat looks awesome. you have inspired me to possibly attempt doing my own boat eventually. i have not seen the videos yet but i will look later. is prep basically sanding down existing and cleaning before application of paint?
 
CM, the boat looks awesome. you have inspired me to possibly attempt doing my own boat eventually. i have not seen the videos yet but i will look later. is prep basically sanding down existing and cleaning before application of paint?

Yes it's pretty simple sand with 220 grit, wiping it down with interlux 333, tack it then paint it. The directions are straight forward on the can.
 
I just did the hull of my 79 Eluder and am very pleased with it. Prep is the key just like all painting. I found it handy to have extra brushes handy because they tend to load up with paint. I have two coats on and plan on a third. I'm anxious to see how CM's looks after buffing.

Hullpainting-12.png
 
GL looks great!!! You're right prep is the key, I would say 90% prep and 10% is painting. I'll probably water sand and buff the boat once I get the porpoising issue resolved.
 
Both boats look fantastic, buffed or not!

Now I'm torn between Interlux and Imron? Interlux looks to be DIY friendly where Imron sounds like it's more durable from the other thread? I'm assuming Interlux will be cheaper also? Is touching up Interlux when you get a scratch a PITA (pain in the ...)?
 
Just giving a head up, I was looking thru MKHammers catolog, he carries the Interlux products that I used on the Enforcer.
I am sure Mike will like the plug, plus he is great to work with:thumb:

I would use the interlux over imron anyday. Its a lot safer and easy as can be to use. I used their product on my hull (different from what rob used) and it was so easy, it would be hard to screw up. Thanks for sharing Rob. I do have a good buffer, but I need help putting the stroker motor in the enchanter ....... you did say you wanted to learn about I/O's right;)
 
Back
Top