hey everybody, is there any good source for the color codes on my engine harness to hook up all my gauges? i bought a seloc manual that covers my motor but can only find a few diagrams none of which have been helpful. the previous owner of my boat was one of those "did it start? sweet floor it" kind of guys. nothing is hooked up properly and the speedo is the only fuctioning gauge currently. i plan to redo my dash with all new gauges by autometer but not before i figure out the wiring color codes. the motor is a 1998 merc 200 xri
-
Welcome to the Checkmate Community Forums forums.
» Interact with over 10,000 Checkmate Fanatics from around the world!
You are currently viewing our boards as a guest which gives you limited access to view most discussions, articles and access to our other FREE features.
By joining our free community you will be able to:
» Post topics and messages
» Post and view photos
» Communicate privately with other members
» Access our extensive gallery of old Checkmate brochures located in our Media Gallery
» Browse the various pictures in our Checkmate photo gallery
Registration is fast, simple and absolutely free so please, join our community today!
If you have any problems with the registration process or your account login, please contact support by clicking here or by using the"contact us" link at the bottom of the page.
You are using an out of date browser. It may not display this or other websites correctly.
You should upgrade or use an alternative browser.
You should upgrade or use an alternative browser.
need a good source for merc wiring diagram
- Thread starter enchanted
- Start date
keith4216
Well-known member
http://checkmate-boats.com/forums/showthread.php?t=24185&highlight=wiring+diagram
http://checkmate-boats.com/photopost/showphoto.php/photo/2336
Might be something here that will help you.
http://checkmate-boats.com/photopost/showphoto.php/photo/2336
Might be something here that will help you.
http://checkmate-boats.com/forums/showthread.php?t=24185&highlight=wiring+diagram
http://checkmate-boats.com/photopost/showphoto.php/photo/2336
Might be something here that will help you.
those charts are described as "the marine standard" is that what mercury uses on their outboards?
keith4216
Well-known member
I would assume mercury uses the marine standard.
If you search Mercury outboard wiring diagram theres a bunch you can look at.
Heres another one that seems to be pretty detailed.
http://www.maxrules.com/mercwireindex.html
If you search Mercury outboard wiring diagram theres a bunch you can look at.
Heres another one that seems to be pretty detailed.
http://www.maxrules.com/mercwireindex.html
I would assume mercury uses the marine standard.
If you search Mercury outboard wiring diagram theres a bunch you can look at.
Heres another one that seems to be pretty detailed.
http://www.maxrules.com/mercwireindex.html
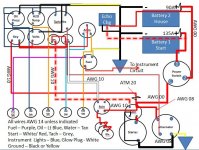
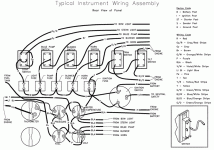
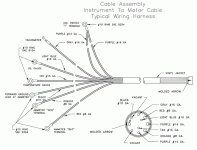
keith ive tried searching google and i even bought a shop manule for my motor. i come up with tons of diagrams but there not what im looking for. the picture i have just posted is just a random merc diagram i found. i put a black box around the pulg in the bottom right corner. it also has an arrow pointing at it so its hard to miss lol. here is my problem, every diagram i find is like the one pictured. the diagram im looking for is on the boat side of the plug in the box i drew. heres the thing. that harness that plugs into that plug runs all the way up to my dash for all my gauges. none of the wires are marked and almost none of them are plugged in. so without the right diagram i cant hook up anything but a speedo.

i hope i was clear in my description of what im looking for. thanks for your help i really appreciate it
keith4216
Well-known member
Yep your clear, lol
From the connection foward everything should be colored as to what it is.
I thought you where looking for a motor diagram. If you are looking for wiring for gauges etc thats all the marine standard color codes. I have to say though your best bet might be just rewire everything you need. The wireing wasn't the best to start and it sounds like yours have been played with already.
Ramifications
Well-known member
I would just pull everything out and start from scrach. Most of the wires coming from the plug go to the ingnition and trim. The wires are color coded, so it's just a matter of finding the right color wires for the sending units once the ingnition and trim wires are hooked up. The positive/power side of the gauges comes from the ignition and the negative just run directly from the battery. After that, you are just left with sending wires to connect. If you use the links provided, you should have all you need to rewire the boat. Post up some pics and we can probably walk you through it

Wire Color Where To
BLK = BLACK Ground
TAN/WHT = TAN/WHITE Oil Light
TAN/BLK = TAN/BLACK Temperature Light
TAN = TAN Temperature Gauge
PUR = PURPLE Ignition 12 Volt
GRY = GRAY Tachometer
BRN/WHT= BROWN/WHITE Trim Gauge
BLK = BLACK Ground
TAN/WHT = TAN/WHITE Oil Light
TAN/BLK = TAN/BLACK Temperature Light
TAN = TAN Temperature Gauge
PUR = PURPLE Ignition 12 Volt
GRY = GRAY Tachometer
BRN/WHT= BROWN/WHITE Trim Gauge
TAN/BLU = TAN/BLUE Visual Warning Kit (Optional)
Attachments
well boys and girls i have good news and bad bad very bad. 
i got all of my wiring together so i think (thats the good news)
heres the horrible news, i havnt had this boat in the water yet, so tonight after i finished my wiring i decided (for the first time) to hook the muffs up, start her up and test out my tach, trim, water pressure, voltage gauges.
well the tach trim voltage gauges work..............however the pressure gauge doesnt and the motor isnt pumping water


as for a little background, i was told the boat had been sitting winterized for 2 years before i bought it.
so what can it be? bad impeller the jackwadd that the sold me the boat conveniently forgot to mention?
or maybe the impellers are rubber and it dry rotted from sitting?
either way im assuming its the water pump, how hard is it to pull the lower on one of these to change it? im pretty handy, i changed my trim pump/motor without any help. cant be harder than that right?
i looked up the rebuild kit on the mercury website, its a 46-42579A 4
the parts are on ebay and amazon. i dont want to buy them if something else is the problem though

i got all of my wiring together so i think (thats the good news)
heres the horrible news, i havnt had this boat in the water yet, so tonight after i finished my wiring i decided (for the first time) to hook the muffs up, start her up and test out my tach, trim, water pressure, voltage gauges.
well the tach trim voltage gauges work..............however the pressure gauge doesnt and the motor isnt pumping water


as for a little background, i was told the boat had been sitting winterized for 2 years before i bought it.
so what can it be? bad impeller the jackwadd that the sold me the boat conveniently forgot to mention?
or maybe the impellers are rubber and it dry rotted from sitting?
either way im assuming its the water pump, how hard is it to pull the lower on one of these to change it? im pretty handy, i changed my trim pump/motor without any help. cant be harder than that right?
i looked up the rebuild kit on the mercury website, its a 46-42579A 4
the parts are on ebay and amazon. i dont want to buy them if something else is the problem though
Ramifications
Well-known member
What engine do you have? Why do you say it isn't pumping water? I would run through the basics on the cooling system... Water pump, T-stats, poppet... it is most likely the water pump if you're aren't moving any water. The lower unit is fairly easy to remove... a few bolts and she should come right apart.
What engine do you have? Why do you say it isn't pumping water? I would run through the basics on the cooling system... Water pump, T-stats, poppet... it is most likely the water pump if you're aren't moving any water. The lower unit is fairly easy to remove... a few bolts and she should come right apart.
its a merc 200 xri and its pumping absolutely NO water what so ever. exhaust is coming out of the piss tubes but not a drop of water. when i pulled the muffs water ran out of the water intake vents for long enough that i know water was getting to the pump but it would seem it wasnt getting past it. the pump rebuild kit is 32$ on amazon. im just gonna buy the parts and rebuild it anyway. its just good insurance i suppose
Ramifications
Well-known member
You shouldn't have exhaust coming out of the telltale, if that is what you meant. No, or very little, water will come out of the telltale until the engine heats up and the T stats open up.
I would plan to replace the T stats and pump at the same time. When you pull the old impeller, check to make sure it is whole and not missing pieces. If you are missing pieces, they could cause blockage in the cooling system. Make sure you spin the impeller counter-clockwise into the housing. Also, don't loose your keyway that the impeller locks into. Don't move the throttle/shifter during the time the lower unit is off. It sucks when you reinstall the lower and realize the throttle isn't in the neutral position You will need to line up the bolts, drive shaft and shift shaft during reinstallation. I found it most difficult to keep pressure on the lower unit and spin the flywheel at the same time to align the drive shaft. Maybe someone has trick on how to align them a different way, or just get a buddy to help you. Good luck
I would plan to replace the T stats and pump at the same time. When you pull the old impeller, check to make sure it is whole and not missing pieces. If you are missing pieces, they could cause blockage in the cooling system. Make sure you spin the impeller counter-clockwise into the housing. Also, don't loose your keyway that the impeller locks into. Don't move the throttle/shifter during the time the lower unit is off. It sucks when you reinstall the lower and realize the throttle isn't in the neutral position
 You will need to line up the bolts, drive shaft and shift shaft during reinstallation. I found it most difficult to keep pressure on the lower unit and spin the flywheel at the same time to align the drive shaft. Maybe someone has trick on how to align them a different way, or just get a buddy to help you. Good luck
You shouldn't have exhaust coming out of the telltale, if that is what you meant. No, or very little, water will come out of the telltale until the engine heats up and the T stats open up.
I would plan to replace the T stats and pump at the same time. When you pull the old impeller, check to make sure it is whole and not missing pieces. If you are missing pieces, they could cause blockage in the cooling system. Make sure you spin the impeller counter-clockwise into the housing. Also, don't loose your keyway that the impeller locks into. Don't move the throttle/shifter during the time the lower unit is off. It sucks when you reinstall the lower and realize the throttle isn't in the neutral positionYou will need to line up the bolts, drive shaft and shift shaft during reinstallation. I found it most difficult to keep pressure on the lower unit and spin the flywheel at the same time to align the drive shaft. Maybe someone has trick on how to align them a different way, or just get a buddy to help you. Good luck

wait a minute, this motor has a thermostat? i thought they should pump water immediately, how long does it need to run before it should start pissing from the tell tale? my other outboards were both jonsons and they started pumping out the tell tale seconds after starting
Ramifications
Well-known member
Yes, you should have two T-stats- one in the top of each head. If you follow the hose from the telltale it should go to T-stats.
Here is a link to a 98 200 EFI... Not sure if it is the right model, since I don't know your serial number.
http://www.crowleymarine.com/mercury-outboard/parts/1679_140.cfm
Here is a link to a youtube video on replacing the water pump/impeller
It is not the same engine, but you get the idea...
http://www.youtube.com/watch?v=BiQNhFYFvdQ
Also, if you have a pitot style speedo that attaches to the lower unit, disconnect it prior to unbolting the lower.
Yes, you should have two T-stats- one in the top of each head. If you follow the hose from the telltale it should go to T-stats.
Here is a link to a 98 200 EFI... Not sure if it is the right model, since I don't know your serial number.
http://www.crowleymarine.com/mercury-outboard/parts/1679_140.cfm
Here is a link to a youtube video on replacing the water pump/impeller
It is not the same engine, but you get the idea...
http://www.youtube.com/watch?v=BiQNhFYFvdQ
Also, if you have a pitot style speedo that attaches to the lower unit, disconnect it prior to unbolting the lower.
wow i had no idea, well i think tonight after work i will pull the cowl and use a temp gun to keep an eye on the head temp and let it run for a bit to see if they open and the water starts flowing. any idea how long it will have to run? im assuming it will reach 145 degrees pretty quick right? i was only letting it run for 30 seconds at a time looking for water to pump. when i didnt see it i shut it down. i guess my night is planned out for me then lol
Ramifications
Well-known member
wow i had no idea, well i think tonight after work i will pull the cowl and use a temp gun to keep an eye on the head temp and let it run for a bit to see if they open and the water starts flowing. any idea how long it will have to run? im assuming it will reach 145 degrees pretty quick right? i was only letting it run for 30 seconds at a time looking for water to pump. when i didnt see it i shut it down. i guess my night is planned out for me then lol
You should be fine to run it for a minute or two and see if it starts to spit out some water. I would first test your overheat alarm. I forget the wire color for certain(pink I think), but just ground it out and if the alarm sounds, you're good to go. Be sure to turn the key to the "on" position before testing. If the alarm sounds while running, shut it down

well im pleased to announce that after about a minute and a half it started to flow as it should. the temp at the head when it started to flow was 146 degrees. i ran it for 10 minutes and it never passed 155. so i guess all is well. im still going to replace the impeller and the stats. thanks for the help


