-
Welcome to the Checkmate Community Forums forums.
» Interact with over 10,000 Checkmate Fanatics from around the world!
You are currently viewing our boards as a guest which gives you limited access to view most discussions, articles and access to our other FREE features.
By joining our free community you will be able to:
» Post topics and messages
» Post and view photos
» Communicate privately with other members
» Access our extensive gallery of old Checkmate brochures located in our Media Gallery
» Browse the various pictures in our Checkmate photo gallery
Registration is fast, simple and absolutely free so please, join our community today!
If you have any problems with the registration process or your account login, please contact support by clicking here or by using the"contact us" link at the bottom of the page.
You are using an out of date browser. It may not display this or other websites correctly.
You should upgrade or use an alternative browser.
You should upgrade or use an alternative browser.
1978 Convincer restoration
- Thread starter 23outlaw
- Start date
BADBK
Well-known member
Thanks BADBK, I have been trying to justify buying your Starflite but, for now I just need to focus on getting this one done first. By the way, I really like that bright red color on your new boat. Your Starflite would look great painted like that too.
Totally understand... too many fires burning ain't a good thing. Got plenty of interest, local and away, just no money yet

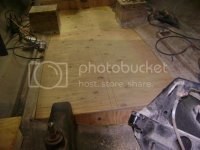
I ordered some fiberglass matt and woven roving from Mike at Checkmate last week. We have cut out the old stringer, replaced it with a new one and glassed it in. The foam floatation was all removed and replaced with new. All the wood for the floor was glassed on the under side to seal it.
I will be glassing in the top of the floor and bulk heads tomorrow and will post pictures of the finished floor then.
What did you manufacture your stinger out of ? When you say you glassed it, what do you mean?You also said you glassed the underside of the flooring... what did you use of that?
23outlaw
Active member
I used a 2x6 for the stringer, just like the factory had in there originally. We removed the old one and prepped the surface area where the stringer was mounted. Next we encased the entire new stringer in fiberglass mat, then we used woven roving and epoxy bonding adhesive to attach the new stinger to the hull. The floor was encased in fiberglass mat on both the top and the bottom side and attached to the hull and new stringer with woven roving.
Kurtster
Well-known member
Little by little I am reading all the great threads on restoration. I wish I had started yours before I started my boat. Great job, thanks for all the good information.
This has been oe of my favorite resto threads --- keeping up with Outlaws updates has been a lot of fun and his well detailed informations have been invaluable.
I'm actually doing a very simple resto on my mate this winter and I am taking some hints and ideas from Outlaws experiences in this thread.
OK, all that said ------
Outlaw, where are the interior pics

23outlaw
Active member
I have finally been able to get some photos of the interior as it progresses along. The bases for the seats are all finished and rather than cover them in vinyl like the factory did I decided to carpet them since the seat bases for the bucket seats were carpeted. The vinyl cushions, the bucket seats and the pieces that fit under the dashes should be finished in 3 weeks.

New bulkhead for the bow.
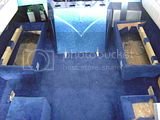
Rear seat bases.
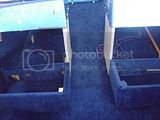
bow seat bases.

New bulkhead for the bow.

Rear seat bases.

bow seat bases.
23outlaw
Active member
As I said before, the flame arrestor and the exhaust elbows on the new engine were too tall to fit under the stock motor lid. I wanted to maintain the stock looking lid with out adding a scoop or some other thing to gain the clearance. Here is what we came up with, I had a guy bend some aluminum, polish it out to match all the other chrome and polished pieces on the boat, and then attach it to the lower edge of the stock motor lid.
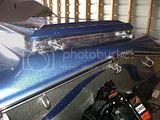
This gives me the clearance I needed but, I am not sure I like the look..
not sure what else I could do to achieve a somewhat stock look.
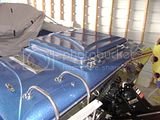
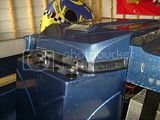
I will need to add some sort of a pin stripe tape or something to conceal the edge between the fiberglass lid and the aluminum.
I would like to get some opinions on how this looks....

This gives me the clearance I needed but, I am not sure I like the look..
not sure what else I could do to achieve a somewhat stock look.


I will need to add some sort of a pin stripe tape or something to conceal the edge between the fiberglass lid and the aluminum.
I would like to get some opinions on how this looks....
Kurtster
Well-known member
I will need to add some sort of a pin stripe tape or something to conceal the edge between the fiberglass lid and the aluminum.
I would like to get some opinions on how this looks....[/QUOTE]
Personally I think it looks great, however what I think and what other opnions are should not be your decision maker, especially regarding this project and with someone as talented as you ---- make it the way it looks and feels good to you.
As far as concealing the edge ---- yes a stripe tape or something like that would work, although very often when a tape product is used for "edge" dressing it sometimes becomes frayed along the seam edge.
How about a tip and roll boarder of a nice imron or awlgrip using a edge dressing color like silver or dark blue or black.
In anycase, your doing a great job that you should be very proud of

23outlaw
Active member
Thanks Kurster, I appreciate the compliments on my boat. I think I am going to try a chrome tape stripe to conceal the transition edge from the fiberglass to the aluminum. I will post a photo when I get it installed.
I am happy with how this project has turned out. As soon as I get the interior in I would like to try for BOTM !
I am happy with how this project has turned out. As soon as I get the interior in I would like to try for BOTM !

