• Welcome to the Checkmate Community Forums forums.

    You are currently viewing our boards as a guest which gives you limited access to view most discussions, articles and access to our other FREE features.
    By joining our free community you will be able to:

    » Interact with over 10,000 Checkmate Fanatics from around the world!
    » Post topics and messages
    » Post and view photos
    » Communicate privately with other members
    » Access our extensive gallery of old Checkmate brochures located in our Media Gallery
    » Browse the various pictures in our Checkmate photo gallery

    Registration is fast, simple and absolutely free so please, join our community today!

    If you have any problems with the registration process or your account login, please contact support by clicking here or by using the"contact us" link at the bottom of the page.

1986 Starflite restoration

caliburn

Active member
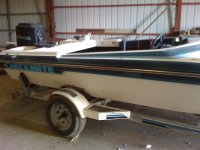
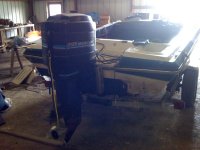
Hello all, I was asked to create this thread as this is my first restoration of a lovely boat, well soon to be any ways, the photos are a week old and I have been pretty busy with her, all the carpet is now gone everything is off the boat and believe me she has gave me hell, from half the nuts on the windshield bolts that were rusted out to peeling back some of the fiberglass that was cracked in places, the majority of the wood backing for the seats were rotted out so I made new ones and for the bench, however the seat coverings are in ok shape so to save some money this year I will put them back on for the up coming season, the side windshield was broken that was a job to remove the glass, I will have a new one next week, My plans are to repaint her in a white pearl with blue pearl, i need to ask does anyone know about Tamcos Premier Series clear coat its supposed to be like Imron, I have never painted something this size so this will be hopefully a good learning experience for me.
I sanded her down almost completely today and I will take more photos tomorrow for everyone, I wanted to keep the rub rail, a small section in the aft was dmg. so I removed it and that was a joke the rail is screwed down to the hull and with those crazy rivets/butterfly bolts that the wings only broke when I tried to compress them, so the only way I could remove them were to drill them out and to break piece by piece the insert out of the rail.:brickwall:
IMG_0230.jpg

IMG_0231.jpg

IMG_0232.jpg
 
What a great project! I have an '89 that I am taking it slowly on, This year is a new interior and some steering- set back mods, next year is paint and engine. These are sexxxy azz boats! Let us know how the clear coat works out! The previious guy painted over the gelcoat with some not so gorgeous paint and I believe instead of spraying it, he masked it off for a duplication of the original red-white-blue graphics, and then used a broom to paint it.

I am going to clear coat it when painted, so I very interested in how your Tacmos Premier Clear works out!
 
Yes it looks like a good project, one day I would like to do a complete resto, ifs fun to watch them all come together.

When your ready to get new interior covers the CM factory stuff is top notch, I ordered them last year for mine and cut my own wood for any of it that was rotten, the price for covers for yours is around $900

Very good quality stuff and all you have to do is staple it on, here's how mine turned out.

207804_10150143396582060_593712059_6976542_6665830_n.jpg


I will admit that when I opened up the box it was a little intimidating though, but I had the bow area to deal with as well.

181700_490786977059_593712059_6565657_1478757_n.jpg
 
You did a great job! Hope you remembered the STAINLESS staples! The guy that owned mine previous apparently didn't know that we now make stainless staples, and pulled out his office stapler or something...yuck!
 
You did a great job! Hope you remembered the STAINLESS staples! The guy that owned mine previous apparently didn't know that we now make stainless staples, and pulled out his office stapler or something...yuck!

Thanks and yes I used stainless staples, I bought them 3 months before the covers got here, lol.
 
What a great project! I have an '89 that I am taking it slowly on, This year is a new interior and some steering- set back mods, next year is paint and engine. These are sexxxy azz boats! Let us know how the clear coat works out! The previious guy painted over the gelcoat with some not so gorgeous paint and I believe instead of spraying it, he masked it off for a duplication of the original red-white-blue graphics, and then used a broom to paint it.

I am going to clear coat it when painted, so I very interested in how your Tacmos Premier Clear works out!

I will, I did not have time to take more photos of her today but will tomorrow and thanks for the support. Oh and I will not be painting with a broom :bigthumb: 
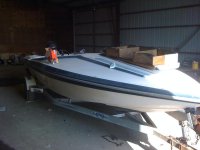
LOL only the biggest compressor and professional gun
 
Yes it looks like a good project, one day I would like to do a complete resto, ifs fun to watch them all come together.

When your ready to get new interior covers the CM factory stuff is top notch, I ordered them last year for mine and cut my own wood for any of it that was rotten, the price for covers for yours is around $900

Very good quality stuff and all you have to do is staple it on, here's how mine turned out.

207804_10150143396582060_593712059_6976542_6665830_n.jpg


I will admit that when I opened up the box it was a little intimidating though, but I had the bow area to deal with as well.

181700_490786977059_593712059_6565657_1478757_n.jpg

Mine are in ok shape no rip's but they are marked up in places so maybe next year, since I am doing everything else.
 
You did a great job! Hope you remembered the STAINLESS staples! The guy that owned mine previous apparently didn't know that we now make stainless staples, and pulled out his office stapler or something...yuck!

Lol I thought about using the old trusty tack hammer, NOT , thanks for the tip I will go out and pick a box of them up for mine.:cheers:
 
hear are todays photos and a shot of the new carpet that will go in last, and its some real nice carpet.:surf:
IMG_0234.jpg

IMG_0237.jpg

IMG_0236.jpg
 
Caliburn looking at you pictures why not clearcoat the colors and buff out the white gelcoat? That would save you alot of money/:D To answer your question on sippyrat's thread, I used Nason Urethene paint. Here's the list of my paint all 2 stage:

Nason Primer 421-19
Nason activator 483-87

REDUCER- 2 needed
(Omni)
MR-186G

LACQUER THINNER- 1 gallon needed
(lowes or home depot)

BASE COATS

WA-8555 Black
WA-8554 White
WA-8774 Red

Activator
483-30

CLEAR COAT-
Nason Clear 498-00
Nason Activator 483-78

well I thought of that but there were alot of dings and gouges that I bondo-glassed and sanded down and those areas are now grey,granted they are only a inch spots hear and there but if I cleared her now I would have those grey spots I dont think even touch up paint and sanding would turn out right, but I am up for anything,and the missing bump rail insert is a problem looked high and low for it , and now I have the bottom to contend with they had anti-fowling paint on her, so the only thing I can think of doing to that is it will have new anti fowling paint there, if you have any sudjestions, and yes the Nason products are at the front of the list, I just wanted to find out about the auto acrylics and what difference they are to Nason and thank you again for the help.
 
Last edited:
Today I removed the bump rail and insert and I must say that was a job in it self, I have been beefing up the inside flooring hear and there the past few days, also took the broken side windshield down to have a new one cut and it should be ready in a few days.
I started the repair on the fender that was broke got the first layer of fiberglass done.
I ordered the new bump rail and insert and my primer and paints have started to arrive, One thing I want to do since this will be a custom paint job done myself is gosting blue flames on her, but any way sorry no pics today.:eyecrazy:
 
I have a paint booth in the back of the shop that was used for storage, well I just cleaned it out and was wondering what is the best method on jacking a my boat up and can I hang the boat to paint under her, is this even possible?
 
I have a paint booth in the back of the shop that was used for storage, well I just cleaned it out and was wondering what is the best method on jacking a my boat up and can I hang the boat to paint under her, is this even possible?

You can use the tie down eyes and the bow eye to hang the boat. However I won't go underneath it without some type of support just in case something broke. What not flip it, would be much easier to paint.
 
You can use the tie down eyes and the bow eye to hang the boat. However I won't go underneath it without some type of support just in case something broke. What not flip it, would be much easier to paint.

I just want to say thank you and to everyone that has helped me in this venture.
 
If you are going to hang it, do you have the ability to hang it about 7-8' off the ground? If so, you could lower one side to expose the bottom without going under the boat.
Good call Spencer!

As small as the boat is, 4 guys can flip it. Or 2 guys with a couple straps, a tree, and a truck! 2 straps under the boat and around the tree, 2 over top of the boat and to the truck. As you move the truck forward, it will roll the boat up and stop when it is balanced on its side. From there, 2 guys to finish the flip and set it down easy. Doing it in the yard will keep it from getting scratched all up or damaged. Having flipped every boat I have painted, this is the easiest way to paint it. Once you do it, you will realize how easy it is to flip :thumb:
 
Back
Top