-
Welcome to the Checkmate Community Forums forums.
» Interact with over 10,000 Checkmate Fanatics from around the world!
You are currently viewing our boards as a guest which gives you limited access to view most discussions, articles and access to our other FREE features.
By joining our free community you will be able to:
» Post topics and messages
» Post and view photos
» Communicate privately with other members
» Access our extensive gallery of old Checkmate brochures located in our Media Gallery
» Browse the various pictures in our Checkmate photo gallery
Registration is fast, simple and absolutely free so please, join our community today!
If you have any problems with the registration process or your account login, please contact support by clicking here or by using the"contact us" link at the bottom of the page.
You are using an out of date browser. It may not display this or other websites correctly.
You should upgrade or use an alternative browser.
You should upgrade or use an alternative browser.
2800SX Outboard Restoration Begins!!!
- Thread starter JUPITER PULSARE
- Start date
JUPITER PULSARE
Well-known member
Quick update: I bought two new style trim pumps with the clear tanks along with the Mercury slide brackets. They will be installed next weekend once I figure out if I'm able to through-bolt them into the glassed in panel that runs along the bilge sides.(gonna need some skinny long arms to reach the nuts!!) The prior owner had them screwed in with wood screws. I picked up my tie bar from the machine shop (had to have it cut down for 18" propshaft centers) and bolted it on the wingplates. I also ran my trim pump hyd. lines from the clamps, through the transom rigging ports to the bilge. I removed the trim solenoids from both motors as the solenoids will be relocated to the trim pumps. I have next weekend off and should get the boat ready for the water. Here's what's left to do:
1) lift the starboard powerhead to replace the studs with longer studs.
2) install both trim pumps/hoses. Run power and bleed system.
3) replace water pump/impellor on starboard motor.
4) change gear oil on both lowers.
5) run new fuel lines to both motors.
6) install fuel pump on starboard motor.
7) bleed steering system.
8) install both batteries and fire up the motors.
7) reinspect all nuts/bolts/hoses/systems/etc.
8) SPLASH!!!!
DropTop5.0
Well-known member
You're going to be a busy guy. Cant wait to see it splashed.
JUPITER PULSARE
Well-known member
I finally get a saturday off to work on the boat and it rains all freaking day!!
 The only thing I got accomplished yesterday was through bolting and mounting my trim pump slide brackets and I swapped out all the motor mounting hardware for brand new stainless bolts, AN washers & locknuts..one of the old bolts had to hack sawed off because the lock nut jammed..space under the Gil bracket was tight and I was on my back for two hours with a hack saw!!!!
 That sucked!! Oh well...tomorrows another day..I hope it stays dry so I can get some work accomplished!!
The only thing I got accomplished yesterday was through bolting and mounting my trim pump slide brackets and I swapped out all the motor mounting hardware for brand new stainless bolts, AN washers & locknuts..one of the old bolts had to hack sawed off because the lock nut jammed..space under the Gil bracket was tight and I was on my back for two hours with a hack saw!!!! That sucked!! Oh well...tomorrows another day..I hope it stays dry so I can get some work accomplished!!JUPITER PULSARE
Well-known member
Another frustrating day...found out the the trim pump fittings are slightly different when swapping the old style pumps to the newer style pumps and trying to connect the hoses....not to mention that the two newer style pumps I acquired are also slightly different..one has nipples inside the openings where you insert the fittings, the other does not??? Moved on to other projects...changed the gear oil in each lower, reattached the transom mounted sender for the depth finder, flipped one of my slide brackets due to the threads being stripped that lock down the trim pump! (again reaching my arms into impossible positions and squeezing into tight spaces)..I'm getting way to old for this!
...found out the the trim pump fittings are slightly different when swapping the old style pumps to the newer style pumps and trying to connect the hoses....not to mention that the two newer style pumps I acquired are also slightly different..one has nipples inside the openings where you insert the fittings, the other does not??? Moved on to other projects...changed the gear oil in each lower, reattached the transom mounted sender for the depth finder, flipped one of my slide brackets due to the threads being stripped that lock down the trim pump! (again reaching my arms into impossible positions and squeezing into tight spaces)..I'm getting way to old for this!paulsboats
Well-known member
What happend to the days when the neighborhood kid would show up interested in boats,cars ect.And would be more than happy to lend a hand!I know i used too!oh ya they didnt have computers and computer games back then!Another frustrating day

Ramifications
Well-known member
Agreed. Although they had computers and video games when I was growing up, I would rather be outside wrenching or hammering on something since I never really got into either one of the other options. Usually doing more harm than good at that time, but I was out there.
I hear your frustrations- Good luck Jup!
I hear your frustrations- Good luck Jup!
Another frustrating day
Now this is a useful post. Glad to see someone pointing out the things that can be encountered when doing these kind of jobs. Gives the complete story of working on a boat, not just the sugar-coated parts.
JUPITER PULSARE
Well-known member
Now this is a useful post. Glad to see someone pointing out the things that can be encountered when doing these kind of jobs. Gives the complete story of working on a boat, not just the sugar-coated parts.
JSmitty, there are so many little projects that wind up being so time consuming when you least expect it...stupid things like rusted or stripped nuts and bolts, chasing down elusive parts, waiting on ordered items, not having the right size bolt/stud/nut/washer to finish the job correctly (and running back to the marine store for the correct item...over and over again), waiting on glasswork/gelcoate to dry, sanding, buffing, etc. etc. The list is endless! I've redone so many boats in my life that I should know better and I always say "This is the last time!" I know my frustrations will disappear the first time I nail the throttles and hear both outboards screaming!!! Once I get this old Checkmate up to my standards and on the water, the only thing left to do will be to build some potent 2.5 fishing motors to replace the 2.4 200's....and then I can say I've finished the "last one"!!!
 I did get motivated enough yesterday to change the lower unit gear lube with some Merc High Performance gear Lube!! One less item crossed off my list!!
JUPITER PULSARE
Well-known member
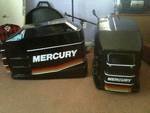
Just ordered two brand new Eagle One Performance 260 style cowls for the 2800 . They should arrive the end of the week!!
http://eagleoneperformance.com/
. They should arrive the end of the week!!http://eagleoneperformance.com/
T
TheNerd
Guest
Jupe, you know we all like pics, lots of pics.
JUPITER PULSARE
Well-known member
JUPITER PULSARE
Well-known member
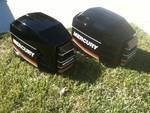
Just a quick update: with the help of my buddies forklift I got the hardest work done yesterday after a long hiatus! I finally pulled the starboard powerhead to replace the studs with longer studs and installed all new stainless steel nuts and washers. I also needed to pull the powerhead to install the bungee hardware for the new motor cowls (they are very close at 18" centers) and installed both new 260 style motor cowls. My trim pumps are now wired up and installed. I also had the tops of my Eddie Marine battery boxes stripped, sprayed red and ceramic coated! The list is getting shorter....here's whats left:
1) run power to the trim pumps
2) fill and bleed the trim pumps
3) run new fuel lines to the motors
4) mount fuel pump on starboard motor
5) fill and bleed the hyd. steering
6) replace the starboard water pump and impellor
7) attach the shift cables, throttle cables, motor harnesses, etc. to each powerhead.
8) install batterys
It looks like I'm down to 1 more day of work before the beast will see life for the first time in years!!!
! I finally pulled the starboard powerhead to replace the studs with longer studs and installed all new stainless steel nuts and washers. I also needed to pull the powerhead to install the bungee hardware for the new motor cowls (they are very close at 18" centers) and installed both new 260 style motor cowls. My trim pumps are now wired up and installed. I also had the tops of my Eddie Marine battery boxes stripped, sprayed red and ceramic coated! The list is getting shorter....here's whats left:1) run power to the trim pumps
2) fill and bleed the trim pumps
3) run new fuel lines to the motors
4) mount fuel pump on starboard motor
5) fill and bleed the hyd. steering
6) replace the starboard water pump and impellor
7) attach the shift cables, throttle cables, motor harnesses, etc. to each powerhead.
8) install batterys
It looks like I'm down to 1 more day of work before the beast will see life for the first time in years!!!
fnshrmaster
Member
I have been following this thread. Looking forward to seeing the on the water pics! I love that hull, makes me want the old 251 I had! Have fun with it, a keeper for sure!Just a quick update: with the help of my buddies forklift I got the hardest work done yesterday after a long hiatus
1) run power to the trim pumps
2) fill and bleed the trim pumps
3) run new fuel lines to the motors
4) mount fuel pump on starboard motor
5) fill and bleed the hyd. steering
6) replace the starboard water pump and impellor
7) attach the shift cables, throttle cables, motor harnesses, etc. to each powerhead.
8) install batterys
It looks like I'm down to 1 more day of work before the beast will see life for the first time in years!!!

hotdaddy27
Well-known member
I have been following this thread. Looking forward to seeing the on the water pics! I love that hull, makes me want the old 251 I had! Have fun with it, a keeper for sure!
Holly Signature!!!!
kct11
Well-known member
Holly Signature!!!!
Where is coop to take care of that?