• Welcome to the Checkmate Community Forums forums.

    You are currently viewing our boards as a guest which gives you limited access to view most discussions, articles and access to our other FREE features.
    By joining our free community you will be able to:

    » Interact with over 10,000 Checkmate Fanatics from around the world!
    » Post topics and messages
    » Post and view photos
    » Communicate privately with other members
    » Access our extensive gallery of old Checkmate brochures located in our Media Gallery
    » Browse the various pictures in our Checkmate photo gallery

    Registration is fast, simple and absolutely free so please, join our community today!

    If you have any problems with the registration process or your account login, please contact support by clicking here or by using the"contact us" link at the bottom of the page.

Diary of a Preditor Restoration

Chris E

Well-known member
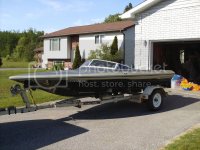
Well, i've gone and done it now, here is my the first boat i have ever owned - what the hell am i thinking? 1979 predictor in very rough shape - good thing there are a ton of experts in the restortation department. so i figured, that i would basically start at the begining and see where this ends up. this will be kind of neat, as no one is going to no what happens next or how this will turn out - i'd like to think i had a clue as to what i am doing, but i'm not getting my hopes up.

picked it up today in barrie, got it home without incident and got the boat set up on the trailer properly.

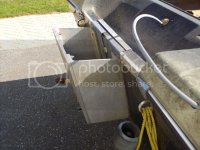
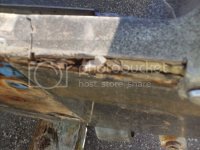
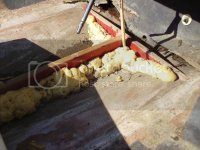
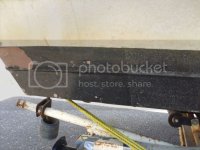
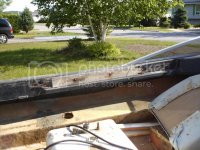
took the set back plate off, - it's for sale if anyone wants it, and shock of shocks, the transom is rotten - funny i did lean on this thing pretty hard, guess i'm not as much of a fat ass as i thought! as you can see in the pictures the previous owner figured that spray foam is the be all and end all of boat fabrication, so that's the first thing to go, the stringer is leaving and and a plywood stringer will be fabricated in it's place - everything will be plywood - i just think it's stronger. the engine of choice will be a 150, however that is a long way away.

the time budget is 2 years (my garage isn't heated and i hate wiping snow off vehicles in the winter) the boat will get wrapped for the winter.

my financial budget is restained by wifes patience and by how badly she wants me out of the house.

lots of questions will be coming, and am looking forward to getting this boat ship shape - if it doesn't kill me first!
:cheers

another first, bought a digitial camara yesterday, so this is also my first experiance with photobucket - either it will work or it won't.

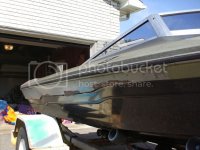
starboard side
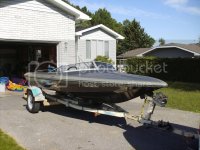
HPIM0031.jpg

port side


HPIM0030.jpg

set back plate - for sale


HPIM0034.jpg

rotten transom - shocking!

HPIM0046.jpg

spray foam crazy!

HPIM0037.jpg

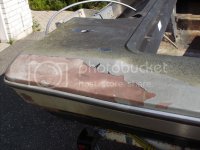
body work that needs to be done


HPIM0041.jpg

HPIM0033.jpg

HPIM0032.jpg

HPIM0035.jpg


where to start? i'm thinking the deck has to leave the hull so the transom can be repaired - lot of water when you start pressing on it. also, those boxes, on either side of the transom - do they serve any purpose, if not there gone to. i'd like to get the hardware stripped this week, any wiring removed, and the windshield off - i'm so opomistic!
 
Yes, take the deck off, things will be so much easier. The boxes are air tanks. They hold the foam that is supposed to keep the boat in a level position submerged. Get rid of the wood and foam that they were working on installing.

It looks like its had some paint work done at one time. You'll want to strip that, either with a chemical stripper or a power sander. Or you could even talk a sandblasting guy into quickly going over the boat. Lightly!!

Checkmate has the patterns for the interior wood, and vinyl, all but the side panels. Since the side panels changed for the later Predictor.


If there is plenty of rot in the transom then things should go fairly well when you tear it out.
 
Congrats on the new project Chris E! Looks like it should keep you busy for a while. Did it come with any seats? What color are you going to paint it? This should turn into another very interesting thread.

How much for the transom bracket? Do you know how much setback it is? Im looing for a good used one. Would the transom saver be included? Thanks
Geoff
 
Pictures can be made smaller by changing the setting on the camera.
The fun part about this project is you can doing anything you want. Factory, or not. When you get ready for the interior shoot me a note. Found a place that can do just about anything for a lot less than the local shot as far as seats go.
Bring it on.
 
Holely Molely Dang what a mess That is one lucky Mate
This should be verrrrrry interesting.

Keep the pics coming Chris E :thumb:
 
Question on Stringer/Floor Replacement

Yes, take the deck off, things will be so much easier. The boxes are air tanks. They hold the foam that is supposed to keep the boat in a level position submerged. Get rid of the wood and foam that they were working on installing.

It looks like its had some paint work done at one time. You'll want to strip that, either with a chemical stripper or a power sander. Or you could even talk a sandblasting guy into quickly going over the boat. Lightly!!

Checkmate has the patterns for the interior wood, and vinyl, all but the side panels. Since the side panels changed for the later Predictor.


If there is plenty of rot in the transom then things should go fairly well when you tear it out.

Coop,

After you take the deck off, do you need to brace the hull while replacing the stringers and floor? In other words, will the hull shift without being braced and prevent the deck from fitting after stringer and floor replacement? Can this work be done on the trailer or do recommend something else? Thanks. Newbie here looking for answers before attempting my own work. Rick
I would recomend either work on it on a bunk trailer that fits the boat. Or on a cart that was made for it to sit on. If nothing else sit the boat on the floor and chock the sides so that it is level.

The floor will most likely remain stable, its the sides that might "pucker" a little. These can be pushed back out when you go to set the deck back on.

You can also find that the nose of the boat might stick out farther now. There is usually a "pull block" or something still in the nose area. If not you can glass one in. If you attach an eyebolt to it, and one to the transom you can use a "come along" or other device to make the hull "shorten" up slightly so that you can get a deck back on.
 
My Dad told me that they used to bury the old wood boats in sand to do stringer & deck work.

Of course they didn't have the upper deck but it would still work.

Sand was plentiful also.

Need a sand box?
 
My Dad told me that they used to bury the old wood boats in sand to do stringer & deck work.

Of course they didn't have the upper deck but it would still work.

Sand was plentiful also.

Need a sand box?
Actually, THAT is a really good idea, the sand would almost be like setting the boat back down in the mold.

I'm going to write that one down on a list of stuff I have.
 
cooperider I'm glad you liked that .Those Oldtimers were pretty slick & resourseful

Plus all the things I've picked up from your posts & threads ,you liking that
tickled the .... out of me
 
well, haven't got much done since sunday afternoon, was able to remove the steering - which was a real treat - had to take the hole rack apart to get the cable out of the little hole they put it through on the transom. thank you to my wife for buying me a compressor a couple of years ago! got the windshield off, cut all the old bolts for the side bolsters out, removed what was left of the gauges and switches, started removing the rub rail and gunnel molding until i killed both batteries in the cordless drill.

hopefully by friday i'll have the deck ready to remove from the hull and i can con some suckers into helping me remove it on the weekend. thankfully i am a hop, skip and a stumble from the beer store :cheers
 
ok, spent the day drilling rivets, and am just about ready to pull the deck, only question is, this thing is sitting on a roller trailer, that i spent a couple of hours setting up last week (meaning that it now sits on the rollers, unlike the first pics) think it'll be ok or should i roll it onto the floor of the garage and support it as coop suggested?
 
I'd say listen to that experience. It'll also be alot easier to get in & out of.

Those rollers are alot less support than the bunks more pressure in smaller area.

Chris E looks better in yellow :D
 
I'd say listen to that experience. It'll also be alot easier to get in & out of.

Those rollers are alot less support than the bunks more pressure in smaller area.

Chris E looks better in yellow :D

that yellow took a long time coming - there is a long and sordid story that goes with that - for another day! :brickwall:

i figured it would need to come off that trailer - i don't work smart - i work lazy! - that'll be tonights project - then i can split the hull - actually it'll make a bit more room in the garage - i hate single car garages!
 
got the boat off the trailer last night (my wife helped me - love freaking her out when doing this stuff - she was sure the boat was going to go through the back of the garage - tonites mission is to block the sides to make sure the hull doesn't shift or move on me as coop suggested. the deck is ready to come off now.
 
I know it's like I married my mom.well sorta. I hope she doesn't read this. :(

You should have told her to get the water hose & fill the shop .
No really Chris E you should be ashamed of yourself hacking on your better half like that.

Now I'm covered.

Roll on :thumb:
 
Back
Top