
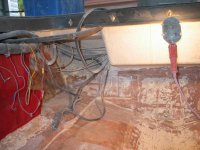
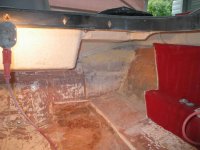
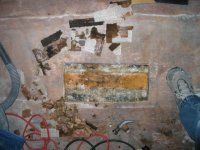
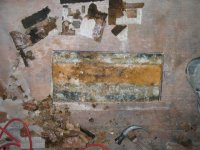
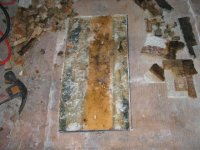
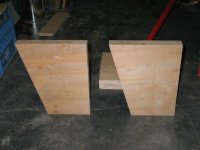
Here are some pictures after the flotation boxes was removed and cleaned up. I've got a few more items to take care of and waiting on the supplies from Merton's. Then I can start the process of rebuilding the knee braces, stringers and then the floor. Since I've got a 200 Merc hanging off the back, I'm going to beef up the knee braces and add more support to the transom.
-
Welcome to the Checkmate Community Forums forums.
» Interact with over 10,000 Checkmate Fanatics from around the world!
You are currently viewing our boards as a guest which gives you limited access to view most discussions, articles and access to our other FREE features.
By joining our free community you will be able to:
» Post topics and messages
» Post and view photos
» Communicate privately with other members
» Access our extensive gallery of old Checkmate brochures located in our Media Gallery
» Browse the various pictures in our Checkmate photo gallery
Registration is fast, simple and absolutely free so please, join our community today!
If you have any problems with the registration process or your account login, please contact support by clicking here or by using the"contact us" link at the bottom of the page.
You are using an out of date browser. It may not display this or other websites correctly.
You should upgrade or use an alternative browser.
You should upgrade or use an alternative browser.
Pulse170 Floor Restoration
- Thread starter Rob B
- Start date
- Status
- Not open for further replies.
Looks good back there now! Mine is 4 years older than yours. I'm afraid to start poking around at this point. Everything looks perfect inside the back end of my boat, but yours probably did too. Thanks for taking the time and effort to document all this work. When you get it all done, you may get a few people wanting you to re-do theirs too!
Mark
Well-known member
Hey CM
Nice job so far.
I am a bit surprised that such a late model boat has so much rot. Checkmate needs to step up the engineering on the floors and stringers. The hull and coring are rarely a problem and are very well done.
There was no way the boat was stored inside...maybe in the winter. It is the rain that destroys these things. The owner leaves them out in the rain and the water creeps through screw and staple holes and rots the strings and floors from the inside out.
The splash well is usually not the problem. The water comes in the boot and runs straight into the starboard flotation box where it has no way to get out. Was the starboard box worse than the port side box? Anyway, I would avoid replacing them the same way.
What I did in my resto was build 3 watertight compartments in the floor and did not replace any foam or the ugly ski locker. Here's the link http://checkmate-boats.com/forums/showthread.php?t=4539&highlight=reborn
Hey CM
Nice job so far.
I am a bit surprised that such a late model boat has so much rot. Checkmate needs to step up the engineering on the floors and stringers. The hull and coring are rarely a problem and are very well done.
There was no way the boat was stored inside...maybe in the winter. It is the rain that destroys these things. The owner leaves them out in the rain and the water creeps through screw and staple holes and rots the strings and floors from the inside out.
The splash well is usually not the problem. The water comes in the boot and runs straight into the starboard flotation box where it has no way to get out. Was the starboard box worse than the port side box? Anyway, I would avoid replacing them the same way.
What I did in my resto was build 3 watertight compartments in the floor and did not replace any foam or the ugly ski locker. Here's the link http://checkmate-boats.com/forums/showthread.php?t=4539&highlight=reborn
Mark the starboard side was worse. The foam held alot of water and I wasn't going to replace either flotation box after I seen all the water. I've also decided not to replace the ski locker, that's where alot of the rot was at. I'm still amazed at the engineering quality of the boat. Some parts stringers didn't have any glass at all. I've actually looked at your resto and have taken a few pointers from it. Great job you did.

Looks good back there now! Mine is 4 years older than yours. I'm afraid to start poking around at this point. Everything looks perfect inside the back end of my boat, but yours probably did too. Thanks for taking the time and effort to document all this work. When you get it all done, you may get a few people wanting you to re-do theirs too!
Thanks JW and you're welcome!!! Just think all this started because of my seat being loose.
 I've got more surpises tearing the floor out than anything else and man it's very time consuming.
I know you can go back together with everything composit instead of wood, but if your boat held up this long as-is, then maybe fiberglassed wood is the way to go? Fiberglassed better than the factory did of course..............
The composite wood wasn't cost effective to me since I couldn't get it locally. I decided to use top grade exterior plywood and encapsulate in mat and fiberglass. Hopefully that will last 20 plus years.
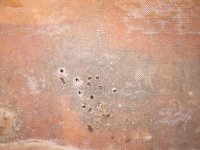
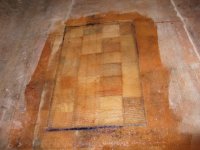
Looking back thru the pictures I forgot to mention about the core underneath the driver and passenger seats. I will be replacing a small portion of the core underneath the drivers side, not sure what I'll do on the passenger side yet. I've got the core on the way along with the other supplies I ordered. What happen I think is when the floor got soft the screws embedded in the core causing a small spot to rot. The first picure is the drivers side and the second is the passengers side.
Attachments
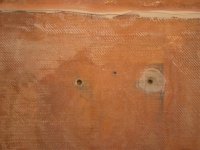
VERY interesting. I'm surprised your floor was soft enough to sink that far down? The floor couldn't have moved that much, that means the screws are too long. I think I'll pull my screws and grind the tips off flat just in case my floor gets a little springy. Crazy.
I was thinking the same thing. I'm not sure how I'll mount those seats yet, but you can be sure this will not happen again. Btw, if you look back in earlier posts you can see the wood was rotten under those seats. Better to catch all this now instead of falling thru the hull later.

You know, I think you're making history here. I think you may very well be the first '90's Checkmate re-build. How does it feel to be 'number 1'?
I think I'm the 2nd guy, Jupiter Pulsare is the first with the 1994 Pulsare.
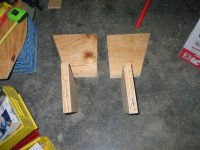
Well guys working 60 hrs a week kind of slows the progress way down. My supplies was delivered last night so I've got everything I need so far. Anyway I've finished most of sanding and got the knee braces cut out.
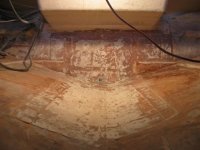
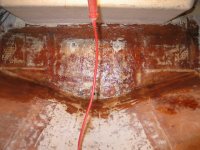
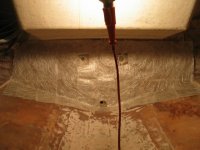
I've epoxied two 3/4" pieces together giving me a nice 1 1/2" knee brace on each side, sorry no pictures at the moment. Then I added mat and resin to the inside of the transom to seal any holes and nicks from the cutting wheel and screws. See pictures.
My supplies was delivered last night so I've got everything I need so far. Anyway I've finished most of sanding and got the knee braces cut out. I've epoxied two 3/4" pieces together giving me a nice 1 1/2" knee brace on each side, sorry no pictures at the moment. Then I added mat and resin to the inside of the transom to seal any holes and nicks from the cutting wheel and screws. See pictures.
Next up will be cutting the rotten core shown in the early pictures out and adding new core, thanks coop for the excellent instructions. Then on to cut and fitting the stringers. Man this is so time consuming....
Attachments
cooperider
Well-known member
You know I started reading this thread, then got distracted with other things, then JW asked if I had seen how bad your boat was. So I came back and got the updates. Wow.
That body filler is everywhere around here, 55 gallon drums of it. Its used to fill the strakes, bond the transom to the hull before the glass over it, to hold the stringers in place so they don't move when things are glassed together. Its also used to bevel many edges that will be glassed, and to fill any gaps between things.
That body filler is everywhere around here, 55 gallon drums of it. Its used to fill the strakes, bond the transom to the hull before the glass over it, to hold the stringers in place so they don't move when things are glassed together. Its also used to bevel many edges that will be glassed, and to fill any gaps between things.
You know I started reading this thread, then got distracted with other things, then JW asked if I had seen how bad your boat was. So I came back and got the updates. Wow.
That body filler is everywhere around here, 55 gallon drums of it. Its used to fill the strakes, bond the transom to the hull before the glass over it, to hold the stringers in place so they don't move when things are glassed together. Its also used to bevel many edges that will be glassed, and to fill any gaps between things.
Coop the body filler makes sense and I kind of figured that's what it's for. Joe @ Merton's told me to use Hull and Deck putty for setting the knees and stringers, also around and under the edge of the floor.
What would be the reason for having the drain hole an 1" to 2" above the bottom of the hull? To me it would have made more sense to have it flush with the bottom so water can exit quickly.
I got the bad section recored today, need one more layer of mat and that will be finished. I had started cutting the knee braces for the transom and decided to add two more where the edge of flotation boxes used to be. I'm not sure if I'll add back that horizontial piece that was under the splashwell yet. Here are some pictures of the new core and knee braces. I haven't installed the knee braces yet, hopefully sometime this week.
Attachments
Old Hickory
Active member
Robbie,
Awsome job I'm very impressed; you're giving me some inspiration
Hick
Awsome job
I'm very impressed; you're giving me some inspirationHick
- Status
- Not open for further replies.