• Welcome to the Checkmate Community Forums forums.

    You are currently viewing our boards as a guest which gives you limited access to view most discussions, articles and access to our other FREE features.
    By joining our free community you will be able to:

    » Interact with over 10,000 Checkmate Fanatics from around the world!
    » Post topics and messages
    » Post and view photos
    » Communicate privately with other members
    » Access our extensive gallery of old Checkmate brochures located in our Media Gallery
    » Browse the various pictures in our Checkmate photo gallery

    Registration is fast, simple and absolutely free so please, join our community today!

    If you have any problems with the registration process or your account login, please contact support by clicking here or by using the"contact us" link at the bottom of the page.

jeff,s enchanter resto

Status
Not open for further replies.
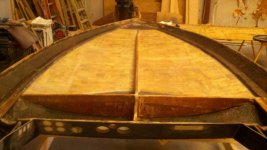
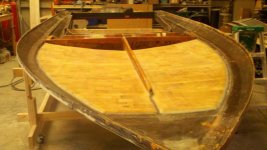
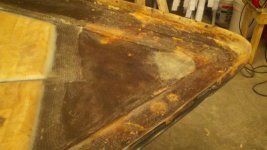
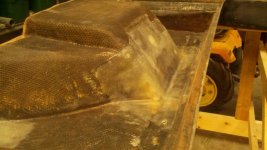
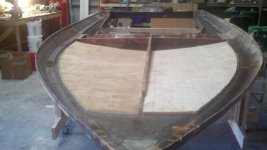
finished the core under the bow this am...I like the look too...think i ll leave it natural...no paint for me....of course just when i thought it was time to flip it back over...i found out why the nose had so much loose woven roven added...it appears some one came in too the dock a little to hard...pics to follow....
 

Attachments

  • deck core 005.jpg
    deck core 005.jpg
    40.2 KB · Views: 43
  • deck core 021.jpg
    deck core 021.jpg
    47.3 KB · Views: 43
  • deck core 018.jpg
    deck core 018.jpg
    48.9 KB · Views: 42
Last edited:
heres the damage from underneath...cant tell from the top...It must have been done professionally...I only found it when i was cleaning up loose roven from the original build....
 

Attachments

  • deck core 019.jpg
    deck core 019.jpg
    46 KB · Views: 59
  • deck core 020.jpg
    deck core 020.jpg
    47.4 KB · Views: 58
  • deck core 029.jpg
    deck core 029.jpg
    38.5 KB · Views: 60
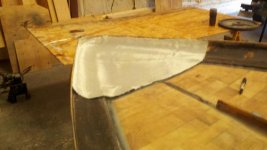
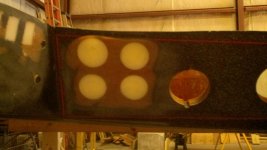
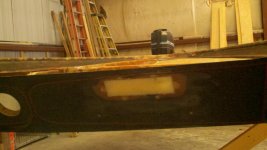
heres more shots of other deck work...Im moving the gauges as they were just thrown about. I pulled the factory's roven of the transom well and reinforced it with 2 layers of 1708....this should keep the flexing and cracking to a minimum...by the way the cost of the deck core alone was 250.00 with epoxy, cloth and balsa...
 

Attachments

  • deck core 022.jpg
    deck core 022.jpg
    40.2 KB · Views: 52
  • deck core 026.jpg
    deck core 026.jpg
    52.3 KB · Views: 49
  • deck core 027.jpg
    deck core 027.jpg
    42.7 KB · Views: 48
Looking good and ouch on the deck . Jeff , Last nite in are conversation i forgot to mention that we are getting hammered by snow just so you could tell your dinner date from Mich the news ....who most likely does not miss the snow at all , and could care less if she ever sees snow again .:lol:
 
Looking good and ouch on the deck . Jeff , Last nite in are conversation i forgot to mention that we are getting hammered by snow just so you could tell your dinner date from Mich the news ....who most likely does not miss the snow at all , and could care less if she ever sees snow again .:lol:

ya...none of us miss that!...were getting hammered by high winds right now...I almost take the snow...almost...

its really a small world....
 
Your boat is turning out great!!! :thumb:Are you gonna add new interior from CM or have a local person do it?

CM?...checkmate?...didnt know i had a option...:D I have new fronts..or newer front seats....I just came in from the shop from cutting new wood for the padded side pieces, the material is like new.....the only thing I really dont like is the boxy wierd looking back seat..:eyecrazy: and would love a different type of windshield...more rounded...or even molded, never look through it any who....

and thanks for the compliment :thumb: Im not sure, had I known the extent of material cost, i would have done this...at first i thought...1500.00...I think im pushing 3000.00...but thats with setack and hydro steering!!!! which in fact is the whole reason i started this resto....it has been way too much fun though...and thats priceless....

I should've typed Checkmate out!!!:D Some of the folks here have ordered their interior from Checkmate which is running around $2000 give or take. How about the gauges? Eddies Marine has some really nice ones!!:thumb: You might able to cut the windshield down some to make the boat sleeker looking.
 
I should've typed Checkmate out!!!:D Some of the folks here have ordered their interior from Checkmate which is running around $2000 give or take. How about the gauges? Eddies Marine has some really nice ones!!:thumb: You might able to cut the windshield down some to make the boat sleeker looking.

I am looking at new gauges, ill check there....I forgot to mention im flipping the hull this weekend and taking the hook out. :brickwall: At that point she goes to paint...looking like Imron, all burgundy/reddish in color. My paint guy is painting the bottom while shes upside down, after i flip it back, ill install the deck, then back to paint...the paint shop is next door!, so ill just wheel it over on my newly built cart :cheers: ....I know some folks like that speckly black factory color...but im so happy to see it go...
 
I am looking at new gauges, ill check there....I forgot to mention im flipping the hull this weekend and taking the hook out. :brickwall: At that point she goes to paint...looking like Imron, all burgundy/reddish in color. My paint guy is painting the bottom while shes upside down, after i flip it back, ill install the deck, then back to paint...the paint shop is next door!, so ill just wheel it over on my newly built cart :cheers: ....I know some folks like that speckly black factory color...but im so happy to see it go...

Any stripes or all one color for now? That's gonna be a nice setup once you're done. I forgot to ask how are you gonna mount the front seats? I didn't like what checkmate did screwing the pedestals to the floor.:shakehead: I seen different options in the resto thread and actually like all them.:thumb:
 
Any stripes or all one color for now? That's gonna be a nice setup once you're done. I forgot to ask how are you gonna mount the front seats? I didn't like what checkmate did screwing the pedestals to the floor.:shakehead: I seen different options in the resto thread and actually like all them.:thumb:

working on a paint scheme now...could just be two white racing strips down the center...not sure...I dont like the pedestal seats anymore either...they just dont seem stable, and if i learned anything its to limit any screws in the floor...My boat had fiberglass boxes originally, i installed the pedestals when i redid the floor the first time..:mad:...im actually up for options..but was looking at some aluminum or stainless plates that would bolt to the raised wood side dividers and have a simplistic leg of the same material, that sets on the floor without attachment, like i said still kickin that around...
 
Jeff looking on us composites website, do you buy the epoxy as a kit or how ever many gallons you need? I guess my question is how do you know which product to buy and how much?
 
Jeff looking on us composites website, do you buy the epoxy as a kit or how ever many gallons you need? I guess my question is how do you know which product to buy and how much?

good question.......I buy it as a kit...as i knew I was going to do alot of resto...4 gallons goes along way...to date i think ive used at least 8

how mush to buy...hmm thats a tough one...thats prob a question for OG...it goes fast when your finding something new every day...and what the application is...

for example...I did the core under the bow...total of 4.5 sq. yards of 1708, 4.5 sq. yrds of 17 oz bi-axle, 40 sq. ft of balsa and cabosil/resin mix to fillet the edges...i also used thin mix of cabosil to stick the balsa core..l used almost 2 gallons for that...Of course when your layering or doing lay up of overlapping 2 inches you use less as part of the cloth is already wet....the way i do epoxy is to saturate the cloth on a bench then wet the wood or hull and laminate the two together..the 1708 really eats up epoxy resin to wet it out...thats why i used more 17 oz biaxle...really strong and the CM back isnt really necessary with epoxy...

On the other end, I use the 635 thin epoxy with the 3 to1 hardener..gives you plenty of work time around the to 60 degree range...if its warmer I would use the 2 to 1 hardener...i dont mind over night dry time, to give me more work time in bigger areas. I use mixing tubs...from 8 oz to a 36 oz batch...with us composites stuff you dont have to really use the pumps...

Their thick epoxy 150...is good for cabosil mix for fillets but isnt necessary...it like a honey consistency...not good with fabric saturation. I will say us composites is awesome to work with...they ship the next day and i have it 2 days later...they have everything but core materials...


That's a great explanation!!! I haven't worked with epoxy so I didn't know much about it. Thanks for sharing!!!:thumb:
 
That's a great explanation!!! I haven't worked with epoxy so I didn't know much about it. Thanks for sharing!!!:thumb:

my pleasure......school of hard knocks....i love epoxy wouldn't use anything else...

actually went back to the receipts...used 10 gals....with a resto this big its important to have the next phase ready as you go...that way i was able to use any excess epoxy that might have gone to waste,,,:)
 
http://www.uscomposites.com/epoxy.html Robbie , just a quick mention the # 635 will go further then Poly or Vinyl which means you have different options as far as fabric goes ....... and in the long run you will not need a fabric that has a binder or a chop back because anything like 1708 with a binder is designed strictly for use with Poly/Vinvl thus the binder ( CSM ) and to tell you the truth the 17 oz used in 1708 is actualy E-Glass minus the chop back which is the most widely used and economical reinforcment fabric in the industry and the fabric of my choice is S - Glass which is the same as E- Glass but more expensive .
 
my pleasure......school of hard knocks....i love epoxy wouldn't use anything else...

actually went back to the receipts...used 10 gals....with a resto this big its important to have the next phase ready as you go...that way i was able to use any excess epoxy that might have gone to waste,,,:)
:lol::lol: Yah Man , if more people tried Epoxy i feel they would never think twice about using Poly or Vinyl again , just my 2 cents . ha ha ha , i just noticed that my rep power has changed which clearly states i will become famous soon enough ha ha ha at age 59 almost 60 yeah right , ha ha ha
 
http://www.uscomposites.com/epoxy.html Robbie , just a quick mention the # 635 will go further then Poly or Vinyl which means you have different options as far as fabric goes ....... and in the long run you will not need a fabric that has a binder or a chop back because anything like 1708 with a binder is designed strictly for use with Poly/Vinvl thus the binder ( CSM ) and to tell you the truth the 17 oz used in 1708 is actualy E-Glass minus the chop back which is the most widely used and economical reinforcment fabric in the industry and the fabric of my choice is S - Glass which is the same as E- Glass but more expensive .

OG thanks for the info!!:thumb: I think for my next project I'll use epoxy. The reason I haven't used epoxy is because not knowing much about it. I think most of the guys here has used poly so that's why I went with it instead of epoxy.
 
Status
Not open for further replies.
Back
Top