• Welcome to the Checkmate Community Forums forums.

    You are currently viewing our boards as a guest which gives you limited access to view most discussions, articles and access to our other FREE features.
    By joining our free community you will be able to:

    » Interact with over 10,000 Checkmate Fanatics from around the world!
    » Post topics and messages
    » Post and view photos
    » Communicate privately with other members
    » Access our extensive gallery of old Checkmate brochures located in our Media Gallery
    » Browse the various pictures in our Checkmate photo gallery

    Registration is fast, simple and absolutely free so please, join our community today!

    If you have any problems with the registration process or your account login, please contact support by clicking here or by using the"contact us" link at the bottom of the page.

My 08 - 2100BR Project

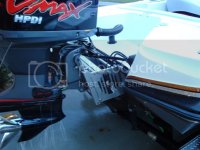
The top/bottom plate are for evenly distributing weight/stress of jackplate on the transom. They come separate and are a must. Polished and look cool too.

Do you happen to have Sea Star Hydraulic steering? If so, you can purchase a blinker unit from them that attaches easily attaches to Sea Star helm and is very inexpensive. Works great!! (especially with a Hot Foot)

Other steering wheel mount units are also available of course, but I'm not familiar with them.

Ok thanks! I do have sea star thats what I am looking for. Should have figured that out on my own my skeeter has those and is sea star also.
 
I guess what I was after is there any reason to stay away from the CMCS hydraulics? Figured it would be the easiest replacement to just remove my 5'' manual CMC and install a new 10 '' hydraulic one and be done.

No matter which j/p you decide to go with, the swap will be basically the same. 8 bolts. I liked bob's because it takes some of the weight from the very aft part of the boat with the interior mounted hyd cyl. Very easy install and a blinker trim is a must! :thumb:
 
With Bobs is there just the 2 hydraulic lines that need to be pulled to the unit then? I assume all the electrical wiring would be in the boat to the hydraulic motor right? If thats the case wouldnt bobs probably be a cleaner looking install once done because with the CMC I would still have to pull the power wires ect in seperate flex or something to keep it clean looking.
If thats the case couldnt I use fittings per attached pic like my hydraulic steering lines to keep a clean install look?
Also I think all my main lines in the flex to the motor appears to be long enough to add another 5'' offset. Agree or Disagee?
Sorry to be a pain on this and I greatly appreciate the help, I just want to make sure I do it right the first time.
 

Attachments

  • 101_3636.JPG
    101_3636.JPG
    33.7 KB · Views: 52
I have the TH marine jp with the pump mounted in the boat and it just has the two hydraulic lines going to the jp, everything else is in the boat, I assume the Bob's would be the same, I agree you have enough flex to move back.
 
Yup on the bob's. WILDMAN or another vendor on here I'm sure can point you in the right direction for the through hull hyd fittings. Think they are spendy on they hyd hoses, but for the aesthetics well worth the $$ IMO.

Here's my old 12" bob's
DSC00311.jpg

On this pic you can see the 2 hyd lines from the j/p to boat. With through hull fittings it would look very clean!
DSC00308.jpg


hahaha, why did I sell that boat again????
 
lift

Made a little more head way, got my lift on. I decided to just go with a manual 12'' powder coated in black. Also got the shoot thru hull digital depth in. Kinda makes one nervous cutting thru the bottom of your boat to get thru the balsa wood but all went well and it is now epoxied in and sealed up tight. Now just have to hope it works when it hits the water.
 

Attachments

  • IMG_0457.JPG
    IMG_0457.JPG
    104.4 KB · Views: 206
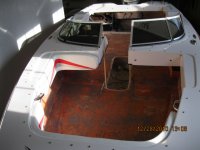
Finally made a little more progress. Got the shoot thru hull digital depth finder in, on board charging system in and got the carpet out and ready for new next week. Looks a little sick without the carpet. Next couple weeks hopefully have the interior back in, sterio installed ect.
 

Attachments

  • IMG_0500.JPG
    IMG_0500.JPG
    113 KB · Views: 64
  • IMG_0501.JPG
    IMG_0501.JPG
    100.8 KB · Views: 60
Before / After

Here is an update for those who are are bored and want something to look at.
I got all the electronics done and installed, Changed the dash trim out to black, removed both the kick panels below dash, replaced toggle switches in black, moved the key and installed digital depth and remote sterio control so I can run all functions of sterio from driver seat. That is (SWEET)! Installed a Sony Deck with Sony remote, 1100 watt amp, 2 - 6x9 JBLs and 2 - 8'' subs and ran Ipod cable to driver side to mount on dash. It sounds awesome!
The rest of my carpet should be here next week so I can finish the seat boxes and start putting the rest of it back together. Will post my final pics when done in a few weeks.
 

Attachments

  • IMG_0526.JPG
    IMG_0526.JPG
    109.2 KB · Views: 233
  • RED CHECKMATE 85I708 A 029.jpg
    RED CHECKMATE 85I708 A 029.jpg
    51.8 KB · Views: 70
  • IMG_0516.JPG
    IMG_0516.JPG
    101.9 KB · Views: 74
Foot Rest

Made some more headway this week on the boat. I finally got all the under dash stuff done. I did away with the storage kick panels it had and fabricated the angled foot rest along with mounting my amp & 8'' subs to them under the dash on both sides. The pics dont show the angle very well but they are the exact angle that Cmate put them at in their previous models before changing it to a flat floor. Also was able to leave what I would call a little storage area for bags ect on the sides. They are very comfy and was worth the effort!
 

Attachments

  • IMG_0543.JPG
    IMG_0543.JPG
    124.9 KB · Views: 50
  • IMG_0544.JPG
    IMG_0544.JPG
    99.1 KB · Views: 47
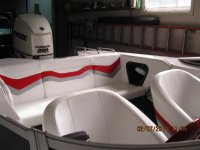
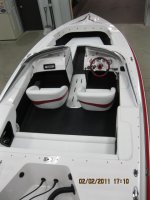
Interior in

Got most of the interior done and in also. Waiting for the new very front bow cushion framework from Cmate to replace the rotten one and then it will be mostly complete.
Wish I could have a dollar for everytime I climbed in and out of this thing in the last couple months. I think I would have enough to order a brand new boat...
Thanks to all that helped with giving me info and help along the way!
 

Attachments

  • IMG_0546.JPG
    IMG_0546.JPG
    92.6 KB · Views: 195
  • IMG_0534.JPG
    IMG_0534.JPG
    92.3 KB · Views: 192
  • IMG_0537.JPG
    IMG_0537.JPG
    92.1 KB · Views: 255
WoW! Looks great! Nice work...you've got a great rig that will serve you well for many, many years.:thumb:
 
Back
Top