• Welcome to the Checkmate Community Forums forums.

    You are currently viewing our boards as a guest which gives you limited access to view most discussions, articles and access to our other FREE features.
    By joining our free community you will be able to:

    » Interact with over 10,000 Checkmate Fanatics from around the world!
    » Post topics and messages
    » Post and view photos
    » Communicate privately with other members
    » Access our extensive gallery of old Checkmate brochures located in our Media Gallery
    » Browse the various pictures in our Checkmate photo gallery

    Registration is fast, simple and absolutely free so please, join our community today!

    If you have any problems with the registration process or your account login, please contact support by clicking here or by using the"contact us" link at the bottom of the page.

Pulse170 Floor Restoration

Status
Not open for further replies.
Hey Cmpulse, great job!! The boat is looking sharp. The only thing I would do is splatter coat the inside of the bilge/transom with white gel to achieve a clean look.
 
It's looking great. I really like the colors on your boat. Sometimes I wish my Exciter was an open bow.

Jallen355 thanks for the compliment!! I looked at your resto and ended using some of your ideas. Thanks for posting your resto. The bow rider comes in handy when I got a bunch of people in the boat. I still would like to get a bow cover for it though.
 
Hey Cmpulse, great job!! The boat is looking sharp. The only thing I would do is splatter coat the inside of the bilge/transom with white gel to achieve a clean look.

Jup I thought about that, but wasn't sure how to apply the gelcoat. I don't have a spray gun.
 
This evening I finished the carpet installation where the pedestals will go. I'll mount those seats last since I'm in the process of adding a new stereo system in the boat and those will be in the way. I've finished up reconnecting the motor and ignition switch wires to the battery. Once I finish the stereo installation I'll put the seats in and take a final picture. That will complete the floor resto. Here's a few pictures.
 

Attachments

  • 120_2010.JPG
    120_2010.JPG
    119.7 KB · Views: 60
  • 120_2012.JPG
    120_2012.JPG
    96.3 KB · Views: 56
  • 120_2013.JPG
    120_2013.JPG
    86.7 KB · Views: 81
Jup I thought about that, but wasn't sure how to apply the gelcoat. I don't have a spray gun.

Hey Cmpulse, you could actually buy white gelcoat and brush it in..I'm sure there are some guys on board that have refinished bilges that may chime in. I brushed my bilge/transom area white after replacing my Pulsare floor. Then I mounted the battery box, oil tank, jackplate pump, etc. Either way, you did a fantastic job! Some boats (Cougar, Dana, to name a couple) do such great flow work that they never paint over the core or wood work...you could see everything through the resin/glass..like a fine piece of furniture!!
 
Robbie,

been away from the board for a couple of weeks; Jeez....been doing a speedy gonzales I see:D resto looks great:thumb: I'll be working on mine in the morning after I get off work. Been trying to get my garage warmed up. Bought 2 space heaters and they have worked really well. Dynalite has finally gotten up to room temp. Should be able to apply tomorrow.

Again; great job!

Hick

LOL!!! Thanks Hick. I went thru a couple of weeks when it warm enough for the resin to set. So by watching the weather I planned accordingly. Once I got the stringers in place everything else went fast. I think the most time consuming part of the resto was tearing the boat apart and taking a bunch of measurements.
 
LOL!!! Thanks Hick. I went thru a couple of weeks when it warm enough for the resin to set. So by watching the weather I planned accordingly. Once I got the stringers in place everything else went fast. I think the most time consuming part of the resto was tearing the boat apart and taking a bunch of measurements.

Yup, measuring takes up alot of time. I had strings tacked all over the inside of my boat so I could make sure everything was level and that the stringer/floor heights would be perfect...very time consuming but worth the effort. Then came the cutting, checking, trimming, checking, cutting, checking, trimming some more, rechecking...it seemed endless!! lol...but then came the glassing..grinding...glassing..grinding..lmao! Glad I don't have to do it again (for a long while)!!!!:bigthumb:
 
Jup I bet I climbed in and out of my boat 100's of times to check, recheck and recheck measurements. I only used a string down the middle everywhere else I used a 2' and a 4' metal level to figure the rest out. I still say the hardest and time consuming part was getting those damn stringers level. LOL!!!!
 
I still have transom, stringer and floor patterns for that boat at Checkmate. But it was nice watching you rebuild your boat. It is one of the few that I still have.:cheers
 
I still have transom, stringer and floor patterns for that boat at Checkmate. But it was nice watching you rebuild your boat. It is one of the few that I still have.:cheers[/quote
Are you serious? LOL!!!! :poke: I could've use the stringer patterns, those were tough to get right. Actually I enjoy a good challenge, was fun project to work on. So how did I do?
 
Robbie, you probably made your install straighter than the factory does :rof:
 
Jup I bet I climbed in and out of my boat 100's of times to check, recheck and recheck measurements. I only used a string down the middle everywhere else I used a 2' and a 4' metal level to figure the rest out. I still say the hardest and time consuming part was getting those damn stringers level. LOL!!!!

My hardest measuring was making sure the floor rested evenly on the stingers and the outer chine with no gaps...I beveled my floor edges so they would drop down/flow into the sides of the boat and rest on the stringers. Then I glassed the underside of the floor to the stringers/bulkheads using the access cut out for my ski locker. If you think resin fumes get ya high...try doing glass work upside down with your head stuck in a hole!!! LOL :banana:
 
Floor Resto

I know it's a little late for this now.. but maybe it will help someone else..
I bought a 1 foot level at Harbor Freight that has a lazer 1/4 of an inch from the bottom surface beat the hell out of the 10 strings I had ran everywhere...after the first piece was set just point and put a mark with a sharpie just remember to make up for the 1/4 inch. made my project a lot easier.. but I still took two days to measuse everything and make prints of what I wanted to do... I have to say this again your pics really helped me a lot.. thanks for the time you put into this thread.. cannot tell you how many times I quit what I was doing and came to this to look at pics

WB, that's great idea as much as I was in Lowes I didn't even think to look for something like that. I'm glad my pictures was some help to you. I know looking over others that did the resto help me as well. I'm more of a visual kind of guy, if I can see it I can build/fix it.:thumb:
Btw post some pictures of your progress would love to see your resto.
 
I got my captain seat pedestals mounted today and added a generous amount of 3M 5200 in the holes. I cut the pedestals down so that I could sit lower behind the windshield, also moved the seats closer to the middle but still have room to walk thru. Sorry for the lighting here are some pictures.
 

Attachments

  • 120_2024.JPG
    120_2024.JPG
    77 KB · Views: 75
  • 120_2027.JPG
    120_2027.JPG
    91.7 KB · Views: 84
  • 120_2029.JPG
    120_2029.JPG
    69.9 KB · Views: 70
I'm finished with the floor resto

I've got the boat completely back together, all that's left is to gas up and head to the water.:surf: 
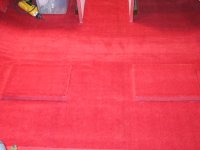
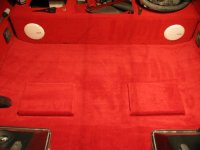
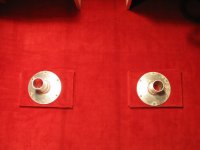
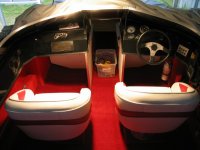
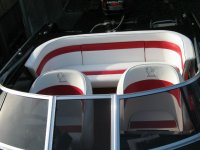
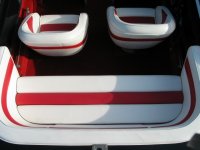
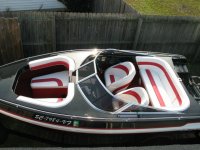
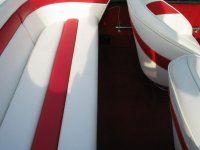
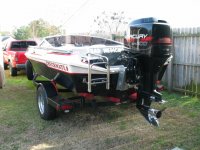
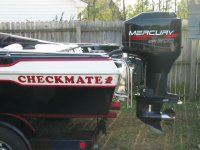
Here's some pictures with all the interior.
 

Attachments

  • 120_2039.JPG
    120_2039.JPG
    85.8 KB · Views: 79
  • 120_2035.JPG
    120_2035.JPG
    71.2 KB · Views: 85
  • 120_2032.JPG
    120_2032.JPG
    120.6 KB · Views: 104
A few more, gotta love Checkmate and Mercury.
 

Attachments

  • 120_2040.JPG
    120_2040.JPG
    64.1 KB · Views: 66
  • 120_2036.JPG
    120_2036.JPG
    138.6 KB · Views: 78
  • 120_2038.JPG
    120_2038.JPG
    116 KB · Views: 77
Status
Not open for further replies.
Back
Top