• Welcome to the Checkmate Community Forums forums.

    You are currently viewing our boards as a guest which gives you limited access to view most discussions, articles and access to our other FREE features.
    By joining our free community you will be able to:

    » Interact with over 10,000 Checkmate Fanatics from around the world!
    » Post topics and messages
    » Post and view photos
    » Communicate privately with other members
    » Access our extensive gallery of old Checkmate brochures located in our Media Gallery
    » Browse the various pictures in our Checkmate photo gallery

    Registration is fast, simple and absolutely free so please, join our community today!

    If you have any problems with the registration process or your account login, please contact support by clicking here or by using the"contact us" link at the bottom of the page.

1988 Enticer restoration. Advice welcomed.

Once you're done with testing fitting, apply a nice thick layer of cabosil and resin to the inner skin, then clamp the transom in place. You want the cabosil to ooze from around the transom as you tighten the clamps, leave those on overnight or a day or two. Once that's cured use the cabosil to fill in all the voids flush with the transom all around. You're good to go!!:thumb:


Thanks. Is it OK for the Cabosil/resin to be 1/4" thick or more in places? Any links to pics of proper clamps? I want the hull to fit the cap when they go back together. Hoping to have this done by next week. Thanks, Scott.
 
Thanks. Is it OK for the Cabosil/resin to be 1/4" thick or more in places? Any links to pics of proper clamps? I want the hull to fit the cap when they go back together. Hoping to have this done by next week. Thanks, Scott.

Here's a link to making clamps it's toward the bottom. http://checkmate-boats.com/forums/showthread.php?t=11926 For the cabosil it's fine as long as all the voids are filled. You should have a solid coat between the transom and the inner skin.
 
Last edited:
Scott i forgot to mention when clamping the transom board to the hull try to shape the squeezed out filler or putty into a fillet or cove along with filling all voids ( perimeter) using a hobby stick so your fabric has something to roll into when doing your layup .
 
Well a bit of an update and more questions. I got the wood cut for the transom today and used two screws to hold them together temporarily so I could check fitment. Looks like I am going to need to use a die grinder to grind down the resin in the bottom corners of the hull or there will be a big gap between the transom and outer skin. I cut the wood tall in the top center as I am trying to decide whether to shape the wood to contour with the glass where the deck meets the hull or cut it shorter like the factory and not have the top motor bolt holes going throught the wood. If I make the wood taller I am going to have to chip all of the DBF from the underside of the splashell or the deck won't sit back on the hull. I need to do some measuring to see if OSG's layup will be thin enough to fit between the splashwell and hull. I really don't want to modify the splashwell. Anyone have a rough idea on resin to Cabosil ratio and about how much to mix up? I have read some people mix Cabosil and resin to desired thickness then added hardener and others said it is difficult to mix the hardener completely once the resin has been thickened. It's going to be close but If I don't screw anything up I might get my horizontal brace and knees built out of this one piece of wood. Thanks for looking and all the advice so far. Scott.
dscf0276i.jpg

dscf0277t.jpg

dscf0280im.jpg

dscf0281a.jpg

dscf0283h.jpg

dscf0284eu.jpg
 
When I did my transom, I made the cabosil/epoxy mix a hair thinner than a peanut butter consistency. I ended up using a trowel with a fairly big groove in it to apply it to both the transom and the outer skin so I knew there would be plenty there. When doing mine, I had to mix two batches, the epoxy offered enough work time to where I was able to mix more as needed and it didn't harden on me - I used US Composites epoxy and hardener.

For the size of the transom, I would make it as big as you can. I would want the bolts for the engine going through wood, not cheap filler. I cut the splashwell out when doing my resto, so it made it easy for me to get the filler out from the deck where the engine mounts. Just my thoughts.
 
Scott , you really need to get everything to fit snug as possible prior to doing anything and if it fits somewhat loose ..... so be it because the putty when clamping everything in place will be filling in all voids ....providing there is an ample amount of filler / putty back there which will do a lot of the worry work for you on its own , and from the looks of things in your pics the ply seems to be higher then the mating lip ( shoe box fitting ) which will be a problem to begin with because the board will never lay flush ...unless pre fitted to the contour of the mating lip , and if if you like shoot me a P-M and i will be more then happy to give you a call , and answer any or all of your questions .
 
Thanks to CMPulse for the post on making the clamps and Old Hickory for posting those originally. I glassed the sides of my plywood that I will be joining together tommorow I hope. Made some clamps for holding them together. When I layed the boards on top of each other to see how close they fit, I noticed one or both boards are warped a little bit so there is a gap in the middle. I can put pressure on them to remove th gap, but is this going to be a problem? Will the Cabosil and resin be strong enough to hold them? I assume once the gap is closed they should be about perfectly straight. I am pretty sure I don't need to sand the glass before joining but want to double check. I am going to sand a couple spots on them where the resin is a little thick so they will fit as tight as possible.
dscf0286v.jpg

dscf0285s.jpg
 
The warp will come out once you cabosil and resin them together either clamp, screw or weight the transom down until cured. The clamps look good!!:thumb:
 
Are the two clamps enough or should I add something to spread the load? Looking forward to the transom, the hull doesn't match up exactly with the wood. Is the transom glass supposed to be perfectly straight? I don't want a bunch of problems when I put the deck back on. Do I need to cut some wood to spread the clamping force there as well? Is two clamps going to be enough for the transon? Thanks, Scott.
 
Are the two clamps enough or should I add something to spread the load? Looking forward to the transom, the hull doesn't match up exactly with the wood. Is the transom glass supposed to be perfectly straight? I don't want a bunch of problems when I put the deck back on. Do I need to cut some wood to spread the clamping force there as well? Is two clamps going to be enough for the transon? Thanks, Scott.

The clamps will hold the transom tight. You can add 4-2x4's length ways (top and bottom) on both sides then clamp down tight. Did you do a dry fit with the cap back on? I don't think any hull is straight, my motor holes were off center when I replaced the transom.:shakehead:
 
Are the two clamps enough or should I add something to spread the load? Looking forward to the transom, the hull doesn't match up exactly with the wood. Is the transom glass supposed to be perfectly straight? I don't want a bunch of problems when I put the deck back on. Do I need to cut some wood to spread the clamping force there as well? Is two clamps going to be enough for the transon? Thanks, Scott.

Are you going to utilize the existing holes for drains, engine mount etc? If so, I would think those two clamps plus bolting some blocks through existing holes would be plenty:bigthumb:
 
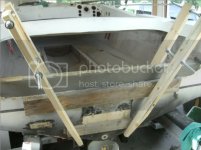
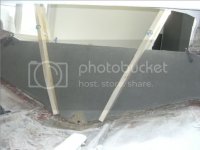
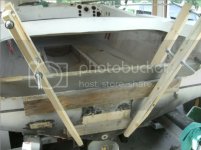
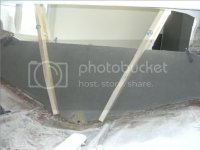
You can clamp the transom like this.

clamping1.jpg

clamping2.jpg

I've never replaced a transom before, however I have glued many things together and you want a nice even distribution of clamping force. I would think either three clamps, or two clamps like cmpulse posted but further out plus the middle either clamped or bolted through the drain holes. Again, I have never done a transom so what is shown could be perfectly fine, but I would want a little more spread of the applied pressure. You could also do what Cmpulse posted above and put two (2)2x4's horizontally across the transom to displace the clamping force on the whole area and clamp with two clamps.
 
Back
Top