-
Welcome to the Checkmate Community Forums forums.
» Interact with over 10,000 Checkmate Fanatics from around the world!
You are currently viewing our boards as a guest which gives you limited access to view most discussions, articles and access to our other FREE features.
By joining our free community you will be able to:
» Post topics and messages
» Post and view photos
» Communicate privately with other members
» Access our extensive gallery of old Checkmate brochures located in our Media Gallery
» Browse the various pictures in our Checkmate photo gallery
Registration is fast, simple and absolutely free so please, join our community today!
If you have any problems with the registration process or your account login, please contact support by clicking here or by using the"contact us" link at the bottom of the page.
You are using an out of date browser. It may not display this or other websites correctly.
You should upgrade or use an alternative browser.
You should upgrade or use an alternative browser.
1988 Vision redo
- Thread starter Kurtster
- Start date
Kurtster
Well-known member
You're becoming a little post whore.

Hmmmm, says the guy with over 3000 posts

Kurtster
Well-known member
Although I don't have any pics for this weeks post of my Vision project, I do have exciting news {well exciting for me }.
}.
First, the reason I don't have a picture is because when I went to the shop today to drop off some of the new hardware,I found that yesterday they had completed spraying the clear coats and the boat is now in the baking booth for the next 48 hrs ---- it will bake under the lamps at 85 degrees till Sunday then brought out to 65 degree ambient temps till tuesday, then the the rest of the "external" hardwares will start to be installed.
That was the first of my good news today.
The next good news came from a phone call I received from Mike Combs from Checkmate Ohio, --- he told me that my new custom made hatch pad upholstery is done and ready to ship to me {that's a week earlier than he estimated -- how often does that happen in this buisness}, he said the new checkered flag graphic came out perfect and the white on the pad is a perfect match to the existing seat upholstery --- I can't wait to see this new skin.
I let Mike keep my old skin as a template for their use in the future -- he told me they didn't have a template for a hatch with the manual "T" latch {as is the case for a pre '89 Vision}
So if anybody in the future wants a hatch skin for a Vision hatch with a manual "T" latch {no actuator}, well Checkmate Ohio now has a perfect template.
And finally, I called the shop that's been doing my powder coating, -- they told me the rest of my parts including my winshield frame and the new custom 36 inch grab rails will be done by end of next week.
Wow, it looks like the project is actually back on schedule for a May launch --- I can't remember any of my big projects in the past actually being on time, I'm not used to this, something must be wrong

DropTop5.0
Well-known member
Good for your Kurtster!
Kurtster
Well-known member
Some of the work involved with restorations of anykind of vehicle is just darn right annoying and funless {yup I just made that word up  }
}
For me, it's stripping paint off of metal parts.
This weekend I needed to disassemble the windshield, strip it and get it ready for powder coating.
What should've taken only a few hours turned into much more time than expected {although I should've expected it}.
Here's what I started with, the complete windshield broken down into four subassemblies {two sides and two fronts}
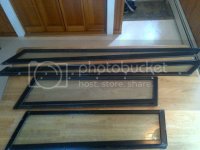
Parts not too corroded, disassembly shouldn't be too difficult, but my dremmel cutter is waiting just in case.
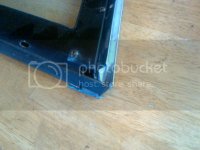
A little cruddy, but it should clean up ok.

Surprizingly the old weather stripping wasn't too bad to remove.

One window disassembled
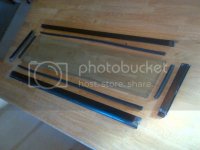
All frame pieces disassembled ---- I safely stored and labeled the four glass panels ---- and I removed and labeled all the rubbers {the rubbers are all in great shape and reusable}
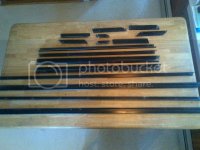
Ahh, now the crappy part ---- Chemical stripping with Zep paint and varnish remover.
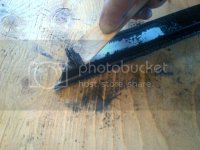
The stripping is not going as well as I hoped --- there seems to have been at one time some kind of "redo" of this frame -- as I strip the paint I find that there are actually a couple of different coats of "stuff" on this frame.
A couple of pieces {the bottom front rails} seem to have a couple of coats of enamel over anodize --- the stripper does well with the enamel but the anodize is tough to remove.
A couple of pieces {front vertical center piece, and two side rear verticals} have somekind of baked clear coating that doesnt seem to come off with anything but wet sand paper.
Also found a couple of Imperfections in the metals that may cause trouble down the road {ie... a small pin hole from someone using too long of a screw}.
So apparently the frame was redone at one time --- and not done very well at that.
Well we'll see how the stripped pieces turn out in a couple nights.
I may have to powder coat in a flat / dull black instead of gloss black so as to help hide some of the metal imperfections.
For me, it's stripping paint off of metal parts.
This weekend I needed to disassemble the windshield, strip it and get it ready for powder coating.
What should've taken only a few hours turned into much more time than expected {although I should've expected it}.
Here's what I started with, the complete windshield broken down into four subassemblies {two sides and two fronts}

Parts not too corroded, disassembly shouldn't be too difficult, but my dremmel cutter is waiting just in case.

A little cruddy, but it should clean up ok.

Surprizingly the old weather stripping wasn't too bad to remove.

One window disassembled

All frame pieces disassembled ---- I safely stored and labeled the four glass panels ---- and I removed and labeled all the rubbers {the rubbers are all in great shape and reusable}

Ahh, now the crappy part ---- Chemical stripping with Zep paint and varnish remover.

The stripping is not going as well as I hoped --- there seems to have been at one time some kind of "redo" of this frame -- as I strip the paint I find that there are actually a couple of different coats of "stuff" on this frame.
A couple of pieces {the bottom front rails} seem to have a couple of coats of enamel over anodize --- the stripper does well with the enamel but the anodize is tough to remove.
A couple of pieces {front vertical center piece, and two side rear verticals} have somekind of baked clear coating that doesnt seem to come off with anything but wet sand paper.
Also found a couple of Imperfections in the metals that may cause trouble down the road {ie... a small pin hole from someone using too long of a screw}.
So apparently the frame was redone at one time --- and not done very well at that.
Well we'll see how the stripped pieces turn out in a couple nights.
I may have to powder coat in a flat / dull black instead of gloss black so as to help hide some of the metal imperfections.
RNGRDVE
Well-known member
Also found a couple of Imperfections in the metals that may cause trouble down the road {ie... a small pin hole from someone using too long of a screw}.
You should be able to take the section to a shop that does aluminium welding and have it welded up and ground smooth.
Kurtster
Well-known member
You should be able to take the section to a shop that does aluminium welding and have it welded up and ground smooth.
Yea, I was also thinking maybe solder might do the same thing for me.
ram750
Member
Great work SRS !!! I look at the thread every day and really like what you are doing.
Since you seem to have taken every single thing apart , do you know how the Rear sundeck comes apart ? Let me explain The top cushion from the bottom fibreglass part ? Then hinges are all loose and would like to have them tighten back up
hoooooo BTW , I has a 221 since Saturday !!!
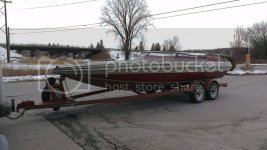
Since you seem to have taken every single thing apart , do you know how the Rear sundeck comes apart ? Let me explain The top cushion from the bottom fibreglass part ? Then hinges are all loose and would like to have them tighten back up
hoooooo BTW , I has a 221 since Saturday !!!

Kurtster
Well-known member
Great work SRS !!! I look at the thread every day and really like what you are doing.
Since you seem to have taken every single thing apart , do you know how the Rear sundeck comes apart ? Let me explain The top cushion from the bottom fibreglass part ? Then hinges are all loose and would like to have them tighten back up
hoooooo BTW , I has a 221 since Saturday !!!
Hi ram750,
First, let me say congrats
 on purchasing one heck of a nice Checkmate --- when you get that Vision in the water and rigged up to your liking, I promise you will not be dissappointed -- these little 22 footers perform like real champs, -- they handle like a Ducati and turn heads like a classic hot rod.
Regarding your engine hatch, -- My Vision had the same problem, the hinges were loose, and the middle one was so loose it caused enough damage to the fiberglass around the mounting hole on the boat to warrant the two holes for that hinge to be re-filled, and re-drilled ---- so, yes, get your hinges tightened before they do any damage.
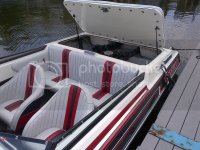
The only way to get to the hinges inside the hatch is to remove the sun pad from the fiberglass bottom, -- you can see in the picture below {a pic of mine from last year} there are 27 mounting nuts {mine are acorn nuts} that hold the sun pad to the bottom fiberglass piece.
You have the possibility of running into a couple of issues.....
>>> One issue you may encounter is removing the mounting nuts, -- those nuts are srewed onto long stainless machine screws that "may" turn as your trying to unscrew the nuts, -- I ended up having to cut three of mine off with my dremmel cutter.
>>> Another issue you "may" encounter is where the hinges bolt to the hatch under the sun pad, -- it may have rot of some sort around the mounting holes and you may need to "build up" the area with somekind of support for the hinges --- on mine I just cut three pieces of stainless plates {1/16 thick X 2" X 4"} and then drilled for the mounting hole patterns --- I even could have just used three large fender washers, but I like wasting my time "making things" in my shop

Good luck with your hinges and your first season with your beautiful Vision.
ram750
Member
Amazing ! Thanks for the info , I figured the Fiberglass may be soft where they are mounted and should probably back it up with something like you suggest.
I had to do that with my rear cleats on my Senator.
BTW our Gas shocks are not mounted in the same way at all ... Did you re-position them ? Mine have a terrible angle for leverage.
Sorry btw did not want to hijack the thread.

I had to do that with my rear cleats on my Senator.
BTW our Gas shocks are not mounted in the same way at all ... Did you re-position them ? Mine have a terrible angle for leverage.
Sorry btw did not want to hijack the thread.

Kurtster
Well-known member
Amazing ! Thanks for the info , I figured the Fiberglass may be soft where they are mounted and should probably back it up with something like you suggest.
I had to do that with my rear cleats on my Senator.
BTW our Gas shocks are not mounted in the same way at all ... Did you re-position them ? Mine have a terrible angle for leverage.
Sorry btw did not want to hijack the thread.

No, that is the original position of the gas shocks ---- is your Vision a '88 or a '89?
Do you have a manual handle and latch or do you have an actuator?
Don't worry about "hijacking" the thread ---- that's what threads are all about and for --- back and forth discussions that may go off into different directions occasionally in order to help a fellow boater / Checkmate owner.
ram750
Member
Mine is an 1988 , manual latch no actuators.
They may have been repositionned on mine ... But I don't think there is any holes where there should not be ... Anyways I only spent five minutes looking at that since I was busy looking at everything else Very stressful buying a boat of that age. I think the original owner was on here but maybe not active anymore.
On the one side its a Cierra Gas cylinder and on the other looks like a the wrong one since the rod is 1/2 the size of the cierra , bent a little and without any doubts not the right pressur....
I will snap some pics when I get two minutes right now I just wanted to get the boat before all the snow melts , park it and work on it when the lake is un-frozen... I have a mustang project I absolutely need to finish and back on the road soon.
They may have been repositionned on mine ... But I don't think there is any holes where there should not be ... Anyways I only spent five minutes looking at that since I was busy looking at everything else
On the one side its a Cierra Gas cylinder and on the other looks like a the wrong one since the rod is 1/2 the size of the cierra , bent a little and without any doubts not the right pressur....
I will snap some pics when I get two minutes right now I just wanted to get the boat before all the snow melts , park it and work on it when the lake is un-frozen... I have a mustang project I absolutely need to finish and back on the road soon.
Kurtster
Well-known member
Kurtster;599534 All frame pieces disassembled ---- I safely stored and labeled the four glass panels ---- and I removed and labeled all the rubbers {the rubbers are all in great shape and reusable} [ATTACH=full said:
Kurtster
Well-known member
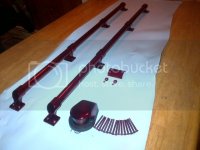
Picked up the remaining red powder coated hardwares last night from the shop.
So, now we have every piece of external metal hardware powder coated {and a couple fusion coated} red --- except the windshield frame, --that's being powder coated semi gloss black.
The first pic is the last few pieces to the red collection.....
The second pic are the pieces previously done.
What's not seen in the pics are two additional stern grab rails and the trim tab plates.
The exhaust tips and the trim tab plates wer actually fusion coated -- the difference between powder coating and fusion coating is a matter of how much heat is used to apply -- fusion coating is more durable but much more expensive than basic powder coating.
Those 36" rails are the ones I made up earlier in the thread, the other pieces seen here are the bow nav lite / the rubrail endcap / the mounting screws for the rails and the lite and the endcap.

Windshied frame should be done powder coating by next Monday, and I am really concerned if I made the right call on that or not {I'll know monday }.
}.
Does anybody know where I can get replacements for the black plastic strips that slide into the windshield frame grooves to cover the mounting screws -- I'll ask Mike at Checkmate when I talk to him again, but maybe someone here in the forum knows of a resource?
So, now we have every piece of external metal hardware powder coated {and a couple fusion coated} red --- except the windshield frame, --that's being powder coated semi gloss black.
The first pic is the last few pieces to the red collection.....
The second pic are the pieces previously done.
What's not seen in the pics are two additional stern grab rails and the trim tab plates.
The exhaust tips and the trim tab plates wer actually fusion coated -- the difference between powder coating and fusion coating is a matter of how much heat is used to apply -- fusion coating is more durable but much more expensive than basic powder coating.
Those 36" rails are the ones I made up earlier in the thread, the other pieces seen here are the bow nav lite / the rubrail endcap / the mounting screws for the rails and the lite and the endcap.


Windshied frame should be done powder coating by next Monday, and I am really concerned if I made the right call on that or not {I'll know monday
Does anybody know where I can get replacements for the black plastic strips that slide into the windshield frame grooves to cover the mounting screws -- I'll ask Mike at Checkmate when I talk to him again, but maybe someone here in the forum knows of a resource?


