• Welcome to the Checkmate Community Forums forums.

    You are currently viewing our boards as a guest which gives you limited access to view most discussions, articles and access to our other FREE features.
    By joining our free community you will be able to:

    » Interact with over 10,000 Checkmate Fanatics from around the world!
    » Post topics and messages
    » Post and view photos
    » Communicate privately with other members
    » Access our extensive gallery of old Checkmate brochures located in our Media Gallery
    » Browse the various pictures in our Checkmate photo gallery

    Registration is fast, simple and absolutely free so please, join our community today!

    If you have any problems with the registration process or your account login, please contact support by clicking here or by using the"contact us" link at the bottom of the page.

71 mx-15 restoration and build

Nice work on the barn! I rebuilt an old historic barn in my hometown this past spring, and it looks very similar to the one your working on. Looks like it's all mortice and tenon.

Boat looks great by the way!

Yup that's all we do is mortice and tenon. The only metal fashioners in that are in the foundation to the sills and also lag bolts in the rafters at the plats for up lift to make it meat code. That's cool you restored one I hope some one restores my barns someday so my work lives on in time. There's alot of hard work that goes into them. The work is vary satisfying. The only thing that sucks is every thing is so heavy.
 
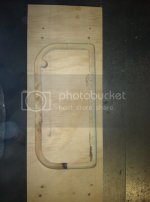
Didn't get to work on the boat this week works been getting in the way. Worked on the glove box tonight a little. Glued it in and made a pattern to rout out a rabbet with a paren bit. The door is going to sit in the rabbet. The pan is the door is going to sit flush with the glove box for a clean sleek look.
3A8-0C8D49A24D6E-9647-000008567D018C0B_zpsadef0110.jpg

775-1157B79E505F-9647-0000085675BB4B4D_zps5ab870a8.jpg
 
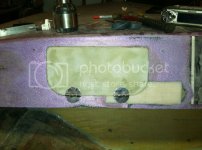
Did a test pice with the jig to make sure I was happy with it be for I cut the rabbet in the dash. Got the rabbit cut took some time to get the jig lined up. What a pain, would of been a lot easer if the top and bottom of the dash were parallel. Think I got the door lined up right but makes the deck look like it's going to be crooked. Half tempted to take it apart and make it not look like a house of mirrors on the inside of the glove box. Good thing the door will be closed more then open. Don't like the hinge much ether going to find something else. But it's a start.

85-EF28AE021A7F-11554-00000A86AAC2AA7A_zps0c5e70aa.jpg

97-05A51DD77040-11554-00000A869EFCCA1B_zpsbadd2fe3.jpg

http://i1336.photobucket.com/albums/o658/youwont57/05B761FE-27FD-
4444-9035-942B76AC50EC-11554-00000A86946DC281_zpsc72019a9.jpg

5A-46BAA972597C-11554-00000A868A1E84F8_zps66128935.jpg

3C-24E4F9D539EA-11554-00000A8680A90B34_zps7ac5f3de.jpg
 
hey how did you repair the holes in the dash? I ask becasue it looks like it's just a ton of filler (thick resin)

I did that on one old gauge hole with only two layers of CSM in the repair and over the last year the large amount of filler has changed size with temperature changes each season, and now the paint has cracked in the outline of the old hole. The holes I used 1708 and more cloth to repair, including overlapping on the the surrounding panel have not cracked

Hm thanks for the heads up. Ya it's just cabosil filling in the holes. I was thinking about that in the back of my head. looks like ill have to grind some of it out and put some lay up of glass. Thanks again for the heads up.
 
yeah I would rind the area around the holes down, lay up a decent amount of cloth to overlap onto the old glass, then sand and fill from there

that glovebox is cool!
 
hey how did you repair the holes in the dash? I ask becasue it looks like it's just a ton of filler (thick resin)

I did that on one old gauge hole with only two layers of CSM in the repair and over the last year the large amount of filler has changed size with temperature changes each season, and now the paint has cracked in the outline of the old hole. The holes I used 1708 and more cloth to repair, including overlapping on the the surrounding panel have not cracked

I think I remember that you used polyester resins. The epoxy, being more flexible may hold up better, hopefully. I used layered pieces of mat and ground into the outer edges for overlap. On small holes I cut the mat up into tiny pieces and mixed it in with the resin and cab as a reinforcer. I've heard people state that they use pink insulation mixed with resin. I'm sure I've made mistakes on my project that will rear their ugly head eventually. I'm hoping for the best.

The glove box is looking great. A lot of work. I think if you can figure out how to hide the hinge it will be "Top Shelf", pun intended. Keep up the good work. :bigthumb:
 
Ya that was my plan was. But didn't work out I shouldn't of but a rabbit on the bottom. Should of made the bottom edge of the door flush with the bottom of the of the glovebox. The rabbit puts the hinge more the to the center of the door. So the bottom of the door wants to sting in and hits the dash looked at a lot of hinges that would move the door out and swing down no dice. Ordered these this morning. Should look a lot better with these. http://m.marinepartdepot.com/cihiup4dia1.html
 
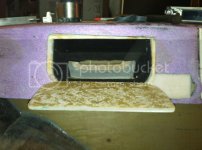
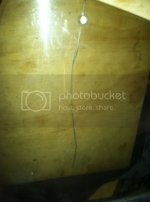
Starting to think making my own glove box was not the best idea. Lol but it came out well for the first time I think. It works and adds my own touch. I carpeted the inside so cell phone,CDs and what not don't get scratched up. The cd deck in the pic Im not using gust for mock up. Started to clean up the windshield tonight also. Used a plastic glue to try to fix the crack in the windshield. Started to polish up the aluminum. Dose any one know if I still can get hardware and parts from checkmate for the windshield. All so the rubber gasket at the bottom.
5B6-42EB7B5E2D7A-3266-000002A97A45481C_zps57790827.jpg
Was not able to get a little sliver of carpet all the way in the back :(

880-6AC146195D50-3266-000002A9648A140F_zps5c7caee9.jpg

30E-24EFCADFFE24-3266-000002A942B5BE3A_zps6fe25062.jpg

22D-281F1102A5B0-3266-000002A9354EDCF1_zps6a34a281.jpg

A38-AD70CCDBE212-3266-000002A92B1B1C7D_zps7fab79c8.jpg
 
Starting to think making my own glove box was not the best idea. Lol but it came out well for the first time I think. It works and adds my own touch.

Ahhh that's in the true tradition of a Checkmate --- personalized craftmanship.

I like the change to the round stylish hinges, what are you using for a latch of some sort to keep the glove box closed ?
 
Ahhh that's in the true tradition of a Checkmate --- personalized craftmanship.

I like the change to the round stylish hinges, what are you using for a latch of some sort to keep the glove box closed ?

That's a good question lol. I was planing on using a magnet push and pop opener. Like you would find on cabinet doors. But it didn't work out so well. What a pain in the butt trying to get that to work. Spent like 2 hours tonight on that. You can find that on the other end of the shop in about 5 pieces lol. So now idk what the plan is maybe some other kind of magnet. Or even maybe a small key latch. I really don't want a nob or Handel would like to keep the sleek look. Any ideas any one ?
 
Back
Top