ballardnboyz
Well-known member
Ah....the days of woven roving. Wish I didn't still have two rolls of it left. That stuff gets heavy.
hmm...i happen to need some....

Welcome to the Checkmate Community Forums forums.
You are currently viewing our boards as a guest which gives you limited
access to view most discussions, articles and access to our other FREE features.
By joining our free community you will be able to:
Registration is fast, simple and absolutely free so please, join our community today!
If you have any problems with the registration process or your account login, please contact support by clicking here or by using the"contact us" link at the bottom of the page.
Ah....the days of woven roving. Wish I didn't still have two rolls of it left. That stuff gets heavy.
Congrats , Ha.. Ha.. Ha.. Ha.. your getting pretty close to the top of the heep hey .


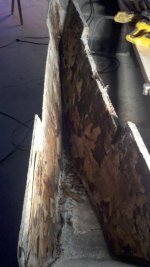
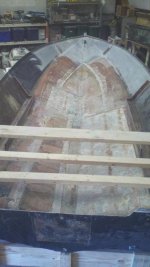
its out...and in one piece....
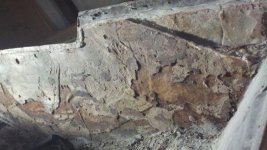
 Damn the top looks rotten!! Glad you got the transom out in one piece, now comes the grinding and all the dust flying......
Great job!!!
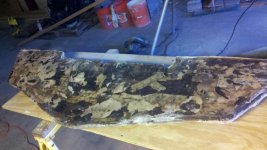
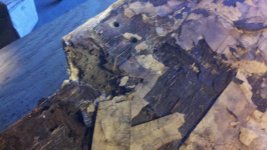
its worse than i thought, but solid where it counted...found more wet balsa core under the transom though, so this was a good thing all the way around. ...for some reason the transom did not come all the way up?? stopped about a inch down on the hull, then the factory packed bondo between the top and hull??? why is that??? Heres a question...how much epoxy did you go through with the transom replace? and did you use slow,fast or med dry time hardener?
Jeff , that filler is called DBF ,or should i say ...Detroit Body Filler , which is commonly used in the industry ...... and yes it is somewhat of a bondo that comes in 55 gal drums .its worse than i thought, but solid where it counted...found more wet balsa core under the transom though, so this was a good thing all the way around. ...for some reason the transom did not come all the way up?? stopped about a inch down on the hull, then the factory packed bondo between the top and hull??? why is that??? Heres a question...how much epoxy did you go through with the transom replace? and did you use slow,fast or med dry time hardener?
Jeff , i normally use an Epoxy that has a pot life of 35 , 45 , 60 ,75 , to a 100 plus minutes ..depending on the hardner which in most cases i only use the slowest because of the pot life , along with the work time involved , and if i use..... the same Epoxy that Skater uses (Shell ) i will have a much longer work time which i prefer but .....................takes 48 hours to cure ....just to sand . Jeff , to make a long story short ....go with a hardner that will give you more work time then you will need to do your layup , which means less waste .........and less money . Jeff , just curious what brand of Epoxy are you planning on using ?its worse than i thought, but solid where it counted...found more wet balsa core under the transom though, so this was a good thing all the way around. ...for some reason the transom did not come all the way up?? stopped about a inch down on the hull, then the factory packed bondo between the top and hull??? why is that??? Heres a question...how much epoxy did you go through with the transom replace? and did you use slow,fast or med dry time hardener?
Jeff , trust me ...if i was you.... i would go with there #556 hardner just because you will have a longer work time ..... with less waste which means money saved ,and to tell you the truth ...us composites offers the best bang for the buck when it comes to purchasing there 635 - Epoxy resin , and the word of wisdom is .................i would seriously consider ordering more resin .....other .....then one gallon .OG, I bought just a gallon of this from,
http://www.uscomposites.com/epoxy.html,
3 to 1 MEDIUM Epoxy Hardener
[SIZE=-1]Pot Life: [/SIZE][SIZE=-1]20-25 Min @ 80F[/SIZE]
[SIZE=-1]Set Time:[/SIZE][SIZE=-1] 3-4 Hours[/SIZE]
[SIZE=-1]Drying Time: [/SIZE][SIZE=-1]8-10 Hours[/SIZE]
maybe i should use this,?? its going to be around 50 degrees in my shop...not sure how much ill need???
2 to 1 SLOW Epoxy Hardener (#556)[SIZE=-2]Using this hardener provides for maximum working time at high temperatures. Ideal in high humidity conditions and temperatures over 85F.[/SIZE]
[SIZE=-2]Should not be used in conditions below 70F unless an extremely lengthy curing time is desired.[/SIZE]
[SIZE=-1]Pot Life:[/SIZE][SIZE=-1] 35-40 Min @ 80F[/SIZE]
[SIZE=-1]Set Time:[/SIZE][SIZE=-1] 5-6 Hours[/SIZE]
[SIZE=-1]Drying Time:[/SIZE][SIZE=-1] 24-28 Hours[/SIZE]
The US Composite Epoxy is very easy to work with, I used it on my resto this past summer. Make sure you got the pump kits with them, things will go a lot easier. BTW, I got good advice from Offshore Ginger as well when deciding on what fiberglass to use, everything turned out well.
After you cut the new transom out, encapsulate the wood with csm 1 1/2 oz mat and resin. You'll need a filler between the transom and the outer skin then clamp it until it cures. After that use the 17 oz to glass the transom in place.
TimSki$, any pictures of your rebuild process?
When doing the knees (either / or ) i somtimes fully ecapsulate them prior to tabing them in using small amounts of hot glue along the back edge and bottom to hold them in place then...... bonding them in place using a fillet which is a coved shaped application of putty made with cabosil and resin shaping the fillet making it smooth using a rounded hobby stick which leaves a nice radius to do your layup or tabing ,and be sure to round all straight edges that will get glassed over . Jeff the pad most likely will be the easiest part of doing that whole job which i would do the same way .........that you would do when replacing your core..... once again using a fillet along the perimeter to fill in all the voids .Robbie, OG, should i encapsulate the plywood pad before i install it?...how do the knee braces attach to the transom and the hull, are they adhered with mat and resin?
and do i wrap them with cloth or mat before i attach them to the transom??
Jeff , i tried to give you a call today to explain a few other things in depth but non the less i will try again tomorrow . Hey guys . i noticed that Tim ski$ has two stars which underneath says Playmate and tim please do not take this the wrong way but to me that sounds kinda gay because we both are from being Playmates Ha Ha Ha .
First of all...playmate, with two pasties, yup sounds gay, not thats there anything wrong with that...ha!
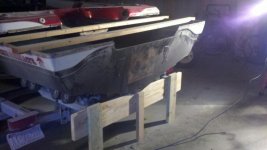
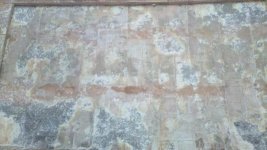
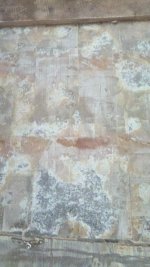
Sorry i missed your call...ill be at it tomorrow afternoon, so please try again...The pics below will show where im at...what do you think, do I need to sand further, theres nothing loose, just not to the original shell...i had to remove, in proportion, about 40% of the core....