• Welcome to the Checkmate Community Forums forums.

    You are currently viewing our boards as a guest which gives you limited access to view most discussions, articles and access to our other FREE features.
    By joining our free community you will be able to:

    » Interact with over 10,000 Checkmate Fanatics from around the world!
    » Post topics and messages
    » Post and view photos
    » Communicate privately with other members
    » Access our extensive gallery of old Checkmate brochures located in our Media Gallery
    » Browse the various pictures in our Checkmate photo gallery

    Registration is fast, simple and absolutely free so please, join our community today!

    If you have any problems with the registration process or your account login, please contact support by clicking here or by using the"contact us" link at the bottom of the page.

1988 Vision redo

Beautiful Job

Dear Kurt You are Doing a Very Beautiful Job on Your Checkmate Vision My Friend. There Will Never Ever Be Another One Like Your Checkmate Vision. Something You My Dear Friend Can Be Very Proud of for Many Years to Come. The Very Best Wishes To You My Dear Friend. Always Your Friend Sammie Action Marine

PS Kurt if I Still Had My Checkmate Vision My Dear Friend You would Find it Being Your Next Project on the Powder Coating Items You have Done on Your Vision....only in Blue
 
Last edited:
Dear Kurt You are Doing a Very Beautiful Job on Your Checkmate Vision My Friend. There Will Never Ever Be Another One Like Your Checkmate Vision. Something You My Dear Friend Can Be Very Proud of for Many Years to Come. The Very Best Wishes To You My Dear Friend. Always Your Friend Sammie Action Marine

PS Kurt if I Still Had My Checkmate Vision My Dear Friend You would Find it Being Your Next Project on the Powder Coating Items You have Done on Your Vision....only in Blue hehe Because at My Action Marine the Guys always said Blue is FAST LOL HEHE

Thanks so much Sammie for the compliment.....
If you had your Warrior Vision today and brought it to me --- I would start with powder coating the mota you had in that montser -- and engine that can push one of these to over 130 mph deserves to be powder coated with "translucent candy ice blue" --- it wouldv'e been perfect for the Warrior :)

Although powder coat would probably peel off at the speeds you used to pilot :thumb:

Thanks again my friend -- have a great week.
 
Is this going on Ebay when your done. Wow, beautiful work Kurstser!

No, I'm gonna keep this one....
As so many of you know, it would be impossible to recoop the monies put into this resto --- doesn't matter how nice you can make a boat look and run, or how much money you put into it --- it's only gonna be valued at what a 1988 Vision is valued at {and when I'm done I'll have almost three times that value invested, -- and that's with doing 75% of the work myself}
So, I'll drive my monies worth out of it over the next few years.

That's not to say I won't be getting another boat next year -- but I'll still keep this one for the lakes.
 
Hey Kurt ,

Boat is coming along nicely... I plan on testing mine this weekend ... I still have a the entire tune up to do , and finish up repairing parts of the cooling system... But I need to get it in the water asap since I am going nuts.

As for the Gas Shocks ... I called checkmate 2 years ago about my Senator and they pass the phone to some amazing old guy in the back that answered my question in a second. I should probably do that again ...

Anyhow here is a picture I took of the marine supply i use to order my stuff. Those are Sierra replacements. They are offered in many different # rating. I can figure the compressed and open size but I will probably have to take one off and push it against a person scale to get the pressure.

IMAG0361_BURST004_zps8870e8b4.jpg
 
I cannot figure out the specs of these gas shocks I have on my engine hatch.
The two shocks have the numbers--- RB8795066 356/94
I have no idea what to make of these numbers --- I tried all kinds of google searches {although I'm not very internet savy} but couldn't find anything that helps identify neither the brand nor the specs.

So, now I'm going out of my mind figuring this out --- I can't stand running across something I can't figure out {it's an OCD thing I have}:brickwall:

If anybody is reading this that can help, please weigh in before I finish pulling "all" my hair out :yell:

It may be trial and error method. I purchased mine at the local West Marine because they allowed me to return the first 2 pair until I found the ones that worked best. They range from 10 pounds pressure to 90 pounds, and 7.5 inches to 20 inches. My store carried a fair variety. Here is their chart:

http://www.westmarine.com/webapp/wc...toreId=11151&storeNum=50667&subdeptNum=50680&
classNum=50683#.UXa890rLtnA

Check out my thread frame "99" on. Wound up using 2 twenty pounders in my application.
Vintage Jetmate:
http://checkmate-boats.com/forums/showthread.php?t=14018

Good luck, hope the first two you try are good. Remember if you use a higher pressure riser, make sure the mounting points are strong and reinforced.
:bigthumb: looking good Kurt!
 
Hey Kurt ,
But I need to get it in the water asap since I am going nuts.

Thanks Ram---- I'm begining to think I'll never get mine in the water at this point --- I just can't seem to find the point where I tell myself ---"stop here and just put it in the water and finsh the rest next winter".:shakehead:
 
Good luck, hope the first two you try are good. Remember if you use a higher pressure riser, make sure the mounting points are strong and reinforced.
:bigthumb: looking good Kurt!

Thanks Jetmate --- I ordered a new pair from Strongarm and they arrived yesterday, -- they're the same part number as the originals so hopefully they'll work fine pressure wise.
I'm gonna try the regular bathroom scale pressure test and see what that tells me --- they are quite difficult to compress so I'm guessing they are of the high end of the pressure scale somewhere between 60 and 90 lbs.

Interesting you mention the mounting points --- I certainly did use new hardwares {and one size larger nuts and bolts than original} on the top mounting points of the hatch lid -- however as I was taking a look at the boat last night making sure the hinge brakets of the hatch lid are gonna line up and just making sure everything looks good before lifting the new hatch into place, I did notice the two bottom mounting brakets although are tight and secure, the washers of the nuts and bolts are rusty --- a closer look revealed also that the bolts {machine screws} are actually a couple of different sizes AND a couple of them are slightly bent.
Well, my anal retentiveness just won't let me ignore that crap....
So, I'll get my dremell cutter out and take care of that....
I'll naturally have to "refinish" the mounts / replace the nuts and bolts and washers with quality 316 stainless {all uniform sizes}:)
 
Hey Kurt ,

From what I learned with car projects in the past I can tell you that at some point you need to wrap up where ever you stand in the project and get it rolling ! enjoy it a little and remember what its all about. Sometimes we get so deeply caught up in the project that we forget about the most important part and then when its too late you realized you burnt the interest you had for it by over working.

About the shocks again , I took one off yesterday and for sure 20" extended , but compressed not sure :P it was a cheap car replacement one and when I tried and pressed it against the ground bent the rod :P so I just straightened back and never close it completely... Btw also realized we don't have a scale at home anymore :pissed: couldn't get the pressure ! But I think its around 60# or more for sure !!!
Sorry bout all the mistake sometimes my french defeats the auto corrector
 
Hey Kurt ,

From what I learned with car projects in the past I can tell you that at some point you need to wrap up where ever you stand in the project and get it rolling ! enjoy it a little and remember what its all about. Sometimes we get so deeply caught up in the project that we forget about the most important part and then when its too late you realized you burnt the interest you had for it by over working.

About the shocks again , I took one off yesterday and for sure 20" extended , but compressed not sure :P it was a cheap car replacement one and when I tried and pressed it against the ground bent the rod :P so I just straightened back and never close it completely... Btw also realized we don't have a scale at home anymore :pissed: couldn't get the pressure ! But I think its around 60# or more for sure !!!

Sorry bout all the mistake sometimes my french defeats the auto corrector

Thanks Ram,
I've always had this OCD thing regarding refurbishing or restos, it's just something I can't help:irked:

I already started to refurbish the bottom shock mounts and hardware.....
I also started cleaning up the inset area where the hatch lands, there are a few ugly gouges and scratches around that area..
Also, the rubber/pvc {or whatever the material is} edge trim around the top of the engine compartment is kinda ugly, so I purchased a new roll of that {my god that's expensive stuff:mad:}.
After the top of the engine compartment is cleaned up and looking respectible, then I'll put the hatch back on and move onto to finishing the interior {this time I really really really mean it};)
Pics of this crap tomorrow.
 
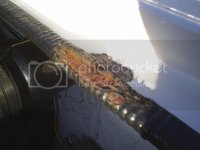
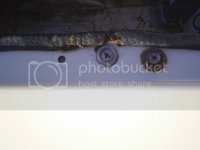
Well, the area where the hatch lands is looking rough...
This pic doesn't really show how bad it really looks --- but you can see the overall look is not that good.
visionproject169.jpg

A closer look at a 12 inch piece of trim missing.
visionproject165.jpg

Another close look at crap..
visionproject167.jpg

More crap..note the extra mount hole --- this is evidence that the mounts were changed at one time for some unknown reason.
visionproject166.jpg

So, in the next day or two we'll see how I make out trying to clean this up without making a Picasso out of it :irked:
 
Thanks for the link about the Flexible trim guys !

Kurt did you find out what pressure those actuators are ?

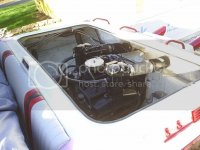
I took mine out for the first time today !!! Water condition were perfect. Don't want to hijack once again but I am sure you will appreciate some pics and not just a few teaser words ...

IMAG0391_zpsa8ecfea9.jpg

IMAG0395_zpse94cc557.jpg


Already Hijacked enough ...

<iframe width="1280" height="720" src="http://www.youtube.com/embed/Qi97pVVPaqE" frameborder="0" allowfullscreen></iframe>

http://youtu.be/Qi97pVVPaqE
 
Thanks for the link about the Flexible trim guys !

Kurt did you find out what pressure those actuators are ?

I took mine out for the first time today !!! Water condition were perfect. Don't want to hijack once again but I am sure you will appreciate some pics and not just a few teaser words ...

Hey Ram,
That is an awesome looking Check ---- love the wing, I don't think Checkmate put those on the '88 model otherwise I may have thought about putting one on mine --- your upholstery looks in perfect condition ---
How was the "maiden voyage" --- let me know a little of how you think the boat handled, --- I know this hull design needs a little seat time to get used to, but once all the piloting dynamics are figured out these things are really quite the performers.
Don't worry about "hijacking" this thread, --- any Vision info here is fun and welcome info ;)

Regarding the Flex trim --- yup, that is what I ended up getting --- they actually had a roll of it {made by Taco} at West Marine..
visionproject163.jpg

The actuator pressure --- that was a little difficult, I used my bathroom scale and made a jig so I could push them down without accidently bending the ram rod {I want to be able to reuse these maybe someday} --- anyway my scale showed a pressure of 72 lbs on one and 76 on the other ---- I don't know if that means they were 90's and now a little worn out -- or if they were 60's and the bathroom scale thing is just not accurate enough.
In anycase I did buy new ones from Strongarm and the old ones will make good "spare parts".
 
You could add a wing like this and not break the budget! Everybody would be laughing at you because you look soooo cool! Yea, thats it!

stupid-car-spoilers-8.jpg
 
Back
Top