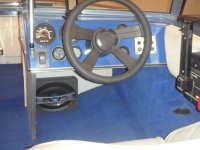
Of course there's a lot more to a Checkmate, like transom braces and knees, which don't sound like much but are just plain time consuming to fabricate, install, and glass.
I agree, I feel like I'm going in slow motion having to wait for the glass to dry. Good job GL!!!Coming together nicely!!
-
Welcome to the Checkmate Community Forums forums.
» Interact with over 10,000 Checkmate Fanatics from around the world!
You are currently viewing our boards as a guest which gives you limited access to view most discussions, articles and access to our other FREE features.
By joining our free community you will be able to:
» Post topics and messages
» Post and view photos
» Communicate privately with other members
» Access our extensive gallery of old Checkmate brochures located in our Media Gallery
» Browse the various pictures in our Checkmate photo gallery
Registration is fast, simple and absolutely free so please, join our community today!
If you have any problems with the registration process or your account login, please contact support by clicking here or by using the"contact us" link at the bottom of the page.
You are using an out of date browser. It may not display this or other websites correctly.
You should upgrade or use an alternative browser.
You should upgrade or use an alternative browser.
'79 Eluder with water poisoning - finally started restoration
- Thread starter groundloop
- Start date
john lamon
Well-known member
Nice work GL, you guys farther south sure seem to have alot of rotting issues, are boats here in Saskatchewan are frozen solid half the year so it probably slows down process

groundloop
Active member
Nice work GL, you guys farther south sure seem to have alot of rotting issues, are boats here in Saskatchewan are frozen solid half the year so it probably slows down process
Yeah, but I get to boat pretty much year round
groundloop
Active member
I'm getting closer and closer to the day when I quit making dust  . Over the past week or so I've installed the 2nd piece of the rear deck and the forward deck, as well as putting pour foam under the outboard sections of the main deck (I'll have a ski locker down the center). I still need to clean up the excess foam and glue the plugs back in the deck from cutting holes for the pour foam.
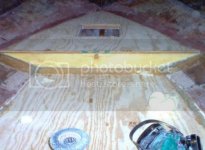
I also started on the flotation foam filled boxes which run lengthwise under the gunwales. Since I've never heard a proper name for these I vote they be called gunwale flotation boxes (GFB's). I had saved one of the old rotted ones to use as a pattern, which helped a lot with getting the vertical sides somewhere close to correct on the first try. I temporarily put the rear seat and side cushions in and sat in the boat for a long time thinking about these things. I had been contemplating putting some bulkheads with hinged covers between the top of the gunwale flotation boxes and the bottom of the gunwale for some additional storage, but decided there really wasn't enough available space to justify the effort. Plus, they weren't exactly in alignment with the gunwales, which would have complicated things. I did finally decide to make the gunwale flotation boxes about 1-1/2 inches shorter than the originals to give me just a bit of extra room for installing speakers.
Now, this may seem kind of strange, and it most certainly did to me the first time I read about someone doing it in an iboats.com forum, but the more I thought about it this crazy idea started to make sense. I used empty drinking water bottles (with the caps screwed on tightly) to take up space in the gunwale flotation boxes. They're light, they'll hold air forever, and they're free. Pour foam went over and around the empty bottles to fill the voids, and the net result is a flotation chamber with a lot less $$$ inside of it (but just as much air).
I wanted to see what the foam looked like with the embedded bottles, so poured most of the foam without yet glassing the top of the boxes in place. If I wasn't satisfied with the result it wouldn't have been too hard to rip all the foam out and start over. Also, after Cooperrider's explanation of why the factory installed these boxes the way they did, I decided to use heavy construction paper to go between the foam and side of the hull to prevent the foam from sticking and possibly deforming the hull. Once the foam was fully cured I checked for any sticking between the paper and sides of the hull, the paper did it's job.

And finally I spent almost an hour tonight with my shop-vac sucking up dust from every nook and cranny. I need to get Tim from Tool Time to design me a V-8 powered shop-vac, sometimes I think that's my most important tool.
 . Over the past week or so I've installed the 2nd piece of the rear deck and the forward deck, as well as putting pour foam under the outboard sections of the main deck (I'll have a ski locker down the center). I still need to clean up the excess foam and glue the plugs back in the deck from cutting holes for the pour foam.
I also started on the flotation foam filled boxes which run lengthwise under the gunwales. Since I've never heard a proper name for these I vote they be called gunwale flotation boxes (GFB's). I had saved one of the old rotted ones to use as a pattern, which helped a lot with getting the vertical sides somewhere close to correct on the first try. I temporarily put the rear seat and side cushions in and sat in the boat for a long time thinking about these things. I had been contemplating putting some bulkheads with hinged covers between the top of the gunwale flotation boxes and the bottom of the gunwale for some additional storage, but decided there really wasn't enough available space to justify the effort. Plus, they weren't exactly in alignment with the gunwales, which would have complicated things. I did finally decide to make the gunwale flotation boxes about 1-1/2 inches shorter than the originals to give me just a bit of extra room for installing speakers.
Now, this may seem kind of strange, and it most certainly did to me the first time I read about someone doing it in an iboats.com forum, but the more I thought about it this crazy idea started to make sense. I used empty drinking water bottles (with the caps screwed on tightly) to take up space in the gunwale flotation boxes. They're light, they'll hold air forever, and they're free. Pour foam went over and around the empty bottles to fill the voids, and the net result is a flotation chamber with a lot less $$$ inside of it (but just as much air).
I wanted to see what the foam looked like with the embedded bottles, so poured most of the foam without yet glassing the top of the boxes in place. If I wasn't satisfied with the result it wouldn't have been too hard to rip all the foam out and start over. Also, after Cooperrider's explanation of why the factory installed these boxes the way they did, I decided to use heavy construction paper to go between the foam and side of the hull to prevent the foam from sticking and possibly deforming the hull. Once the foam was fully cured I checked for any sticking between the paper and sides of the hull, the paper did it's job.

And finally I spent almost an hour tonight with my shop-vac sucking up dust from every nook and cranny. I need to get Tim from Tool Time to design me a V-8 powered shop-vac, sometimes I think that's my most important tool.
bigredinohio
Active member
Thats looking great! Nice idea with the empty water bottles. I need to order some more supplies on mine so I can get cracking again.
groundloop
Active member
I know how that goes. I'll be done with all the fiberglass work in a couple of weeks, then I'll have to get moving on the wiring and installing new gauges. But have I ordered anything for that yet?  Heck no, it's more fun to layup fiberglass than to shop for parts.
 Heck no, it's more fun to layup fiberglass than to shop for parts.
joemechanic69
New member
I sold my 79 eluder late july this year. I found 1 88 eluder in the st.louis area that i am supposed to trade my sportbike for. Reading this thread makes me wonder what i am getting into as the owner said the floor is a little soft in spots... Oh well, no guts... no glory... great thread GL
joemechanic69
New member
One thing that is puzzling me is your air tank things. They were hollow on my 79 eluder. I wonder if foam was added to yours, or if checkmate forgot to put foam in mine.... who knows. lol
groundloop
Active member
.... as the owner said the floor is a little soft in spots... Oh well, no guts... no glory... great thread GL
Well, maybe you'll get lucky and just have to replace the deck and stringers. But if I were to make a bet......

One thing that is puzzling me is your air tank things. They were hollow on my 79 eluder.
Your talking about the box structure under the gunwales? I've seen some Checkmates where there was a single vertical brace there, without it being boxed in and without the foam. On those they would have put floatation foam somewhere else in the boat.
groundloop
Active member
Gettin ready for the end (of glassing)
My plan is to be done with essentially all fiberglass work this week, since I'm taking a few vacation days. As long as I can stay hidden in the garage and avoid the honey-do's that just might be possible.
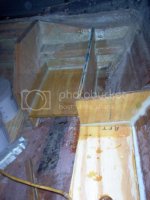
I got the flotation boxes and battery trays fabricated and test fit. One thing I saw during the demolition phase was that some water had gotten into the flotation boxes from the top, possibly from where the steering cables pass through the splashwell. I'm adding a piece of 1/8 plywood to go over the flotation box, and sloping it downward so any water will run off. This of course will be fiberglassed top and bottom using epoxy resin to make sure that it's waterproof.
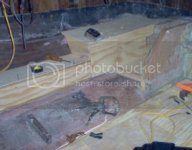
I've often heard that bondo has no place in a boat, and that's mostly true. However, it's slicker than snot on a doorknob for temporarily holding pieces in place - mix it with a little extra hardener to speed curing time and it will also cure extra brittle to make it a snap to remove with a wood chisel or screwdriver. A couple blobs of bondo are visible in this photo where I'm working on fitting a battery tray.
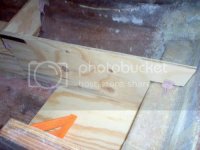
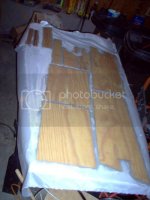
I glassed all the plywood parts for the flotation boxes and battery trays this morning. Instead of doing them one at a time I took a shotgun approach to save time. I put a layer of wax paper on a large piece of plywood, put a sheet of peel ply on that, then the first layer of glass cloth. I arranged the parts on the glass cloth as tightly together as possible, and marked their outlines with a felt marker. Then one at a time I painted epoxy on the bottom of each part, wet out the corresponding area of the glass cloth, pressed the part onto the wet-out cloth, and then painted the edges of each part with epoxy. Then the tops of all the parts were painted with epoxy, the top layer of glass cloth laid over them, and enough extra epoxy painted on to ensure good wet-out. Finally a sheet of peel-ply was put over the top ply of glass. Since the temperature was only around 60 I chose fast epoxy and used a hair dryer to help speed wet-out.
Once they cure, these parts will be tabbed in place using 7725 cloth. By using peel ply they'll be ready to install with no additional sanding.
My plan is to be done with essentially all fiberglass work this week, since I'm taking a few vacation days. As long as I can stay hidden in the garage and avoid the honey-do's that just might be possible.

I got the flotation boxes and battery trays fabricated and test fit. One thing I saw during the demolition phase was that some water had gotten into the flotation boxes from the top, possibly from where the steering cables pass through the splashwell. I'm adding a piece of 1/8 plywood to go over the flotation box, and sloping it downward so any water will run off. This of course will be fiberglassed top and bottom using epoxy resin to make sure that it's waterproof.

I've often heard that bondo has no place in a boat, and that's mostly true. However, it's slicker than snot on a doorknob for temporarily holding pieces in place - mix it with a little extra hardener to speed curing time and it will also cure extra brittle to make it a snap to remove with a wood chisel or screwdriver. A couple blobs of bondo are visible in this photo where I'm working on fitting a battery tray.

I glassed all the plywood parts for the flotation boxes and battery trays this morning. Instead of doing them one at a time I took a shotgun approach to save time. I put a layer of wax paper on a large piece of plywood, put a sheet of peel ply on that, then the first layer of glass cloth. I arranged the parts on the glass cloth as tightly together as possible, and marked their outlines with a felt marker. Then one at a time I painted epoxy on the bottom of each part, wet out the corresponding area of the glass cloth, pressed the part onto the wet-out cloth, and then painted the edges of each part with epoxy. Then the tops of all the parts were painted with epoxy, the top layer of glass cloth laid over them, and enough extra epoxy painted on to ensure good wet-out. Finally a sheet of peel-ply was put over the top ply of glass. Since the temperature was only around 60 I chose fast epoxy and used a hair dryer to help speed wet-out.
Once they cure, these parts will be tabbed in place using 7725 cloth. By using peel ply they'll be ready to install with no additional sanding.

groundloop
Active member
Two steps forward, one step back
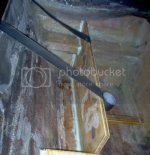
I'm getting enticingly close to being done with all the fiberglass work (and creating dust). A few days ago I had finished fabricating and glassing all the parts for the rear flotation box and battery trays. Tuesday I got the port side completely installed and tabbed in, and ran out of steam halfway through the starboard side, it was around 10 at night and my brain just said STOP - I'VE HAD ENOUGH. So I used a few pieces of duct tape to keep stuff from moving around and called it a night. Wednesday was such a nice day here that my son and I decided to go fishing for the day, didn't catch much but it was a great day to be on the lake. And I didn't get much done yesterday because I was busy stuffing my face with too much turkey.
Today it's a little cooler than I'd like for getting epoxy to cure, and my garage isn't heated so I'm spending a bit of time on other parts of the boat. I've decided it will be easier to rip out every bit of wiring and start from scratch. And all the old gauges are getting tossed and replaced with new ones.
The plastic pieces that cover the passenger and driver side dash were starting to crack and show their age (after 30 years that's not surprising). Knowing it would be a long shot I talked to Mike at Checkmate and he confirmed what I expected, those parts aren't available and the company that made them no longer exists. If the gelcoat under them was in good enough condition I was planning on just letting that show, and fabricating a few brushed aluminum panel for instruments and switches. I pulled the port windshield, removed the plastic dash cover, and the passenger side dash looked to be in pretty good shape. So far so good for plan B.
Then I pulled the starboard windshield and plastic dash cover, and it was immediately apparent that plan B wasn't an option.
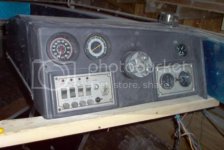
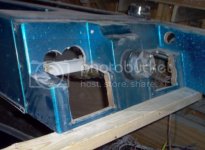
I'll let this sit while I formulate plan C, right now I'm thinking this would make a cool looking dash if I filled all the cutouts and painted the dash area something like beige or an off-white. I'll spend some time over the next few days browsing photos of other people's boats looking for ideas to steal. All I know is that I'm not going to attempt matching the metal-flake, the dash will be painted.
ALSO .... can someone tell me how this steering wheel hub comes off without damaging anything?
I'm getting enticingly close to being done with all the fiberglass work (and creating dust). A few days ago I had finished fabricating and glassing all the parts for the rear flotation box and battery trays. Tuesday I got the port side completely installed and tabbed in, and ran out of steam halfway through the starboard side, it was around 10 at night and my brain just said STOP - I'VE HAD ENOUGH. So I used a few pieces of duct tape to keep stuff from moving around and called it a night. Wednesday was such a nice day here that my son and I decided to go fishing for the day, didn't catch much but it was a great day to be on the lake. And I didn't get much done yesterday because I was busy stuffing my face with too much turkey.


Today it's a little cooler than I'd like for getting epoxy to cure, and my garage isn't heated so I'm spending a bit of time on other parts of the boat. I've decided it will be easier to rip out every bit of wiring and start from scratch. And all the old gauges are getting tossed and replaced with new ones.
The plastic pieces that cover the passenger and driver side dash were starting to crack and show their age (after 30 years that's not surprising). Knowing it would be a long shot I talked to Mike at Checkmate and he confirmed what I expected, those parts aren't available and the company that made them no longer exists. If the gelcoat under them was in good enough condition I was planning on just letting that show, and fabricating a few brushed aluminum panel for instruments and switches. I pulled the port windshield, removed the plastic dash cover, and the passenger side dash looked to be in pretty good shape. So far so good for plan B.
Then I pulled the starboard windshield and plastic dash cover, and it was immediately apparent that plan B wasn't an option.


I'll let this sit while I formulate plan C, right now I'm thinking this would make a cool looking dash if I filled all the cutouts and painted the dash area something like beige or an off-white. I'll spend some time over the next few days browsing photos of other people's boats looking for ideas to steal. All I know is that I'm not going to attempt matching the metal-flake, the dash will be painted.
ALSO .... can someone tell me how this steering wheel hub comes off without damaging anything?
john lamon
Well-known member
Looking good, I'm jealous, if I wan't to go fishing I'll need my ice auger. A brushed piece of aluminum would look good over the whole dash area but might be a little hard to make? that looks alot different than my 89' I thought about putting a piece of aluminum on my dash just for a different look.
Attachments
Last edited:
groundloop
Active member
What yours looks like is what I was expecting (and hoping) to find but NOOOO, my boat had to be difficult. I've ruled out attempting to use brushed aluminum over the entire area, I just couldn't shape it properly. I may use a piece for a switch panel, haven't decided for sure yet though.
karzrus
Well-known member
My 82 dash is like Johns
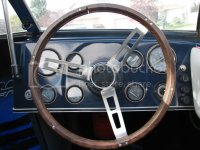
I had my steering wheel off and to do it from where you are now I had a center nut to remove then it was a bit of a press fit to separate the hub from the shaft. A bolt grip puller or steering wheel puller works nice for the press fit but often a tap on the shaft with a hammer and block of wood will do the trick.
Your plastic dash panels may be repairable. Cracks can often be plastic welded from the back side to strenghten and then you may want to paint the front side to freshen the look. Yes the paint will dull and probably chip over time but you could repaint in the future as well.
if ur stering is hydraulic, there are four bolts on the back side with nuts. if u look carefull the stud has a allen rench hole in the center of it. this will enable u to hold backup on the stud wile u unscrew the nut and the hole hub will come out forward. i am not sure about the regular stearing.
groundloop
Active member
Your plastic dash panels may be repairable. Cracks can often be plastic welded from the back side to strenghten and then you may want to paint the front side to freshen the look. Yes the paint will dull and probably chip over time but you could repaint in the future as well.
Right now I'm thinking I'll hang onto the plastice panels as a backup. I've formed a rough idea in my little brain of how I'm going to do the dash, and am kind of getting fired up about it. While I've done a fair amount of fiberglass over the past 10 years or so I don't have much experience with stuff that needs to look good, and I'm kind of looking forward to the challenge. Plus, if I incorporate some of the existing features it'll be a unique looking dash.
if ur stering is hydraulic, there are four bolts on the back side with nuts. if u look carefull the stud has a allen rench hole in the center of it. this will enable u to hold backup on the stud wile u unscrew the nut and the hole hub will come out forward. i am not sure about the regular stearing.
My boat has dual cable steering, but looking at mine it sounds like the same setup.
JT Patroni
Well-known member
Groundloop
Your rebuild is looking real good. What are you using for tabbing material?
Can you use your original dash cover as a plug to make a one off mold
for a glass replacement? I have never done anything like that but in all
that I have read on the subject, they make it sound as if it isn't that
hard. But as I said, I have never done it.
I may have to try my hand at it to make a replacement cooler cover for
my Starflite if I don't find one.
groundloop
Active member
For the stuff I'm doing now I glassed it with plain 10 oz. cloth, and I'm using 7725 cloth for the tabbing material because it's pretty good at going around corners.
I don't know how well making a mold from the original pieces would work in this case, there's some shapes in them that would be hard to duplicate. I've done something like that before, but with a much simpler part.
I don't know how well making a mold from the original pieces would work in this case, there's some shapes in them that would be hard to duplicate. I've done something like that before, but with a much simpler part.
T
TheNerd
Guest
Well, you can either fill the holes in the dash and paint it, or any metal fab shop/sheet metal shop can bend some aluminum or polished stainless to cover the holes in the dash. Not to big of a deal, one piece on either side.

