-
Welcome to the Checkmate Community Forums forums.
» Interact with over 10,000 Checkmate Fanatics from around the world!
You are currently viewing our boards as a guest which gives you limited access to view most discussions, articles and access to our other FREE features.
By joining our free community you will be able to:
» Post topics and messages
» Post and view photos
» Communicate privately with other members
» Access our extensive gallery of old Checkmate brochures located in our Media Gallery
» Browse the various pictures in our Checkmate photo gallery
Registration is fast, simple and absolutely free so please, join our community today!
If you have any problems with the registration process or your account login, please contact support by clicking here or by using the"contact us" link at the bottom of the page.
You are using an out of date browser. It may not display this or other websites correctly.
You should upgrade or use an alternative browser.
You should upgrade or use an alternative browser.
'79 Eluder with water poisoning - finally started restoration
- Thread starter groundloop
- Start date
groundloop
Active member
The dash came out looking great, nice job. Did you paint the passenger side dash as well?
Thanks.
Yes, dash on passenger side is painted as well - the photo came out crappy so I didn't bother posting it.
karzrus
Well-known member
Nice Work! You have significant skill, patience and ability. Wow!!
x2

groundloop
Active member
Let the wiring begin

Thanks for the kind words. I kind of needed the encouragement because I was a bit bummed out earlier this week when a truck came a took away an airplane project I'd started in 1995. At the time it was my dream to build that plane and fly all over the country in it. It was fiberglass, built totally from plans (not a kit), and I was probably 2/3's done with it. Between having kids, building a new house, coaching a youth baseball team, attending soccer (communist kickball ) tournaments, and whatever else we chose to do with our time, I finally decided I was just never going to be able to finish that particular project. But, as much as I hated to see it go, at least I sold it for enough money to pay for my Checkmate and all the materials for the rebuild (overall I lost money, but it's better than getting nothing for it).
Anyway, I finished cutting holes in the driver's side dash for gauges and switches, made bezels for the gauges (which look darned good considering they cost nothing - ask me why I even needed bezels ), made switch panels, and have finally started wiring (which thankfully is much less temperature dependant than fiberglass or paint - it's just a matter of freezing my butt off while I work). I'll have to post a few photos in the next day or so.
Some of the purists amongst us may disagree with my approach to the wiring, but I do know what I'm doing when it comes to electrical work. I'm not using "marine" wire, but rather a very high quality aircraft wire with tefzel insulation (there just happened to be a couple thousand feet of the stuff in my garage waiting to be used for something useful - but only white and grey). It's stranded, tinned wire, and the insulation is as close to flame proof as you can get (you can hold it in a lighter flame and nothing happens). It's also extremely abrasion resistant, so should do very well in a boat. Each wire will be numbered, and I'll be doing a complete electrical drawing on cad which I'll laminate and keep in the boat. And finally, electrons don't care what color wire they're in.

Thanks for the kind words. I kind of needed the encouragement because I was a bit bummed out earlier this week when a truck came a took away an airplane project I'd started in 1995. At the time it was my dream to build that plane and fly all over the country in it. It was fiberglass, built totally from plans (not a kit), and I was probably 2/3's done with it. Between having kids, building a new house, coaching a youth baseball team, attending soccer (communist kickball
 ) tournaments, and whatever else we chose to do with our time, I finally decided I was just never going to be able to finish that particular project. But, as much as I hated to see it go, at least I sold it for enough money to pay for my Checkmate and all the materials for the rebuild (overall I lost money, but it's better than getting nothing for it).
Anyway, I finished cutting holes in the driver's side dash for gauges and switches, made bezels for the gauges (which look darned good considering they cost nothing - ask me why I even needed bezels
Some of the purists amongst us may disagree with my approach to the wiring, but I do know what I'm doing when it comes to electrical work. I'm not using "marine" wire, but rather a very high quality aircraft wire with tefzel insulation (there just happened to be a couple thousand feet of the stuff in my garage waiting to be used for something useful - but only white and grey). It's stranded, tinned wire, and the insulation is as close to flame proof as you can get (you can hold it in a lighter flame and nothing happens). It's also extremely abrasion resistant, so should do very well in a boat. Each wire will be numbered, and I'll be doing a complete electrical drawing on cad which I'll laminate and keep in the boat. And finally, electrons don't care what color wire they're in.
groundloop
Active member
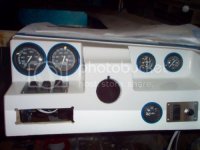
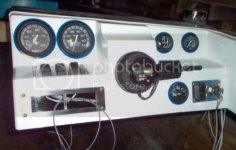
A few photos. Here's the driver's side dash with almost everything in place. There's one hole remaining to fill, it's going to have digital voltmeters for two batteries, but the voltmeters haven't arrived yet. I cut the bezels out of some scrap plastic at work, and the switch panels are brushed stainless, again from the scrap bin at work. They were all cut on a water-jet, and to think I used to make metal parts for projects by hand.
I've finished all of the wiring that I can do right now, which is most of it. Besides the voltmeters, I need to install a new ignition switch - I had planned on using one that I took out of the control box which came with my engine, but noticed that the switch sometimes stuck in the start position. SO.... I sprayed some WD-40 into the switch and now it sticks in the start position ALL the time. Live and learn, at least they're available on ebay for cheap.
I purposely held off on putting the cap back on the hull to give myself easier access for wiring. I'd say that turned out to be a real good move, I rewired my other boat laying flat on my back, reaching around a corner, doing situps every time I needed to reach something, no fun. The wiring went pretty fast like this too, did most of it in just one weekend.
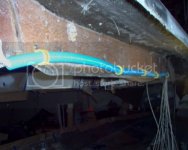
I ran plastic conduit under both gunwales, and along the rear, and pulled the wires I was going to need all at once.
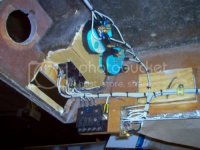
Here's a couple of photos of what took the most time wiring, under the dash.
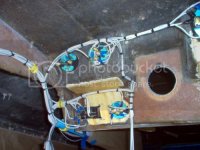

I've finished all of the wiring that I can do right now, which is most of it. Besides the voltmeters, I need to install a new ignition switch - I had planned on using one that I took out of the control box which came with my engine, but noticed that the switch sometimes stuck in the start position. SO.... I sprayed some WD-40 into the switch and now it sticks in the start position ALL the time. Live and learn, at least they're available on ebay for cheap.
I purposely held off on putting the cap back on the hull to give myself easier access for wiring. I'd say that turned out to be a real good move, I rewired my other boat laying flat on my back, reaching around a corner, doing situps every time I needed to reach something, no fun. The wiring went pretty fast like this too, did most of it in just one weekend.
I ran plastic conduit under both gunwales, and along the rear, and pulled the wires I was going to need all at once.

Here's a couple of photos of what took the most time wiring, under the dash.


yellowfiero88
Well-known member
Very nice looking work.
JT Patroni
Well-known member
Very impressive workmanship.
Sam I am
Well-known member
Ha! When i saw all the avionics wire I thought of the old H-46 I used to fly...there was miles of that stuff in there and it was bundled almost indentically to the wires under your dash...as alway's nice job. Your attention to detail is almost fanatical.
I said earlier I would like to get an old boat to work, but I now fear I would never live up to the standards that are displayed on this board! WOW!
I said earlier I would like to get an old boat to work, but I now fear I would never live up to the standards that are displayed on this board! WOW!
T
TheNerd
Guest
Looks great, I wish the underside of my dash looked that nice.
groundloop
Active member
Ha! When i saw all the avionics wire I thought of the old H-46 I used to fly...there was miles of that stuff in there and it was bundled almost indentically to the wires under your dash...as alway's nice job. Your attention to detail is almost fanatical.
Dang, that's a lot of helicopter!!! I couldn't remember what that one looked like so found some photos, that's a beast.
As for wiring, it's not difficult - you just gotta have an accurate drawing to work from so you don't forget anything and after that it's just one wire at a time. I worked for several years designing big industrial control panels, and spent a lot of time in our shop looking over the shoulder of the guys who built them.
I said earlier I would like to get an old boat to work, but I now fear I would never live up to the standards that are displayed on this board! WOW!
Go for it. There's plenty of good information and help available at several places. Iboats.com has a good forum also with a lot of information and help available. The beauty of working with fiberglass is that if you screw up you just sand off your mistake and do it over.
groundloop
Active member
Two Steps Forward, One Step Back (Leave Well Enough Alone)
The last couple of weeks I've watched more of the BRAIN SUCKING BLACK BOX than I have in a long time. I hadn't planned on watching much of the Winter Olympics but just kind of got sucked in, so boat restoration progress has suffered. There've been some great hockey games, and I kind of hate to admint it but have actually watched a bit of curling (I figure even an overweight middle aged guy could do this, so hey, I may try out for the next Olympics).
I started to clean up my fuel tank, and decided I wanted to take a look at the pick-up tube. No problem, right? It'll be an easy matter to just remove the elbow, then reinstall it with some new pipe thread compound. Here's how that turned out:
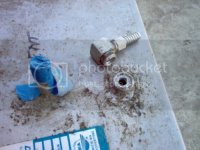
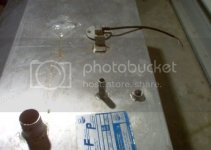
Well, I guess EZ-Outs were invented for idiots that don't know how to leave well-enough alone (especially on a 31 year old aluminum tank). Once I got the broken elbow and pick-up tube out (the pick-up tube was in pristine condition, by the way - $15 and a week long UPS ride will have a new pick-up tube and elbow here) I finished cleaning up the tank and installed a new fuel level sender. I was going to just leave the original sender in the tank, but I think I recall the previous owner telling me that the fuel gauge worked fine. With that in mind I decided to check the sending unit, and of course it was junk. I chose to try a reed switch type sending unit that Moeller makes, it was a bit more costly but since the float is in the middle of the tank it ought to be more stable.
My boat had the original Mercury Ride-Guide dual rack steerig system, which I had temporarily removed while working on the dash. Once I finished the wiring I reinstalled the steering (that system was a bi#$@ to put in by myself). I had to purchase an adapter to connect the helm to my new wheel, once I got that all mounted I discovered that one of the steering cables was bad.


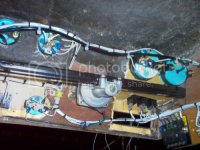
 Replacement cables for Ride-Guide rack steering systems aren't available anymore, so I wound up purchasing a new Teleflex No-Feedback dual cable rack system. It uses a single rack which is smaller than the Ride-Guide racks, so it takes a lot less space under the dash. It's also possible to rotate the rack if need be to allow for cable clearance (which is precisely why my rack isn't perfectly horizontal in the photo, the half empty bottle of Wild Turkey near my computer had nothing to do with it).
I also finished mounting my trim switch. With the old steering system the only way it would mount was such that it would rotate with the steering wheel. Apparently Teleflex intended for it to mount in a fixed position, because there are mounting holes provided for it on the new steering bezel. I was able to drill a single hole in the steering mounting plate and route the cable through that for a very clean installation. (Of course I have to buy a different steering wheel adapter, so I can't mount my wheel 'till that arrives.)
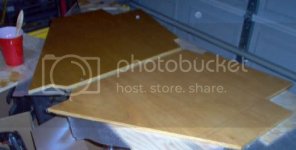
My forward deck is layed out a little different than original, so I had to re-engineer the dash sides. I temporarily ran out of anythig else to do, so went ahead and lowered the cap onto the hull so I could get measurements for the new dash sides. I got these cut and glassed, and am trying to decide what look I'm after when I finish these. The two leading contenders are a typical smooth glossy white, or not using filler and allowing the weave to show through the paint.
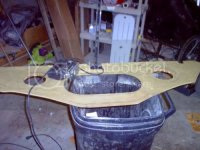
After removing the original vinyl cloth from the forward bulkhead it appears that it's in good enough condition to re-use. The bottom of it is warped somewhat, so I'll have to screw some braces on the back of it to pull it straight. I cut holes for speakers, and hopefully the weather will be warm enough this weekend so I can get it glassed. The plan is to finish it identical to the dash sides, either gloss white or with the glass cloth weave showing.
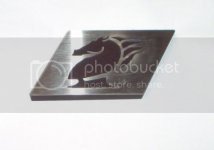
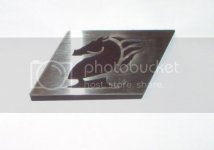
I also made a new Checkmate plaque for the passenger side dash. (Having access to a water-jet is spoiling me !!!)
Oh, I almost forgot. Before it goes in the trash, can anyone use parts from my Ride-Guide rack steering system? Both racks and the helm are in good shape, and one of the cables (14') is ok. As long as it's for your own use (and not to re-sell on ebay) I'll let anything you can use go for the price of FREE (just send me a check for the cost of shipping).
The last couple of weeks I've watched more of the BRAIN SUCKING BLACK BOX than I have in a long time. I hadn't planned on watching much of the Winter Olympics but just kind of got sucked in, so boat restoration progress has suffered. There've been some great hockey games, and I kind of hate to admint it but have actually watched a bit of curling (I figure even an overweight middle aged guy could do this, so hey, I may try out for the next Olympics).
I started to clean up my fuel tank, and decided I wanted to take a look at the pick-up tube. No problem, right? It'll be an easy matter to just remove the elbow, then reinstall it with some new pipe thread compound. Here's how that turned out:

Well, I guess EZ-Outs were invented for idiots that don't know how to leave well-enough alone (especially on a 31 year old aluminum tank). Once I got the broken elbow and pick-up tube out (the pick-up tube was in pristine condition, by the way - $15 and a week long UPS ride will have a new pick-up tube and elbow here) I finished cleaning up the tank and installed a new fuel level sender. I was going to just leave the original sender in the tank, but I think I recall the previous owner telling me that the fuel gauge worked fine. With that in mind I decided to check the sending unit, and of course it was junk. I chose to try a reed switch type sending unit that Moeller makes, it was a bit more costly but since the float is in the middle of the tank it ought to be more stable.

My boat had the original Mercury Ride-Guide dual rack steerig system, which I had temporarily removed while working on the dash. Once I finished the wiring I reinstalled the steering (that system was a bi#$@ to put in by myself). I had to purchase an adapter to connect the helm to my new wheel, once I got that all mounted I discovered that one of the steering cables was bad.


 Replacement cables for Ride-Guide rack steering systems aren't available anymore, so I wound up purchasing a new Teleflex No-Feedback dual cable rack system. It uses a single rack which is smaller than the Ride-Guide racks, so it takes a lot less space under the dash. It's also possible to rotate the rack if need be to allow for cable clearance (which is precisely why my rack isn't perfectly horizontal in the photo, the half empty bottle of Wild Turkey near my computer had nothing to do with it).
I also finished mounting my trim switch. With the old steering system the only way it would mount was such that it would rotate with the steering wheel. Apparently Teleflex intended for it to mount in a fixed position, because there are mounting holes provided for it on the new steering bezel. I was able to drill a single hole in the steering mounting plate and route the cable through that for a very clean installation. (Of course I have to buy a different steering wheel adapter, so I can't mount my wheel 'till that arrives.)

My forward deck is layed out a little different than original, so I had to re-engineer the dash sides. I temporarily ran out of anythig else to do, so went ahead and lowered the cap onto the hull so I could get measurements for the new dash sides. I got these cut and glassed, and am trying to decide what look I'm after when I finish these. The two leading contenders are a typical smooth glossy white, or not using filler and allowing the weave to show through the paint.

After removing the original vinyl cloth from the forward bulkhead it appears that it's in good enough condition to re-use. The bottom of it is warped somewhat, so I'll have to screw some braces on the back of it to pull it straight. I cut holes for speakers, and hopefully the weather will be warm enough this weekend so I can get it glassed. The plan is to finish it identical to the dash sides, either gloss white or with the glass cloth weave showing.

I also made a new Checkmate plaque for the passenger side dash. (Having access to a water-jet is spoiling me !!!)

Oh, I almost forgot. Before it goes in the trash, can anyone use parts from my Ride-Guide rack steering system? Both racks and the helm are in good shape, and one of the cables (14') is ok. As long as it's for your own use (and not to re-sell on ebay) I'll let anything you can use go for the price of FREE (just send me a check for the cost of shipping).
Last edited:
groundloop
Active member
GL the dash turned out really nice. Great job!!!! Are you leaving the vinyl off the side panels and going with gloss white instead? I like that idea if indeed that's what you're doing.
Thanks.
Yes, doing the side panels with gloss white is one of the options I'm considering. Using the original vinyl is not even possible because the side panels are a different size and shape than the factory ones. The other option I was thinking about was letting the weave of my glass cloth show through the paint, and then maybe doing a "splatter" with some grey paint, but I'm just not sure about that.
I've seen the splatter paint on tin boats, but not on fiberglass boats. That would give the insides a different look. Do you have some test boards to see which you like better?
yellowfiero88
Well-known member
I like that

mconroy
New member
One more "Awsome Job"
Wow,
Just read this thread. Wish I had joined this group earlier. Same story, 1981 Eluder, same wet foam, I just caught it earlier (mid 1990s) and could save more. No way could I do the electrical work you did. It was beautiful (from they guy who works with space hardware). I have a 200 Merc on mine. It went a lot faster with the wet stuff out. That hull will really fly. The thing to watch for is that around 70 the air gets a little crazy coming over the front of the boat.
[big time safety tip]
You will feel air swirling around your feet all of a sudden. Soon the bow will act like your other plane project and generate lift. This may be the reason I have seen newer ones with a hinged windshield (down force?) A previous owner of mine got it vertical (wife in boat, led to rapid sale, I win). The trick is to start trimming the motor back in. What this does is raise the stern (go figure), then you can easily pick up another 5 mph or so. Then look over your shoulder. No wake.... Pretty cool, just a thin film of mist on the surface and a few ripples. I have no idea how little boat is left in the water at that time, but it rides really nice and the motor sounds awesome. No idea how fast it will really go this way. I still have throttle left. However, this is usually when the higher brain functions kick back in and point stuff out.
I love mine, just do not get to use it much. Same story, 3 kids, school sports, club sports, less coaching now though. Bouncing between Sell and Keep. Wife keeps pointing out other uses for the garage.
Cannot wait to see the final results.
Again, Awesome...
Mike
groundloop
Active member
I've seen the splatter paint on tin boats, but not on fiberglass boats. That would give the insides a different look. Do you have some test boards to see which you like better?
Gloss white wins.
That hull will really fly. The thing to watch for is that around 70 the air gets a little crazy coming over the front of the boat.... You will feel air swirling around your feet all of a sudden. Soon the bow will act like your other plane project and generate lift. This may be the reason I have seen newer ones with a hinged windshield (down force?) A previous owner of mine got it vertical (wife in boat, led to rapid sale, I win). The trick is to start trimming the motor back in. What this does is raise the stern (go figure), then you can easily pick up another 5 mph or so. Then look over your shoulder. No wake.... Pretty cool, just a thin film of mist on the surface and a few ripples. I have no idea how little boat is left in the water at that time, but it rides really nice and the motor sounds awesome. No idea how fast it will really go this way. I still have throttle left. However, this is usually when the higher brain functions kick back in and point stuff out.
I wonder if the guy who scared his wife was driving around with too much trim. I've seen a couple of photos of guys sitting there fat dumb and happy with the bow WAYYYYYY up in the air just waiting for trouble. I'm definitely not going to start running any kind of speed until I get comfortable with the boat's handling, and even then I'll start increasing speed a little at a time.
I love mine, just do not get to use it much. Same story, 3 kids, school sports, club sports, less coaching now though. Bouncing between Sell and Keep. Wife keeps pointing out other uses for the garage.
I lucked out. We visited a friend of mine last summer with a 21 ft. bowrider, wife commented how much more room there was compared to our 14-1/2 ft fish-n-ski, and how much nicer it rode. She actually suggested that I find a bigger boat for the family, though I still gotta wonder how she'll react to a boat as fast as the Eluder. In our fish-n-ski she's a great speed indicator - she starts yelling at me to slow down at precisely 35 mph - I can't wait to see her face at 65 or 70
 .
.My son likes to ski and knee-board, wants to get a wake board this year (though I realize a Checkmate won't throw much of a wake). I'm going to build a ski-board that my daughter and any non-skiing friends can stand up on and still have fun. During the summer we usually take the kids to the lake at least once a week, when I get the Checkmate ready we'll probably have even more friends and family tagging along.

