I looked for those. Did not find one big enough to cover the hole. I guess the deck will just have to get some more bling.
-
Welcome to the Checkmate Community Forums forums.
» Interact with over 10,000 Checkmate Fanatics from around the world!
You are currently viewing our boards as a guest which gives you limited access to view most discussions, articles and access to our other FREE features.
By joining our free community you will be able to:
» Post topics and messages
» Post and view photos
» Communicate privately with other members
» Access our extensive gallery of old Checkmate brochures located in our Media Gallery
» Browse the various pictures in our Checkmate photo gallery
Registration is fast, simple and absolutely free so please, join our community today!
If you have any problems with the registration process or your account login, please contact support by clicking here or by using the"contact us" link at the bottom of the page.
You are using an out of date browser. It may not display this or other websites correctly.
You should upgrade or use an alternative browser.
You should upgrade or use an alternative browser.
Tri-mate 2 over haul.
- Thread starter Chris
- Start date
Its about an inch and a half. The problem is I created a bit of egg shape to be able to get the cable through. It fits inside a cable cap that is used to cover the outlet.
175 this was what i had in mind but not sure if you could use or something similar. This company makes them in different sizes.
http://qccrubber.thomasnet.com/item...30?&plpver=10&origin=advsrch&by=prod&filter=0
http://qccrubber.thomasnet.com/item...30?&plpver=10&origin=advsrch&by=prod&filter=0
Thats a great site, I can see ordering grommets for all the stereo installs I do.
The problem with putting a grommet in the cable hole is the size of the hole. It is fairly small so the cable cover will cover the hole. Thanks for looking for me.
The problem with putting a grommet in the cable hole is the size of the hole. It is fairly small so the cable cover will cover the hole. Thanks for looking for me.
175 here's the rubber boot for the splashwell that I was looking for. I'm not sure if you can use this for the cables.
http://www.marineparts.com/Kel/kel459.aspx
http://www.marineparts.com/Kel/kel459.aspx
wickedrister
Active member
Looking good Gus 
Sam I am
Well-known member
I'm emotionally invested in this project...
...after reading all 63 pages. I was so hoping to get to page 63 and see a photo of 175 ripping across the water at an insane speed. A blur of yellow and black as he actually approaches ludicrous speed. A huge rooster tail and a ridiculous grin on his face. His wife weeping for joy. But alas...no picture. I haven't felt like this since I saw the Departed. Two hours getting hooked and everybody dies. Wow...what a ride. So...I will start page 64.
Bravo. This is an incredible project. I'm hooked. When this thing hits the water there better be a hell of party. AND a youtube video. Keep at it! You rock.
Thanks Sam. Its been a love/hate relationship.
Going to be able to hit the water this year, and not be able to afford the gas to run it. LOLOLOL
Going to be able to hit the water this year, and not be able to afford the gas to run it. LOLOLOL
Chris E
Well-known member
Thanks Sam. Its been a love/hate relationship.
Going to be able to hit the water this year, and not be able to afford the gas to run it. LOLOLOL
didn't you say that three years ago? sorry can't help myself

Just received the T-bolts in the mail to lock the windshield down. I have been looking for them since I took the windshield off. Have not done anything new on the the boat. I have had the garage full of other peoples problem auto's. Its been nice to see my garage making a bit of money, rather that me spending it.
175 where did you find those t-bolts to lock the windshield down. I'm missing one.
cmp, the T-bolts where a needle in a hay stack. Spend a bunch of time making calls trying to find them. I thought I would never find them. Found them on ebay one day with a but it now. Bought them about 3 min. after the guy posted. Those where the only ones I found in 3 years of looking. Shoot me a PM with your address and I will send ya one.
Oh yea, its been 4 years since I have been saying. " this year" funny how life gets in the way sometimes.
Oh yea, its been 4 years since I have been saying. " this year" funny how life gets in the way sometimes.
Boston Predictor
Well-known member
If its not in the water this year, im personally going to take a week off work, fly out to Nebraska and finish it with you!
Right on BP. I'll buy the beer and Nebraska steaks. When ya comming???:cheers
Reed
Active member
Spent the last few days getting the OB hose rigging kit installed. As with everything on this boat the trend continues. It all has to be modified. Most of the trouble was the plastic ends that mount to the cowl. Seems they only make them for the new cowls. Baa humbug, I will make them work. Since the racing cowl has space to cut a hole, I made that happen. Then came the trouble of mounting the hose mount to the lower pan. This is where the fun began as the cowl has to fit in front of the hose parts. There is not a lot left of the original parts as they have been sanded and massaged down to about half of there former glory. Still have to pick up some different mounting screws and make a gasket for the fitting in the splash well. Not sure about the hose length, may be a bit long. Better to start long and take off a bit at a time then have to buy more.


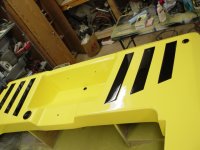
Gus your boat is looking ~GREAT~!!!!!! Great Job
81 enchanter
Active member
i agree, looks awesome, way better then my trimate did!
The saga continues. Set the fuel tank and rear seat in place. Found out the fuel tank that fit with the stock seat will not tuck back far enough to clear the seat. The new seat has a different shape to the back. So after search the net for a fuel tank that would tuck back in farther I found one. Will have to drop to 12 gal instead of 19. Oh the joy.
Did have a good piece of news. I have been looking for the second cable attachment for the old merc. Since the mid is a 1978 the newer kits will not work. Found the company that originally made the kit for the motor. T & R marine out of FL. Made a call to them to see if that had any laying on the shelf collecting dust. They called me back after looking everywhere and did not find one. What they did find was the blueprints for the kit, but they weren't sure if they could still build it. Spend some quality time talking 2 Billy about the boat and sobbing on his shoulder. He told me he would see what he can do. 2 days later I get another call. Billy was able to work some magic and was able to build the kit. The price..$200 to my door and do I want it. Oh yea. $800 cheaper that HYD.
If I ever decide to over haul, modify, hot rod and a boat again someone slap me.