• Welcome to the Checkmate Community Forums forums.

    You are currently viewing our boards as a guest which gives you limited access to view most discussions, articles and access to our other FREE features.
    By joining our free community you will be able to:

    » Interact with over 10,000 Checkmate Fanatics from around the world!
    » Post topics and messages
    » Post and view photos
    » Communicate privately with other members
    » Access our extensive gallery of old Checkmate brochures located in our Media Gallery
    » Browse the various pictures in our Checkmate photo gallery

    Registration is fast, simple and absolutely free so please, join our community today!

    If you have any problems with the registration process or your account login, please contact support by clicking here or by using the"contact us" link at the bottom of the page.

jeff,s enchanter resto

Status
Not open for further replies.
DAMMMMMMM ..................l@@king g@@d ...........Are you sure you haven't done this before ? :bigthumb: Jeff just curious are you going with one layer of 17 oz or two which i would recomend along with staggering the layup .

thanks OG!..
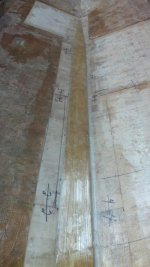
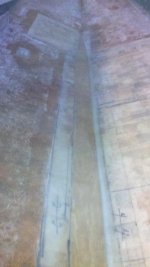
Im going to put a build up of 17 0z bi-axle to get me even with the old roven, then going to cover and overlap the entire repair area about 3 inches onto the old roven all at once, then when dry im going to cover all the new and old balsa in the whole boat with 17 0z bi-axle...ill have about 20 yrds of 17oz. biaxle before im through...not including the transom...

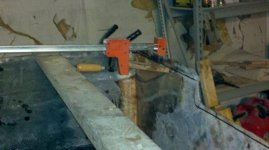
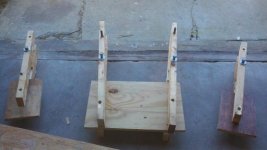
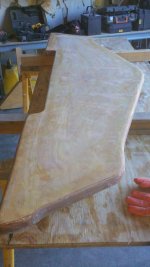
the transom was laminated in 1708, then wrapped in 17 ox. bi-axle, then it will be laminated to the hull with cobasil and 1708, after clamping and a overnight cure, will then feather out all edges the with cobasil, then cover the transom and tie into the hull with 2 layers of 17 0z bi-axle....still leaving me the knee braces, stringers and floor. Did i say I wrapped the new 3/4 inch pad with 17 oz. too? Who said this would be easy???? :brickwall:
 
DAMMMMMMM ..................l@@king g@@d ...........Are you sure you haven't done this before ? :bigthumb: Jeff just curious are you going with one layer of 17 oz or two which i would recomend along with staggering the layup .

or do you think covering the old roven in the entire balsa area is overkill??
 
or do you think covering the old roven in the entire balsa area is overkill??
Jeff personally i would only cover the area's of concern ( balsa repair ) using two layers of glass staggered around the permieter or outside of the actual core repair , and to tell you the truth adding a liitle more beef is your call yea or nay considering i was under the inpression that your partner wanted to address those areas that were somewhat dry but non the less you are doing a great job and to tell you the truth there is nothing ever wrong with a little overkill if needed ....:thumb:
 
Last edited:
Jeff personally i would only cover the area's of concern ( balsa repair ) using two layers of glass staggered around the permieter or outside of the actual core repair , and to tell you the truth adding a liitle more beef is your call yea or nay considering i was under the inpression that your partner wanted to address those areas that were somewhat dry but non the less you are doing a great job and to tell you the truth there is nothing ever wrong with a little overkill if needed ....:thumb:

OG, when you say "staggered", what does this refer too? Am I correct in assuming you mean run two layers of 17 oz., each in a different direction?
 
Jeff personally i would only cover the area's of concern ( balsa repair ) using two layers of glass staggered around the permieter or outside of the actual core repair , and to tell you the truth adding a liitle more beef is your call yea or nay considering i was under the inpression that your partner wanted to address those areas that were somewhat dry but non the less you are doing a great job and to tell you the truth there is nothing ever wrong with a little overkill if needed ....:thumb:

and after i install a build up layer on the new balsa, can I use 50 " 17 oz. and run from port to starboard, starting from the stern and heading towards the bow?..this way i cover the new repair area and the old balsa at one time..
 
OG, when you say "staggered", what does this refer too? Am I correct in assuming you mean run two layers of 17 oz., each in a different direction?
Jeff your repair is only as strong as your weakest link so..............if you do your layup using two layers of fabric one on top of each other (both) the same size all you have is one thick layer of glass thus ........staggering each layer of fabric in different sizes ....one being bigger then the next around all perimeters will give your repair more structural integrity . Jeff , for instance... lets just say your first layer of glass is 4x4 then make your next layer of fabric 6X6 which is bigger and staggered . I also sent you a P.M.
 
Jeff your repair is only as strong as your weakest link so..............if you do your layup using two layers of fabric one on top of each other (both) the same size all you have is one thick layer of glass thus ........staggering each layer of fabric in different sizes ....one being bigger then the next around all perimeters will give your repair more structural integrity . Jeff , for instance... lets just say your first layer of glass is 4x4 then make your next layer of fabric 6X6 which is bigger and staggered . I also sent you a P.M.

OK, that i get....When the rest of my materials show, Ill let you know...I think a call will be in order...

I just a video of a boat by SKATER, 140 mph...HOLY CRAP!!...Bet they layered their glass!! :surf:

http://youtu.be/sc5Y9NipiVA
 
mrfxab.jpg
 
so would you just do the edges of the transom to the hull or do you use a full piece? ..so another words, my transom is 87" x 26"...would i cut a piece 95" x 34" and then 99"x 38" and so on a...or just 6", 8", then 10" strips at the perimeter...? and would you let each layer dry or apply all at once? Keep in mind I wrapped the complete transom in 17 oz. bi-axle
 
todays pics..I sanded all the shiny excess resin off the balsa then a fillet of cabosil at the balsa gaps and edges, then applied first build up of 17 oz. tomorrow i will "layer" the next application of 17 oz. making the cloth 2" bigger at the perimeter....
 

Attachments

  • core repair 007.jpg
    core repair 007.jpg
    95.6 KB · Views: 81
  • core repair 009.jpg
    core repair 009.jpg
    81.4 KB · Views: 79
  • core repair 012.jpg
    core repair 012.jpg
    74.9 KB · Views: 72
so would you just do the edges of the transom to the hull or do you use a full piece? ..so another words, my transom is 87" x 26"...would i cut a piece 95" x 34" and then 99"x 38" and so on a...or just 6", 8", then 10" strips at the perimeter...? and would you let each layer dry or apply all at once? Keep in mind I wrapped the complete transom in 17 oz. bi-axle
Jeff , other then confusing you with my typing or trying to answer all of you question's i feel it would be more appropriate if we talk tomorrow which would be much easier to explain ...other then typing .... or ....once again ... trying to answer all of your questions above . I apologize for this............Artie
 
Last edited:
thanks Robbie..more work than i thought, but if your going to do something, do it right!...looking forward to getting the top back on then I can get back to the rigging that started this project....:shakehead:

Oh I know all to well!!! Both resto's started out with a floor replacement ended up with new stringers and knees.The Enforcer got rebuilt from the console back to transom. :p The repaint thread started because of replacing the old tube gil bracket to a setback bracket and jackplate.:eek:
 
Jeff , does you partner have any 4oz finish fabric /cheese cloth / surfboard fabric ..............................which would really work well for capping off the top of your transom using 4 layers of fabric instead of using 17 oz which would be much easier to work with and not as thick .
 
ok..finally after all the sanding and core work....time for the new transom :bounce:

this was the prep, had to fill the corners of the molded hull first...then made some clamps fore the transom...
 

Attachments

  • transom repair 020.jpg
    transom repair 020.jpg
    43.5 KB · Views: 94
  • transom repair 027.jpg
    transom repair 027.jpg
    41.5 KB · Views: 94
  • transom repair 029.jpg
    transom repair 029.jpg
    90.8 KB · Views: 94
Status
Not open for further replies.
Back
Top